
Volunteer Check-In and Checkout
Volunteers (teachers, classroom helpers, greeters, security, hall monitors) check in and out of services just like the children they serve. Their check-in records are tagged as volunteer so they can be counted separately from child counts in your stats and reports.
This article covers the volunteer flow end-to-end: how to check a volunteer in, how to check them out, and how volunteer records flow into reporting.
Why Track Volunteer Check-Ins
Tracking who is on duty (and which room they are serving in) gives you several things:
- Accountability. If something happens in a room, you have a record of every adult who was checked in.
- Live room counts. Children's ministry leaders can see how many people (including volunteers) are in each room as families arrive, so under-staffed rooms can be caught.
- Serving counts. Volunteer check-ins are counted on your reports (for example, the "volunteers this month" figure), which is helpful for year-end recognition and a general picture of who is serving.
- Compliance. Many child-safety policies require minimum adult-to-child ratios (commonly 1:5 for ages 3-5 and 1:8 for ages 6-12). Keeping volunteer check-ins accurate makes those numbers easy to count by hand.
Who Can Check In Volunteers
Anyone with Check-In access (View/Edit/Full permission on the Check-In module) can check a volunteer in or out -- it is not restricted to administrators. Common patterns:
- Self check-in. A volunteer arrives early, finds themselves on the station's name search, and a station helper checks them in.
- Hall monitor check-in. A designated hall monitor walks each classroom at the start of the service and checks each volunteer in for their assigned room.
- Lead-volunteer check-in. The children's ministry lead checks each volunteer in from a tablet at the start of the service.
Pick the pattern that fits your team. Many churches use a combination -- early arrivers are checked in first, late arrivers are caught by the hall monitor.
Permissions tip: Check-In access is set per role in Team & Roles, where each module is granted None, View, Edit, or Full. A volunteer who needs to run the station should have at least Edit on Check-In.
Checking In a Volunteer
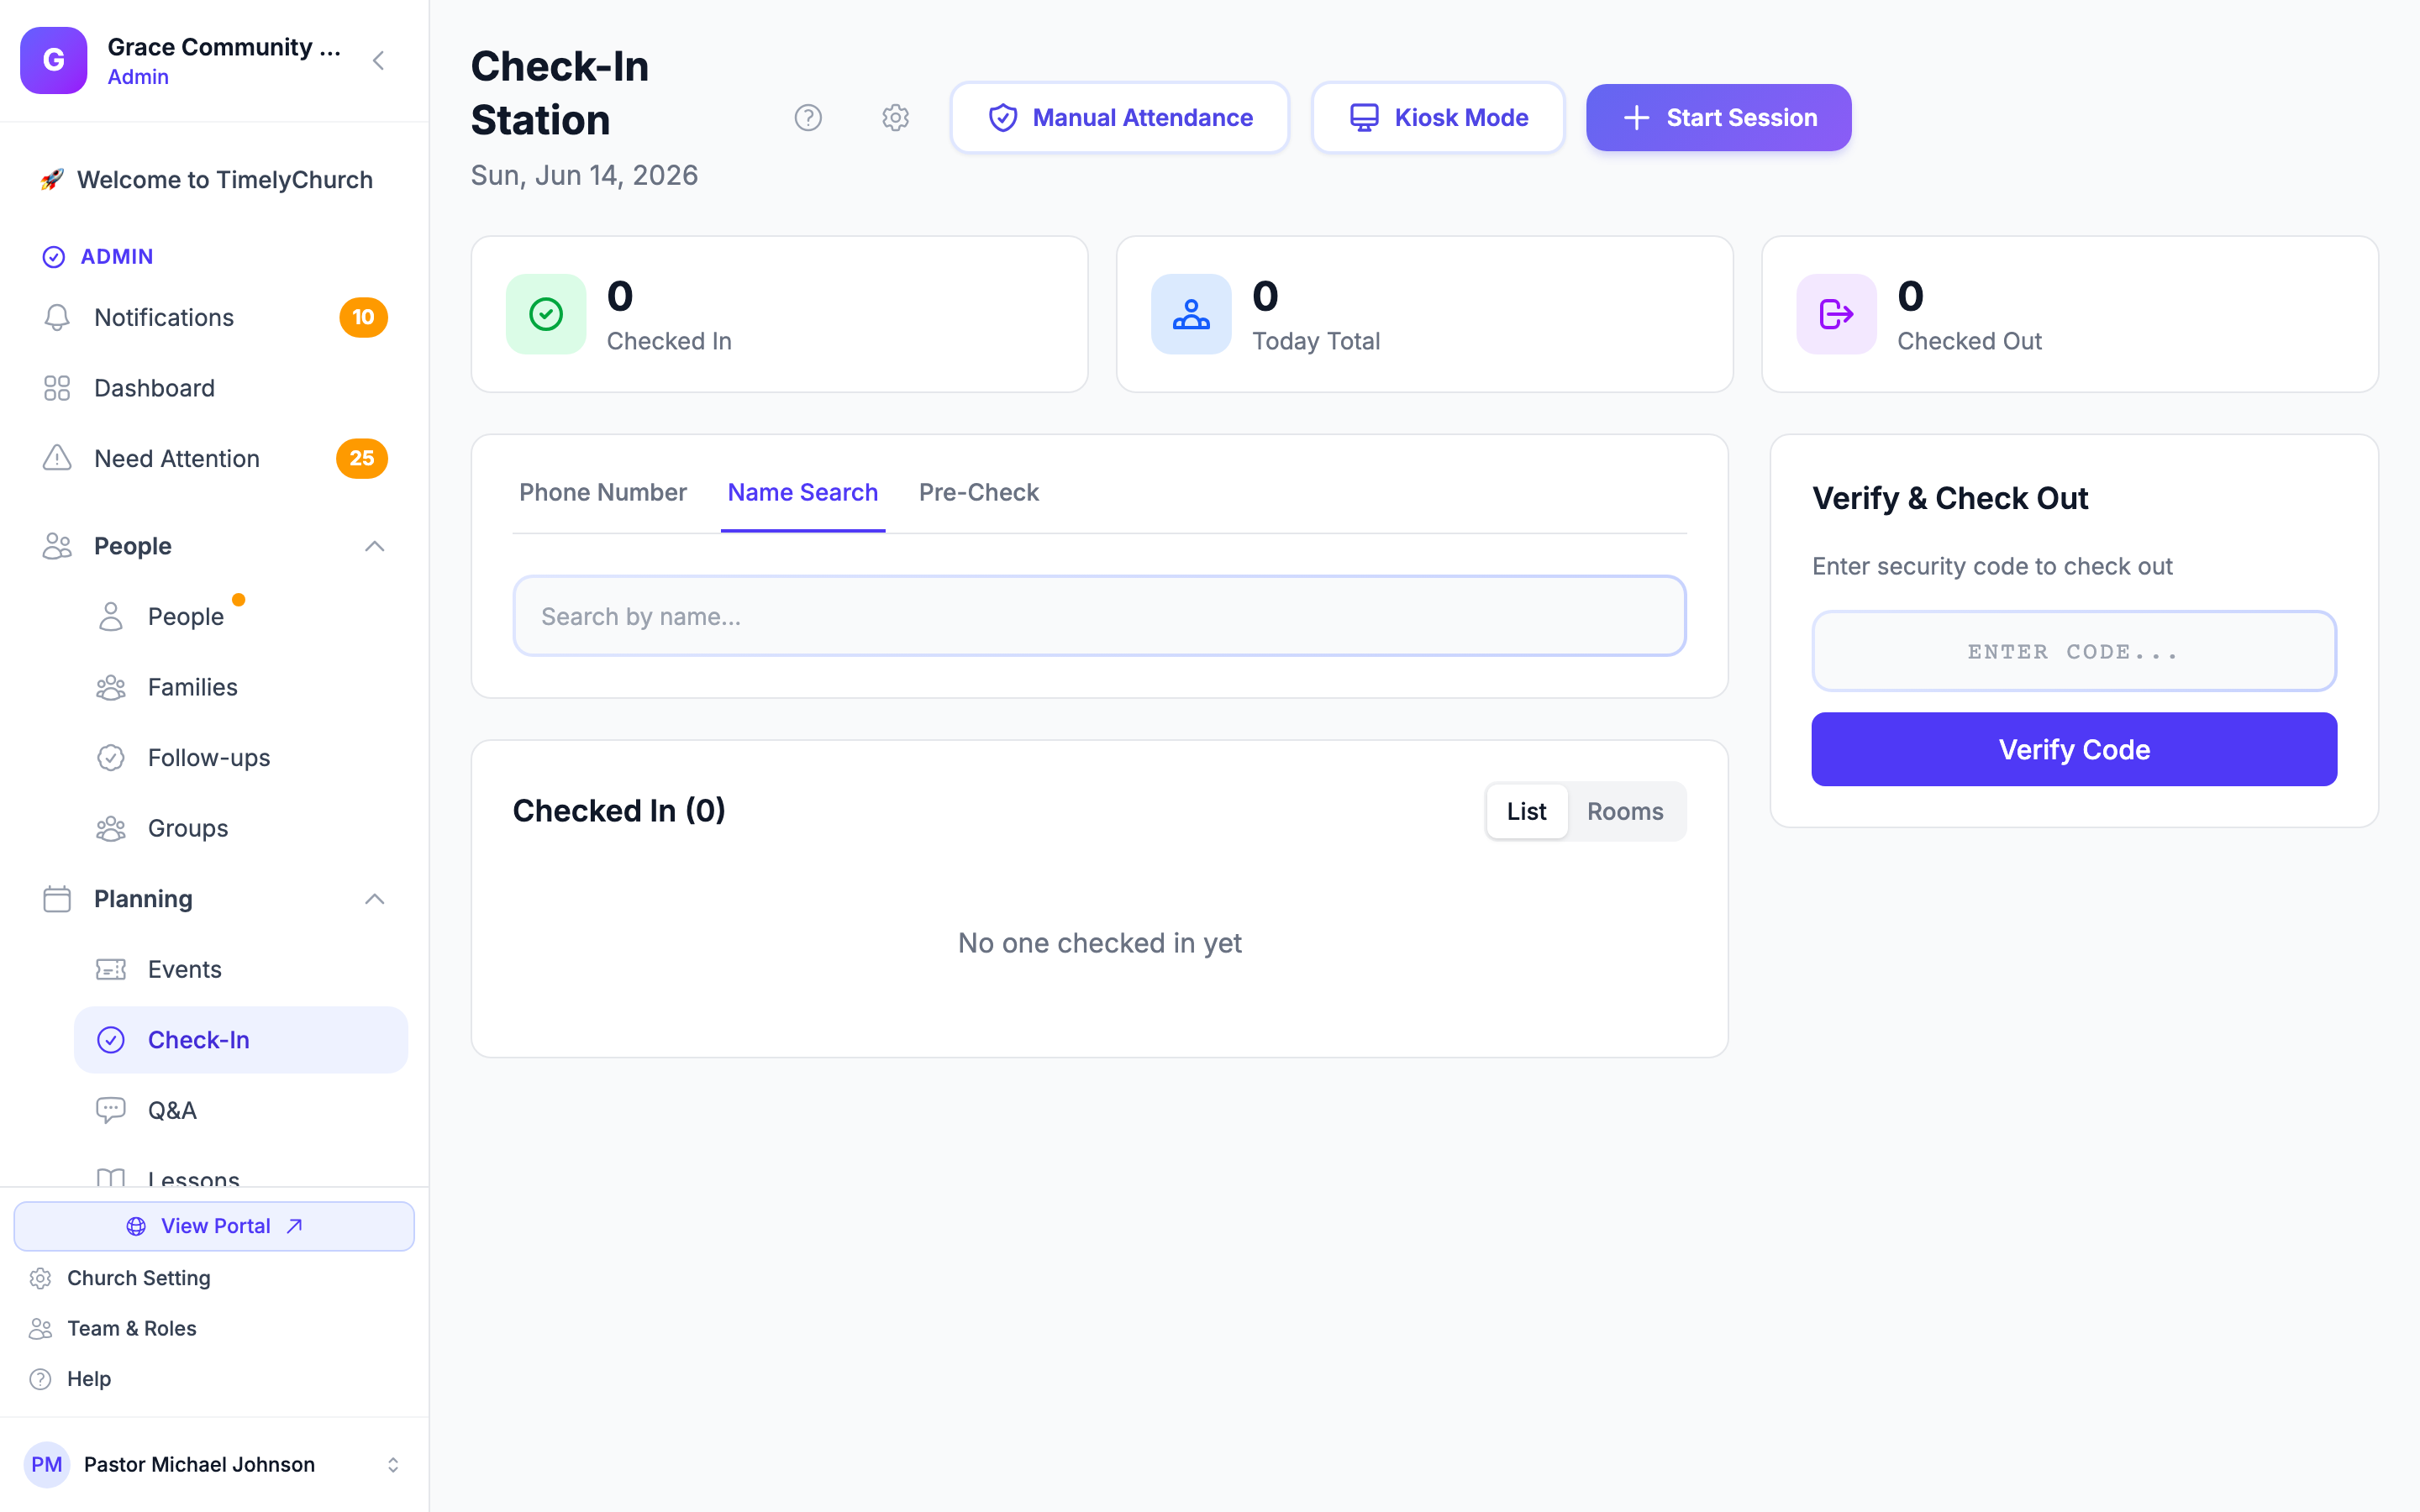
Volunteer check-in happens from the admin Check-In Station (not from the self-service kiosk). The volunteer must already exist as a Person in your People directory.
Volunteers are checked in through the same flow as everyone else -- you search for them, select them, and check them in to the class/group they are serving. The check-in is tagged as a volunteer record by the class you assign and how the person is set up; there is no separate "Check In as Volunteer" mode to switch into.
- Open Check-In in the left sidebar to open the Check-In Station.
- Use the Phone Search or Name Search tab to find the volunteer.
- Select the volunteer from the results.
- Assign the class/group they are serving today (e.g., "Kindergarten," "Hall Monitor," "Worship Team"). Groups available here are your class-type groups.
- If a session is already linked to an event, the check-in is recorded against that session automatically.
- Tap Check In (the button shows the number of people you have selected, e.g. "Check In 1 Person(s)").
The system creates a check-in record and:
- Generates a 6-character security code for the check-in.
- Records the person against the class/group you assigned (so the class roster reflects who is present).
- Updates the live counts for that group.
If no active session exists for today, the system creates one automatically when you check the person in. The session inherits the linked event if one is selected.
Already-Checked-In Guard
If the person is already checked in to the same session, the system will not create a duplicate -- they appear in the "already checked in" list and are skipped. To move them to a different group, check them out first, then check them back in to the correct group.
Background Checks
TimelyChurch can hold a background-check status on each person and use it to gate who is allowed to serve with children. When you check a volunteer in, the system reads their status and either lets them through, warns you, or blocks them.
Recording a Background Check (Administrators Only)
A background check is recorded on the person's profile, and only an administrator can record it. Clearing a check can remove a child-safety block, so it is deliberately not something ordinary People-edit permission can do.
- Open People in the admin sidebar and open the person's profile.
- Open the Involvement tab. (The Involvement tab appears for anyone who is a child or who belongs to a group, class, serving team, or enrollment.)
- Find the Background Check card.
- Tick Background check cleared.
- Optionally set an Expires (optional) date -- useful for policies that re-run checks every year or two.
- Click Save. You'll see the confirmation "Background check updated."
If you are not an administrator, the card shows the line "Only administrators can record background checks." in place of the form.
Note: Un-ticking "Background check cleared" clears both the recorded date and the expiry, so the status resets to "Not on file."
(Screenshot to follow: the Background Check card on a person's Involvement tab, showing the status badge and the "Background check cleared" checkbox with an optional expiry date.)
The Status Badge
The Background Check card shows a colored badge so you can read the status at a glance:
| Badge | Color | Meaning |
|---|---|---|
| Cleared | Green | A valid check is on file. |
| Expired | Red | A check was recorded, but its expiry date has passed. |
| Not on file | Gray | No check has ever been recorded. |
When an expiry date is set, an exp. hint appears next to the badge. A check is valid through its expiry date -- someone whose check expires on the 30th is still cleared on the 30th and expired on the 1st. Dates are compared in your church's local day.
How the Gate Works at Volunteer Check-In
When you check a volunteer in (see Checking In a Volunteer above), their background-check status decides what happens:
- Cleared -- The volunteer is checked in normally.
- Not on file -- The volunteer is still checked in, and the confirmation shows a warning: "Warning: [name] has no background check on file." Nothing is blocked.
- Expired -- The volunteer is not checked in. You'll see "[name]'s background check expired on [date]. An administrator must renew it before they can serve with children." Renew the check on the person's Involvement tab and try again.
Note: "Not on file" only warns; "Expired" hard-blocks. The difference is intentional. A check that lapsed is a stronger signal than one that was never started, so an expired check stops the volunteer until it is renewed -- while churches that don't track background checks in TimelyChurch can still check volunteers in without friction.
Admin Override for an Expired Check
Sometimes you need to let a volunteer serve today while their renewal is in progress. An administrator -- and only an administrator; a non-admin can never bypass this -- can override an expired-check block. When an admin overrides:
- The volunteer is checked in.
- The confirmation shows "Warning: [name]'s background check has expired."
- A permanent audit note is written into the check-in record: "Expired-background-check override by [admin] for [person] at [time]." It records who overrode the check, for whom, and when, so the decision is never silent.
Renew the check on the person's Involvement tab once the new one comes back, so the override isn't needed next time.
Volunteer Badges
Volunteers can wear a volunteer badge with their name, role/group, and a security code. Badges are printed from a Volunteer-type label template (see article 5 for label designer details).
- After check-in, the volunteer appears in the live roster and can be printed like any other check-in.
- A Volunteer-type template is not created automatically. "Create Default Templates" only generates two templates -- a Classic Child Tag and a Classic Security Tag. To get a volunteer badge, create a Volunteer-type template (or duplicate an existing template, change its type to Volunteer), and set it as the default for that type.
- You can build and edit volunteer templates in Check-In Settings > Label Designer (open the Settings gear icon in the Check-In Station header, then the Label Designer tab). The Label Designer groups templates by type, including a Volunteer Badges section.
Tip: A consistent, clearly-marked volunteer badge helps families immediately identify who is "on staff" in the children's area. This is one of the simplest child-safety upgrades you can make.
Volunteer vs. Child Counts
When you check people in to a class, the system keeps a count of how many people are in that group and (where the data is available) how many of them are volunteers.
| Field | Source |
|---|---|
| Volunteers | Count of checkin_type = volunteer check-ins for that group, today, not yet checked out. |
| Children | Count of checkin_type = child check-ins for that group, today, not yet checked out. |
Where Counts Appear
- Room Occupancy data. The live room-occupancy endpoint reports the number currently checked in per room (and a volunteer count per room) alongside the room's capacity and occupancy percentage. See article 12 for how this is used.
- Classroom Roster. The roster's Expected / Here / Checked Out tabs and Room filter let you see who is present in each class.
Note: A live, automatically-calculated volunteer-to-child ratio is not currently shown as a dashboard figure in the Check-In Station. You can read the volunteer count and the children count for a room and compare them against your targets by hand.
Practical Targets
These are common targets used by churches and child-safety standards. Adjust based on your insurance carrier's recommendations and your local laws.
| Age range | Common minimum ratio |
|---|---|
| Infants (under 12 months) | 1:3 |
| Toddlers (1-2 years) | 1:4 |
| Preschool (3-5 years) | 1:5 |
| Elementary (6-12 years) | 1:8 |
| Middle school+ | 1:12 |
If a room is over the target, reassign a volunteer from a less-loaded room or move a child to a different group.
Checking Out a Volunteer
Volunteer checkout is simpler than child checkout: no security code is required, and no authorized-pickup person needs to be selected. (Child checkouts now require both -- the code is verified and an authorized pickup person must be chosen before checkout completes.)
- Find the volunteer in the live roster (on the Check-In Station, or the Classroom Roster page).
- Tap the Out / Check Out button next to their name.
- The system records the checkout time immediately -- no code prompt, no pickup picker.
This is by design. There is no child-pickup risk for an adult volunteer, so there is no need to verify a code or a pickup person.
Behind the scenes:
- The check-in record gets a
checked_out_attimestamp. - The live count drops.
Note: Checkouts are blocked during lockdown for everyone -- the Check Out button is disabled and the system returns "Checkouts are suspended during lockdown. Contact a church administrator." A volunteer cannot be checked out of a room until lockdown clears. See article 9 for details.
Volunteer Reporting
Volunteer check-in records feed a few places:
Session Detail Page
- The session detail stat tiles show Total Checked In, Currently Present, Checked Out, Children, Adults, and First-Time Visitors. Volunteers (who are adults) are counted under Adults in these tiles.
- Everyone who checked in -- including volunteers -- appears in the session's roster.
Reports Overview
- The Reports overview includes a volunteers this month figure, counted from check-in records tagged
volunteer.
Attendance Reports
- Check-in records flow into the attendance reports under Reports (Check-In/Attendance), so volunteer check-ins are part of your overall attendance history.
Note: TimelyChurch also has a separate Volunteers report and event-based serving/scheduling stats (rotation, serving counts on group members). Those are driven by event volunteer assignments and scheduling, which is a different feature from checking a volunteer in at the door. Checking someone in here does not by itself update their event-serving rotation stats.
Common Issues
Person is already checked in
Someone checked them in earlier. Find the existing check-in in the roster; either let it stand, or check them out and back in to the correct group.
Volunteer was checked into the wrong group
Check them out, then check them in again with the correct group selected. The original check-in record is preserved (with both check-in and checkout timestamps), so the audit trail is intact.
A volunteer doesn't exist as a Person yet
Volunteers must have a Person record. Create one in People > Add Person with at minimum first name, last name, and phone. They can then be checked in immediately.
Need to print a label after the fact
Find the person in the Check-In Station's checked-in list and tap the printer icon next to their name to reprint their label. If you have set a default Volunteer-type template, volunteer badges use it; otherwise the label uses the applicable default template.
"Check Out" button is greyed out
The session is in lockdown. Checkouts (including volunteers) are suspended until an administrator deactivates lockdown. See article 9.
Related Articles
- Check-In Process -- Family / child check-in flow.
- Label Templates -- Designing the volunteer badge.
- Lockdown Mode -- Why checkouts are blocked during lockdown.
- Room Occupancy -- Live occupancy and per-room counts.