
Set Up Wristband Check-In (Hardware + Settings)
Wristband check-in lets a child tap a wristband to identify themselves at any door running that session — no name search, no phone number, no line. It's built for camps, VBS, and busy nurseries where the same child checks in at several points in a day. This article covers the hardware to buy and the one setting to turn on. For day-to-day use once it's set up, see Using Wristbands at Camps & Events.
What You'll Need
An RFID reader. Look for a USB "keyboard-wedge" or "HID mode" reader — that phrase is what matters, not the brand. Either 125 kHz or 13.56 MHz works, and either frequency is fine even mixed across readers at the same church. Expect to pay roughly $20–$40. A generic access-control RFID reader from any electronics retailer works fine — you do not need one marketed specifically for churches or check-in.
To your computer, a reader like this isn't a scanner that needs a driver — it behaves exactly like a keyboard. Tap a band and it types the tag's ID number, then presses Enter, just as if someone had typed it by hand. There is nothing to install.
Wristbands. Any generic, reusable RFID wristband or silicone RFID band at the same frequency as your reader (125 kHz or 13.56 MHz). These are the same style of band used for gym memberships and water parks, and they're inexpensive in bulk.
What not to buy: a "writable" RFID system. TimelyChurch never writes any data onto a band — it only reads the factory ID — so paying extra for write capability doesn't add anything here.
Step 1: Plug In the Reader
Plug the USB reader into the computer running your check-in kiosk. That's the entire hardware setup — no drivers, no software, no account with the reader's manufacturer. Because it types like a keyboard, it works with the kiosk immediately, the same way a USB or Bluetooth barcode scanner does for QR check-in codes.
Step 2: Turn On Wristbands for a Session
You can turn wristbands on when you start the session -- tick This session uses wristbands in the Start Check-In Session window -- or afterwards:
- Go to Planning > Check-In and open the session you want to use wristbands for — for example, a camp's "Arrival" session, or each day's session if you're running one per day.
- On the session page, find the Consent / Waiver card and click Add (or Change) to open it. (This needs the Check-In Manage permission.)
- Near the bottom of that panel, check This session uses wristbands.
- Click Save.
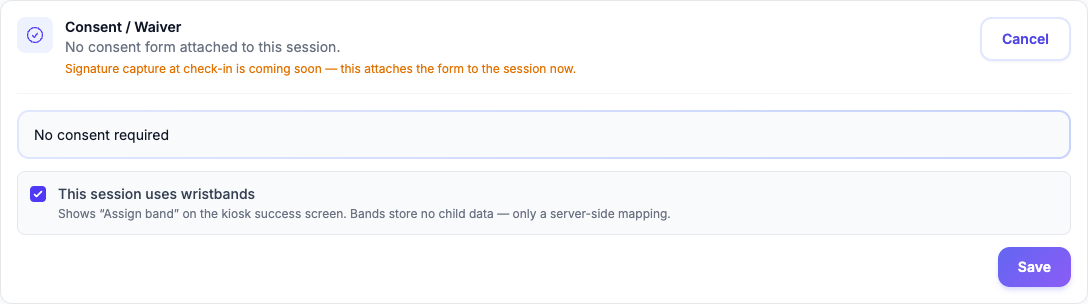
This is a per-session setting, off by default. Turning it on for one session doesn't affect any other session — a normal Sunday check-in stays exactly as it is today, with no new buttons or screens, unless you deliberately enable it.
Important — multi-day camps: wristband bands are linked at the event level, not the individual session. If your camp runs over several days, create one event for the whole week and run every day's check-in session under that same event. A band assigned on day one only keeps working at the lunch line or the door on day five if each day's session is tied to that same event. If you use a standalone session with no linked event, wristbands still work for tap-to-identify, but the bulk Release all bands button (see the camps article) won't be available — it's event-scoped.
Also note: the wristband toggle is per session, not per event. If you're running a separate session for meals or activities (recommended — see the camps article), turn on This session uses wristbands on each of those sessions too, not just Arrival.
Step 3: Confirm the Button Appears on the Kiosk
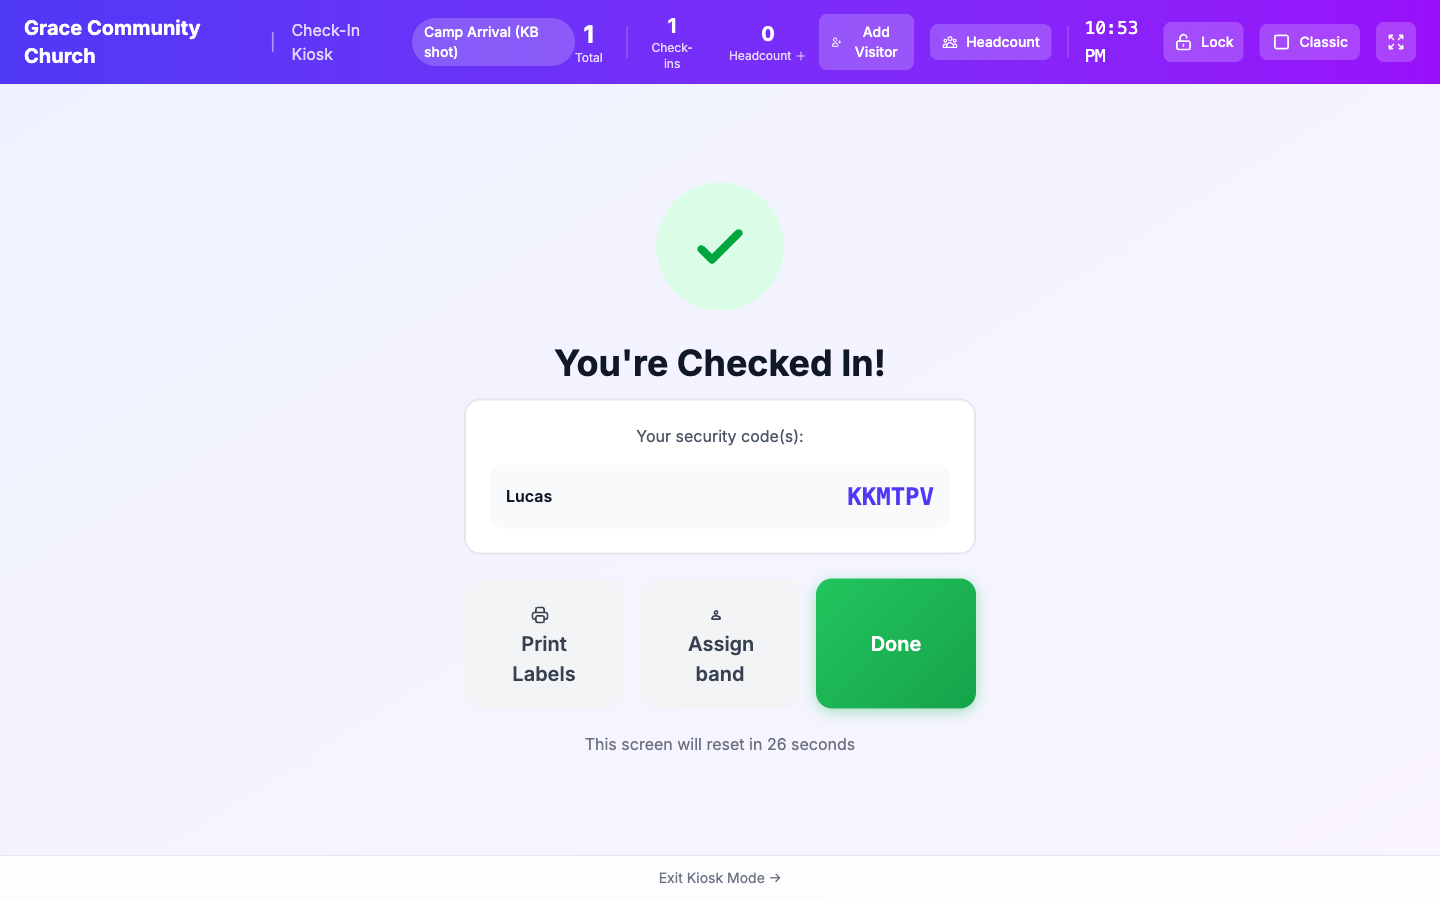
Open Kiosk Mode for that session and check a test person in (or use a real check-in). On the You're Checked In! screen, you should now see an Assign band button next to Print Labels and Done. If you don't see it, double-check the toggle was saved on the correct session, and that the kiosk is pointed at that same session.
A Note on Privacy
The wristband itself never stores a child's name, photo, allergy information, or any other data — not even the check-in security code. TimelyChurch only reads the tag's factory-printed ID number, which is a meaningless string of digits on its own. The link between that number and a specific child lives only inside your church's TimelyChurch account, behind your login. If a band is lost, whoever finds it has learned nothing. See Using Wristbands at Camps & Events for what a parent or staff member should expect day-to-day.