
The Check-In Process
This article walks through every method families can use to check in, whether they are at the self-service kiosk or being helped by a volunteer at the Check-In Station.
Starting a Check-In Session
Before anyone can check in, a session must be active.
- In the left sidebar, open Planning and click Check-In.
- Click Start Session.
- In the Start Check-In Session window, optionally choose an event from the Link to Event dropdown (or leave it on "No event - standalone session") and give the session a custom name (or leave it blank for the default).
- Optionally attach a Consent / Waiver form (see Consent Forms and Waivers at Check-In) or tick This session uses wristbands (see Set Up Wristband Check-In).
- Click Start Session to activate it.
A session can also be created automatically when you open Check-In from an event in the Events module, which passes the event along so the new session is linked to it.
Note: You can run multiple sessions at the same time for different events or classes. Each session tracks its own roster independently.
Lookups only work while a session is open. Phone and name lookups at the kiosk and on the Check-In Station run inside an active check-in session. With no active session, the station asks you to start one first ("Start or select an active check-in session first."). This keeps children's details from being browsed outside check-in time.
Method 1: Phone Number Lookup (Recommended)
This is the fastest method for families who are already in the system.
At the Kiosk
- The family enters their phone number using the on-screen number pad. They can type the whole number or just the last 4 or more digits -- the digits must be the end of the number.
- They tap Find My Family.
- The system looks for mobile, home, and work phone numbers in your church that end with those digits.
- If one household matches, its members appear straight away, each with their name, age, photo and enrolled class. If several households match, the kiosk first asks "Which family are you?" and shows only the household names; nobody's details appear until the family taps theirs. (If more families match than fit on the screen, it asks for more digits.)
- The family taps each person who is checking in today. A green checkmark appears next to selected members, and any allergy or medical alert for that person appears as soon as they are tapped.
- Optionally, under a selected person, they tap + Add a note for the name tag and type something to print on that person's tag (for example a title, group, or table number -- up to 200 characters). The note prints wherever your label template includes the Special Notes field.
- They tap Check In to complete the process. (If the session requires a consent form, the signing step comes first -- see Consent Forms and Waivers at Check-In.)
- The You're Checked In! screen shows the security codes. Tap Print Labels to print, then Done (the screen also resets on its own after a few seconds).
At the Check-In Station
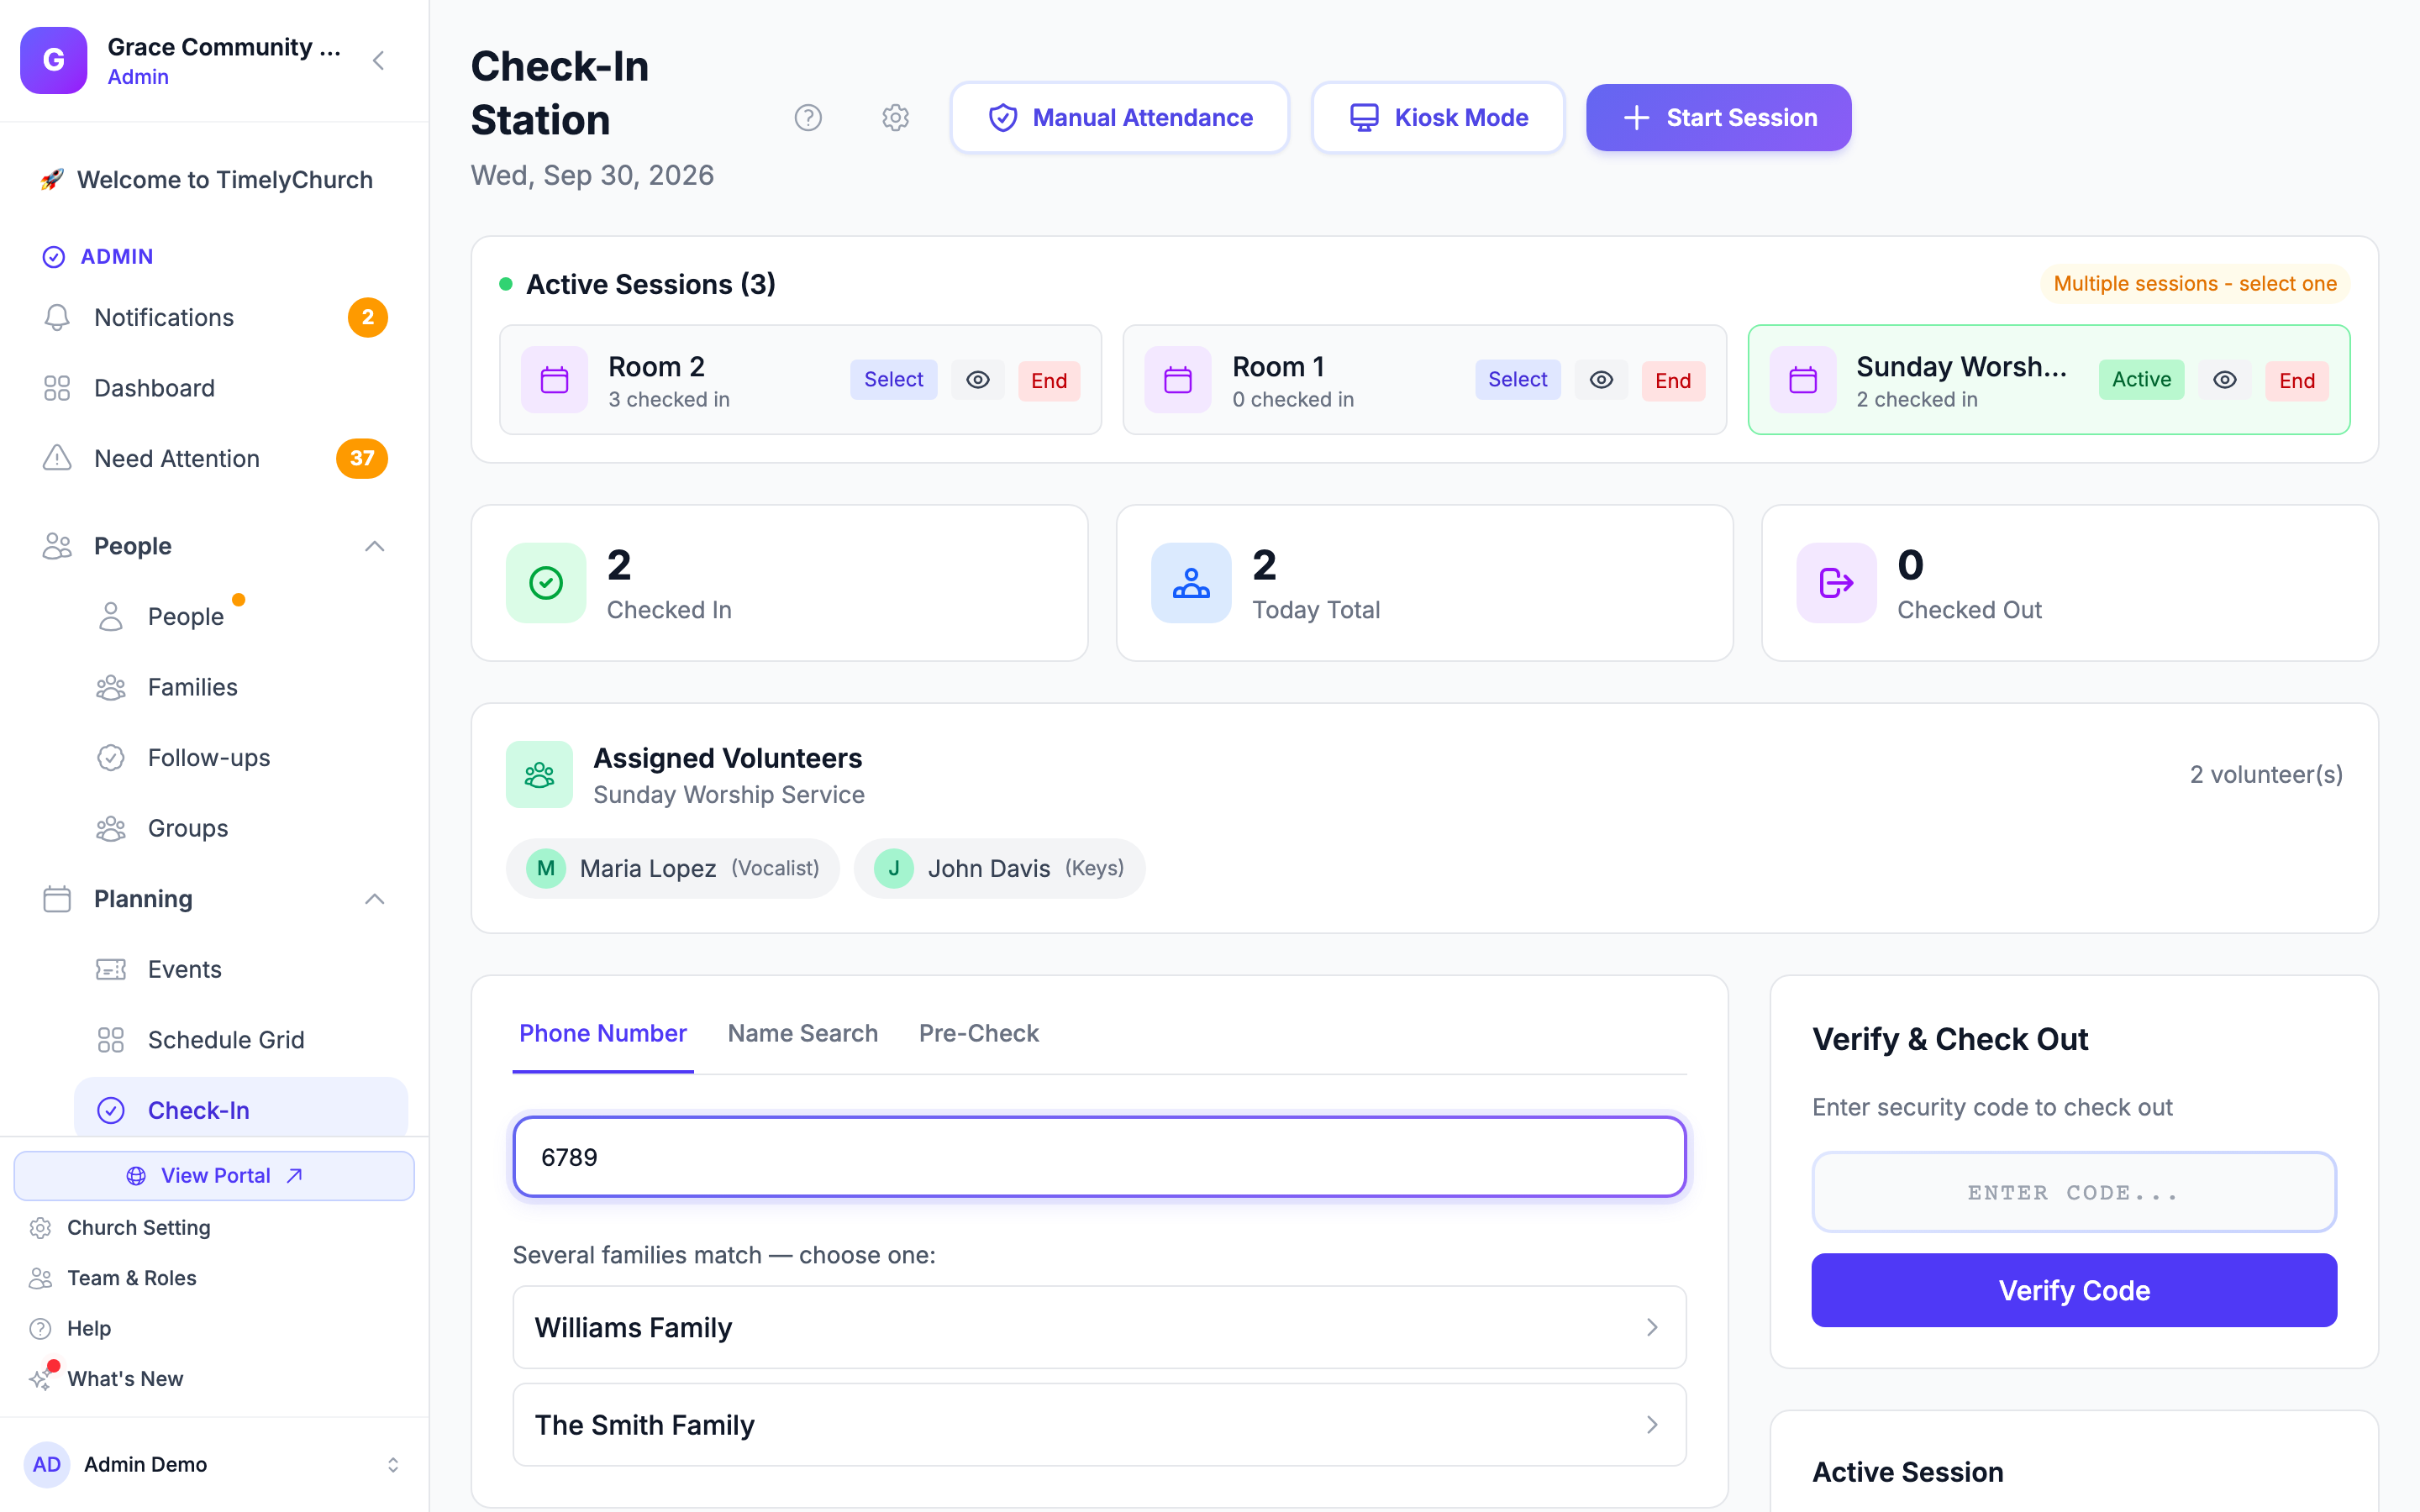
- Select the Phone Number tab on the Check-In Station page. It is the tab that is already selected when you open the station, so you can usually start typing straight away.
- Type the phone number in the search field (placeholder "Enter phone (last 4+ digits)...").
- Family results appear on their own. If several families match, you first see "Several families match — choose one:" with household names only; click the right one. Then click each person to select them (their allergy alerts appear when you select them).
- Click Check In [N] Person(s).
Tip: Enrolled class information is auto-populated. If a child is enrolled in "Kindergarten," that class will be pre-selected -- no need for the parent to choose it manually.
Type or Scan the Phone Number
The phone box on the Phone Number tab is a standard phone-entry field, and it accepts a number two ways:
- Type the digits on your keyboard or the on-screen number pad, or
- Scan the number in with a USB or Bluetooth barcode/badge scanner. A scanner simply "types" the characters into whatever field is focused, so there is no separate scanner mode to turn on -- click into the phone box and scan.
There is no separate "Search" button on the Check-In Station. As you enter digits, the search runs automatically after a brief pause (about a third of a second), and the results narrow as you add more digits.
Note: You only need the last 4 or more digits, and they must be the end of the number -- four digits from the middle of a number find nothing. Fewer than 4 digits returns no results (at the kiosk, Find My Family stays disabled until at least 4 digits are entered). The search looks at mobile, home, and work numbers for the active people in your church, and shows at most 10 households.
Tip: The match ignores punctuation completely. Parentheses, spaces, dashes, dots, and slashes are all stripped from both what you type and what is stored before the numbers are compared -- so a number saved as
(360) 903-5828is found whether you type3609035828,903-5828, or just5828.
Method 2: Name Search
Useful when a family's phone number is not on file or the family does not remember which number they registered.
At the Kiosk
- On the phone entry screen, tap Search by name.
- Type at least 3 letters of the person's first or last name.
- Matching results appear with photos and ages (up to 10 people).
- Select the person -- any allergy or medical alert appears at this point -- and proceed to check-in.
At the Check-In Station
- Select the Name Search tab.
- Type at least 3 letters of the name. Results appear immediately (up to 10 people).
- Click Check In next to the person.
- Optionally choose a class under Assign to Class (Optional).
- Click Complete Check-In.
Method 3: QR Code / Pre-Check-In Code
For families who pre-registered from the member portal (see the Pre-Check-In article).
At the Kiosk
- On the phone entry screen, tap Scan QR Code with Camera (or use the camera panel in the Split layout).
- Scan the QR code on the family's phone.
- The system validates the code, checks that it is for today and has not been used already, and automatically checks in all pre-selected family members.
- Security codes and labels are generated instantly.
A Bluetooth or USB barcode scanner can also read the QR code at any time without navigating to a specific screen.
Scan the code -- don't type it. Pre-check codes are long and are meant to be scanned. The kiosk's Have a pre-check code? box only accepts short codes, so a current code typed there will not be found.
If the session requires a signed consent form that the family has not signed yet, scanning is refused with "This session requires a signed consent form — please check in at the kiosk to sign." Have the family check in by phone number at the kiosk so they can sign.
Method 4: Visitor Walk-In Registration
For first-time visitors who are not yet in the system.
Visitor registration happens on the kiosk.
- Tap Add Visitor in the kiosk header bar. The Visitor Check-In window opens ("Add each family member for their own name tag").
- For each person, enter the First name and Last name, and for an adult optionally a Phone (for pickup contact) and Email (optional).
- Use Add Adult and Add Child to add more people -- up to 7 at once.
- For a child, optionally choose a Grade (optional) (Infant through High School).
- Tap the check-in button (for example Check In 3 People).
- The system creates new Person records (with the Visitor status) and, if several people are entered, a new Family record linking them together. Labels start printing automatically.
Security codes for visitors: the kiosk shows a Family Security Code, which is the code the adults share. Each child also gets their own code, printed on that child's name tag and security tag -- use the child's code at pickup.
Who can pick up: only the first adult entered is set as an authorized pickup for the children. To let another adult collect them, open the family in People → Families and turn on Authorized Pickup for that person.
Allergies: the visitor form has an Allergies (optional) box, but a child's allergy details can only be saved once a parent or guardian has given consent in the family portal. If a child has an allergy, tell the classroom leader directly on the first visit.
Volunteers
Teachers and helpers are checked in the same way as everyone else -- find them by phone or name on the Check-In Station and check them in to the class they are serving. See Volunteer Check-In.
What Happens at Check-In
When a person is successfully checked in, the following occurs:
- A check-in record is created with the person's name, allergies, special notes, and a unique security code.
- That same check-in record doubles as the person's attendance for the day, marked "present." If the person is assigned to a class, the attendance is recorded against that class. (There is no separate attendance step to complete.)
- The check-in appears in the list of checked-in people on the Check-In Station (the List and Rooms views) and on the Classroom Roster.
- Labels print when you tap Print Labels on the confirmation screen (for walk-in visitors, printing starts automatically). What prints is set in Check-In Settings → Printer Setup.
- If you have turned on parent notifications, the child's guardians get a check-in notice -- see Parent Check-In / Check-Out Notifications.
- The first time someone with the Visitor status is checked in, a First-Time Visitor follow-up is created -- see Follow-Ups.
Checking In Multiple People (Family Check-In)
When using phone lookup, you can select multiple family members and check them all in with one action. Each person receives their own security code. The confirmation (Check-In Complete! on the Check-In Station, You're Checked In! on the kiosk) displays all codes and provides a Print Labels button to print all labels at once.
Checking Out
Checkout requires a security code to protect child safety.
Code-Verified Checkout
- On the Check-In Station, find the Verify & Check Out panel (on desktop, this is in the right sidebar; on mobile, tap the expandable "Verify & Check Out" section).
- Enter the 6-character security code.
- Click Verify Code.
- The system displays the person's name, check-in time, and any allergy notes.
- For a child: a "Who is picking up?" list of the family's authorized pickup adults appears. Select the person collecting the child. The Confirm Check Out button stays disabled until a pickup person is chosen.
- Click Confirm Check Out to complete the checkout.
Admin override: If you are signed in as an administrator and the right adult is not on the authorized-pickup list, tick Override pickup authorization (admin only) on the panel. This lets you complete the checkout, and the override is recorded in the check-in's notes for your records.
Quick Checkout (the "Check out" button)
The Check out button next to each checked-in person (on the Check-In Station, the session page, and the Classroom Roster) checks them out without typing the security code -- handy when the parent has lost their receipt.
- For adults and volunteers, it checks them out in one tap.
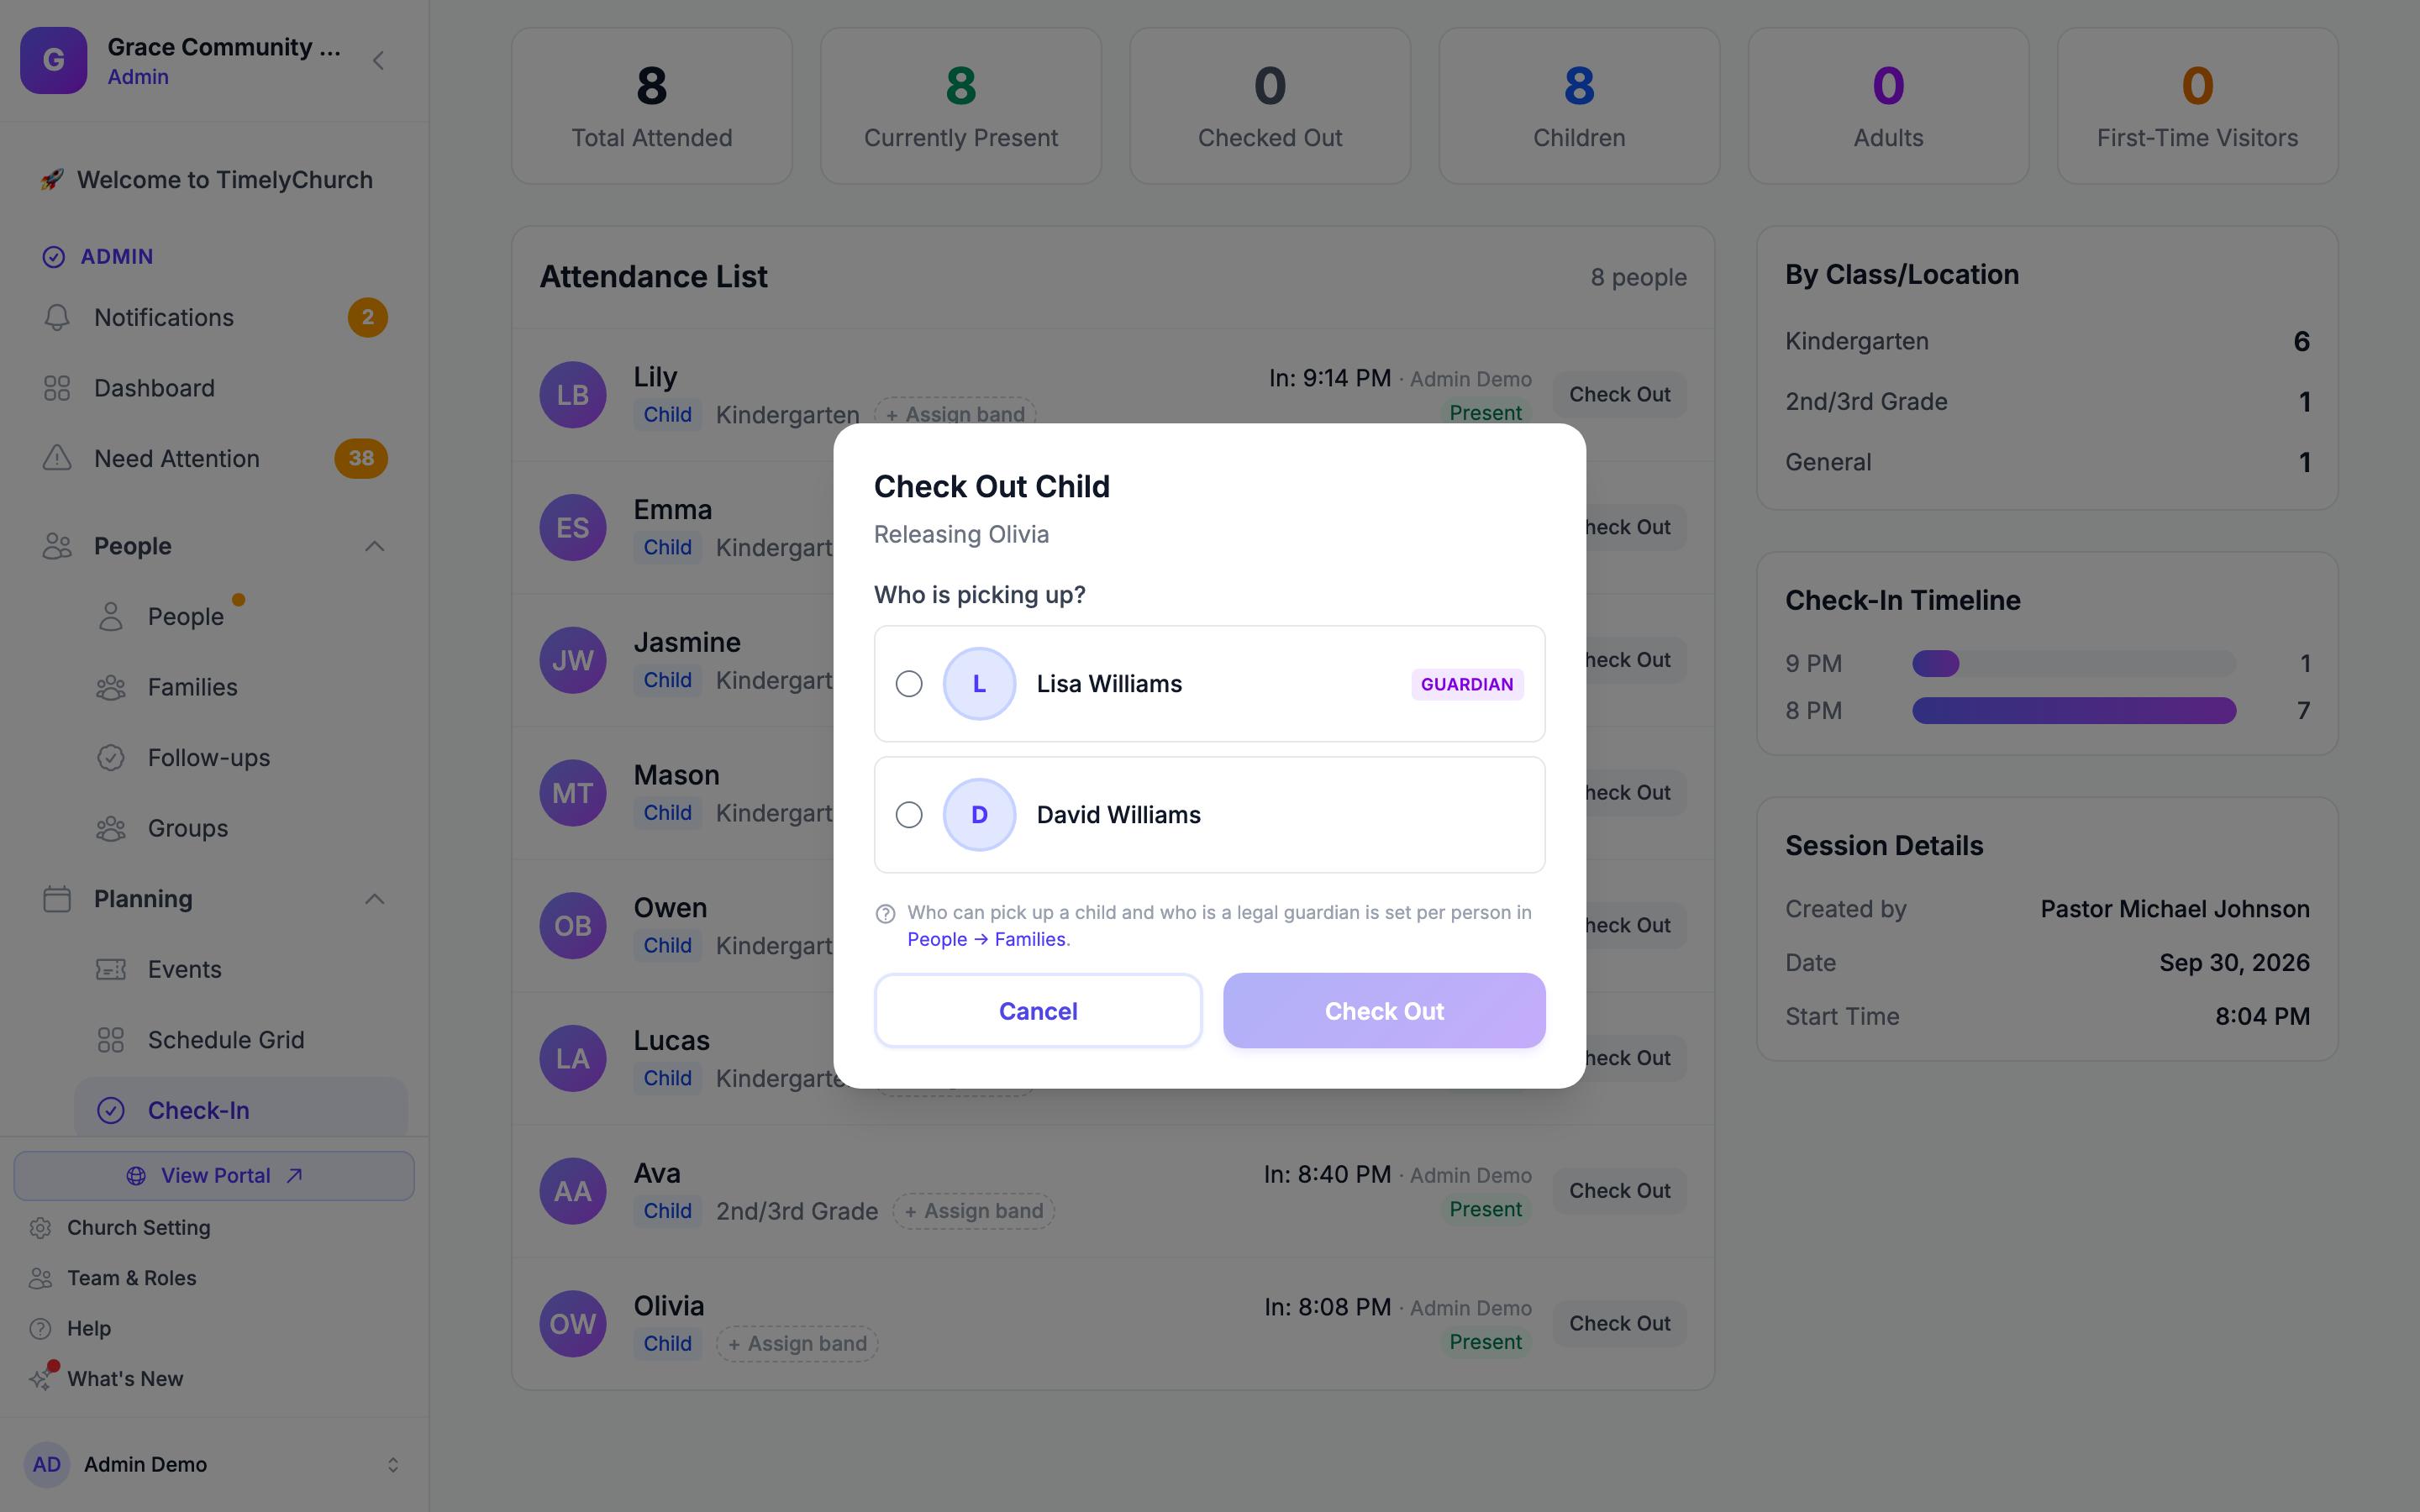
- For a child, it opens the Check Out Child window listing the family's authorized pickup adults under Who is picking up?. You must select one before the checkout can complete. If no authorized adults are on file, use Verify & Check Out with the admin override instead.
Child Safety: A child can never be released without naming an authorized pickup adult (or an administrator overriding it on the Verify & Check Out panel). Quick checkout for children still enforces this safeguard -- it only skips the security-code step, not the pickup check.
Who Is Picking Up? (the pickup picker)
Whenever you check a child out -- through Verify & Check Out or the quick Check out button -- a "Who is picking up?" list appears. It shows the child's family members who are marked as authorized pickups, each with a photo (or their initial) and, where it applies, a Guardian badge for legal guardians.
Choose the person who is actually collecting the child, then press Confirm Check Out (or Check Out). The button stays greyed out until you select someone. Whoever you pick is recorded on the check-in and shown on the roster as "Picked up by …", so you have a clear record of who left with each child. TimelyChurch re-checks your choice against the child's authorized-pickup list before releasing.
A few things worth knowing:
- The photo is there to verify a face, not just a code. Each authorized pickup shows with their profile photo beside their name (falling back to an initials avatar when no photo is on file), so the volunteer releasing the child can match the person in front of them, not only trust that the right security code was handed over. The same pickup photo appears everywhere checkout happens -- the Quick Checkout window, the Check-In index, the classroom Roster, and the Kiosk.
- The list comes from the Authorized Pickup setting. A family member appears here only when Authorized Pickup is on for them. Set this on the family: open the family (from People → Families or the person's Family tab), click Edit next to the adult, and tick Authorized Pickup -- or click the Pickup chip on the person's Family tab. (The hint in the check-out window still calls this setting "Can pick up".)
- The Guardian badge does not grant pickup. It is there to help you recognise a legal guardian, but it does not by itself authorise a release. Authorisation comes solely from Authorized Pickup. This means you can bar a specific guardian from collecting a child (for example, a custody restriction) simply by leaving Authorized Pickup off for them.
- The person must be on the child's list. If you name someone who is not an authorized pickup, the release is blocked with "This person is not authorized to pick up [name]." An administrator can still override this on the Verify & Check Out panel (see above); the quick Check out button has no override.
- No one set up yet? If the child has no authorized pickups on file, the picker shows an amber note -- "No one is set as an authorized pickup for this child yet." -- with a link to People → Families.
Custody Notes
If a child has a custody note on their family record (a court order or a pickup restriction), it is surfaced as a red "Custody note:" alert at the top of the Check Out Child window -- shown before you release the child, so the volunteer at the door sees it in time to act on it. If the child belongs to more than one family, the notes are combined so nothing is missed.
Note: The custody alert appears in the Check Out Child window on the session page, on the Classroom Roster, and on an event's student list. The Check-In Station page itself (both its Verify & Check Out panel and its Check out buttons) shows the pickup picker but not the custody note, so for children with custody restrictions, release them from the session page or the Classroom Roster.
Duplicate Check-In Prevention
The system prevents a person from being checked in twice to the same session. If someone is already checked in, the system will display an error message and skip that person during a family check-in.