
Tutorial: Team Leader "Manage Your Team" Walkthrough
Audience: Worship team leader (or any serving team leader) responsible for filling Sunday positions Time needed: About 15 minutes You'll need: Permission as a team leader on at least one serving team — ask your church admin if you're not sure
What You'll Learn
By the end of this walkthrough, you will know how to:
- Find your team page and understand what's on it
- Read the On Leave badges on your roster so you don't accidentally schedule someone who's away
- Understand how the system rotates through your team (Fair Rotation, Round Robin, or Manual Only)
- Edit the team's schedule template — the position list new events can auto-fill with
- Open the Schedule Grid to see your team's coverage across upcoming services at a glance
You don't need full admin access for most of this. Team leader permission is enough to manage your members and templates. A couple of settings (the team's scheduling rotation) live on an admin-only tab — we'll point those out as we go.
Step 1: Find Your Team Page
Time: 1 minute
- Log in to your TimelyChurch admin panel.
- In the sidebar, expand People and click Groups.
- Click the Teams filter tab near the top (it shows how many teams there are, for example Teams (4)) to narrow the list to serving teams.
- Click the name of your team — for example,
Worship TeamorSound Team.
You'll land on the team detail page. A breadcrumb at the top reads Groups — [your team], and a row of tabs runs across the main panel: Group details, Members, Templates (plus a few more depending on how your team is set up).
Tip: If your church has limited your role to Their teams, the Groups page lists only the teams you lead — that's expected. Some tabs are admin-only, too: if you're a team leader without full Groups admin access, you won't see the Group details tab — you'll land on Templates (or Members) instead. If you don't see your team at all, you may not be a leader on it yet. Ask your church admin to add you under Group leaders on the team's Group details tab.
Step 2: Read Your Roster (and On Leave Badges)
Time: 3 minutes
- Click the Members tab.
- You'll see every member of the team with their role on the team and how often they like to serve (for example, As often as needed). If your team uses fixed positions, each row also shows the positions that member covers.
- Look for the amber On Leave N days · next [date] badge under a member's serving frequency — it appears automatically when a member has marked unavailable dates in the next 60 days. The badge shows the count of upcoming blocked dates plus the soonest one.
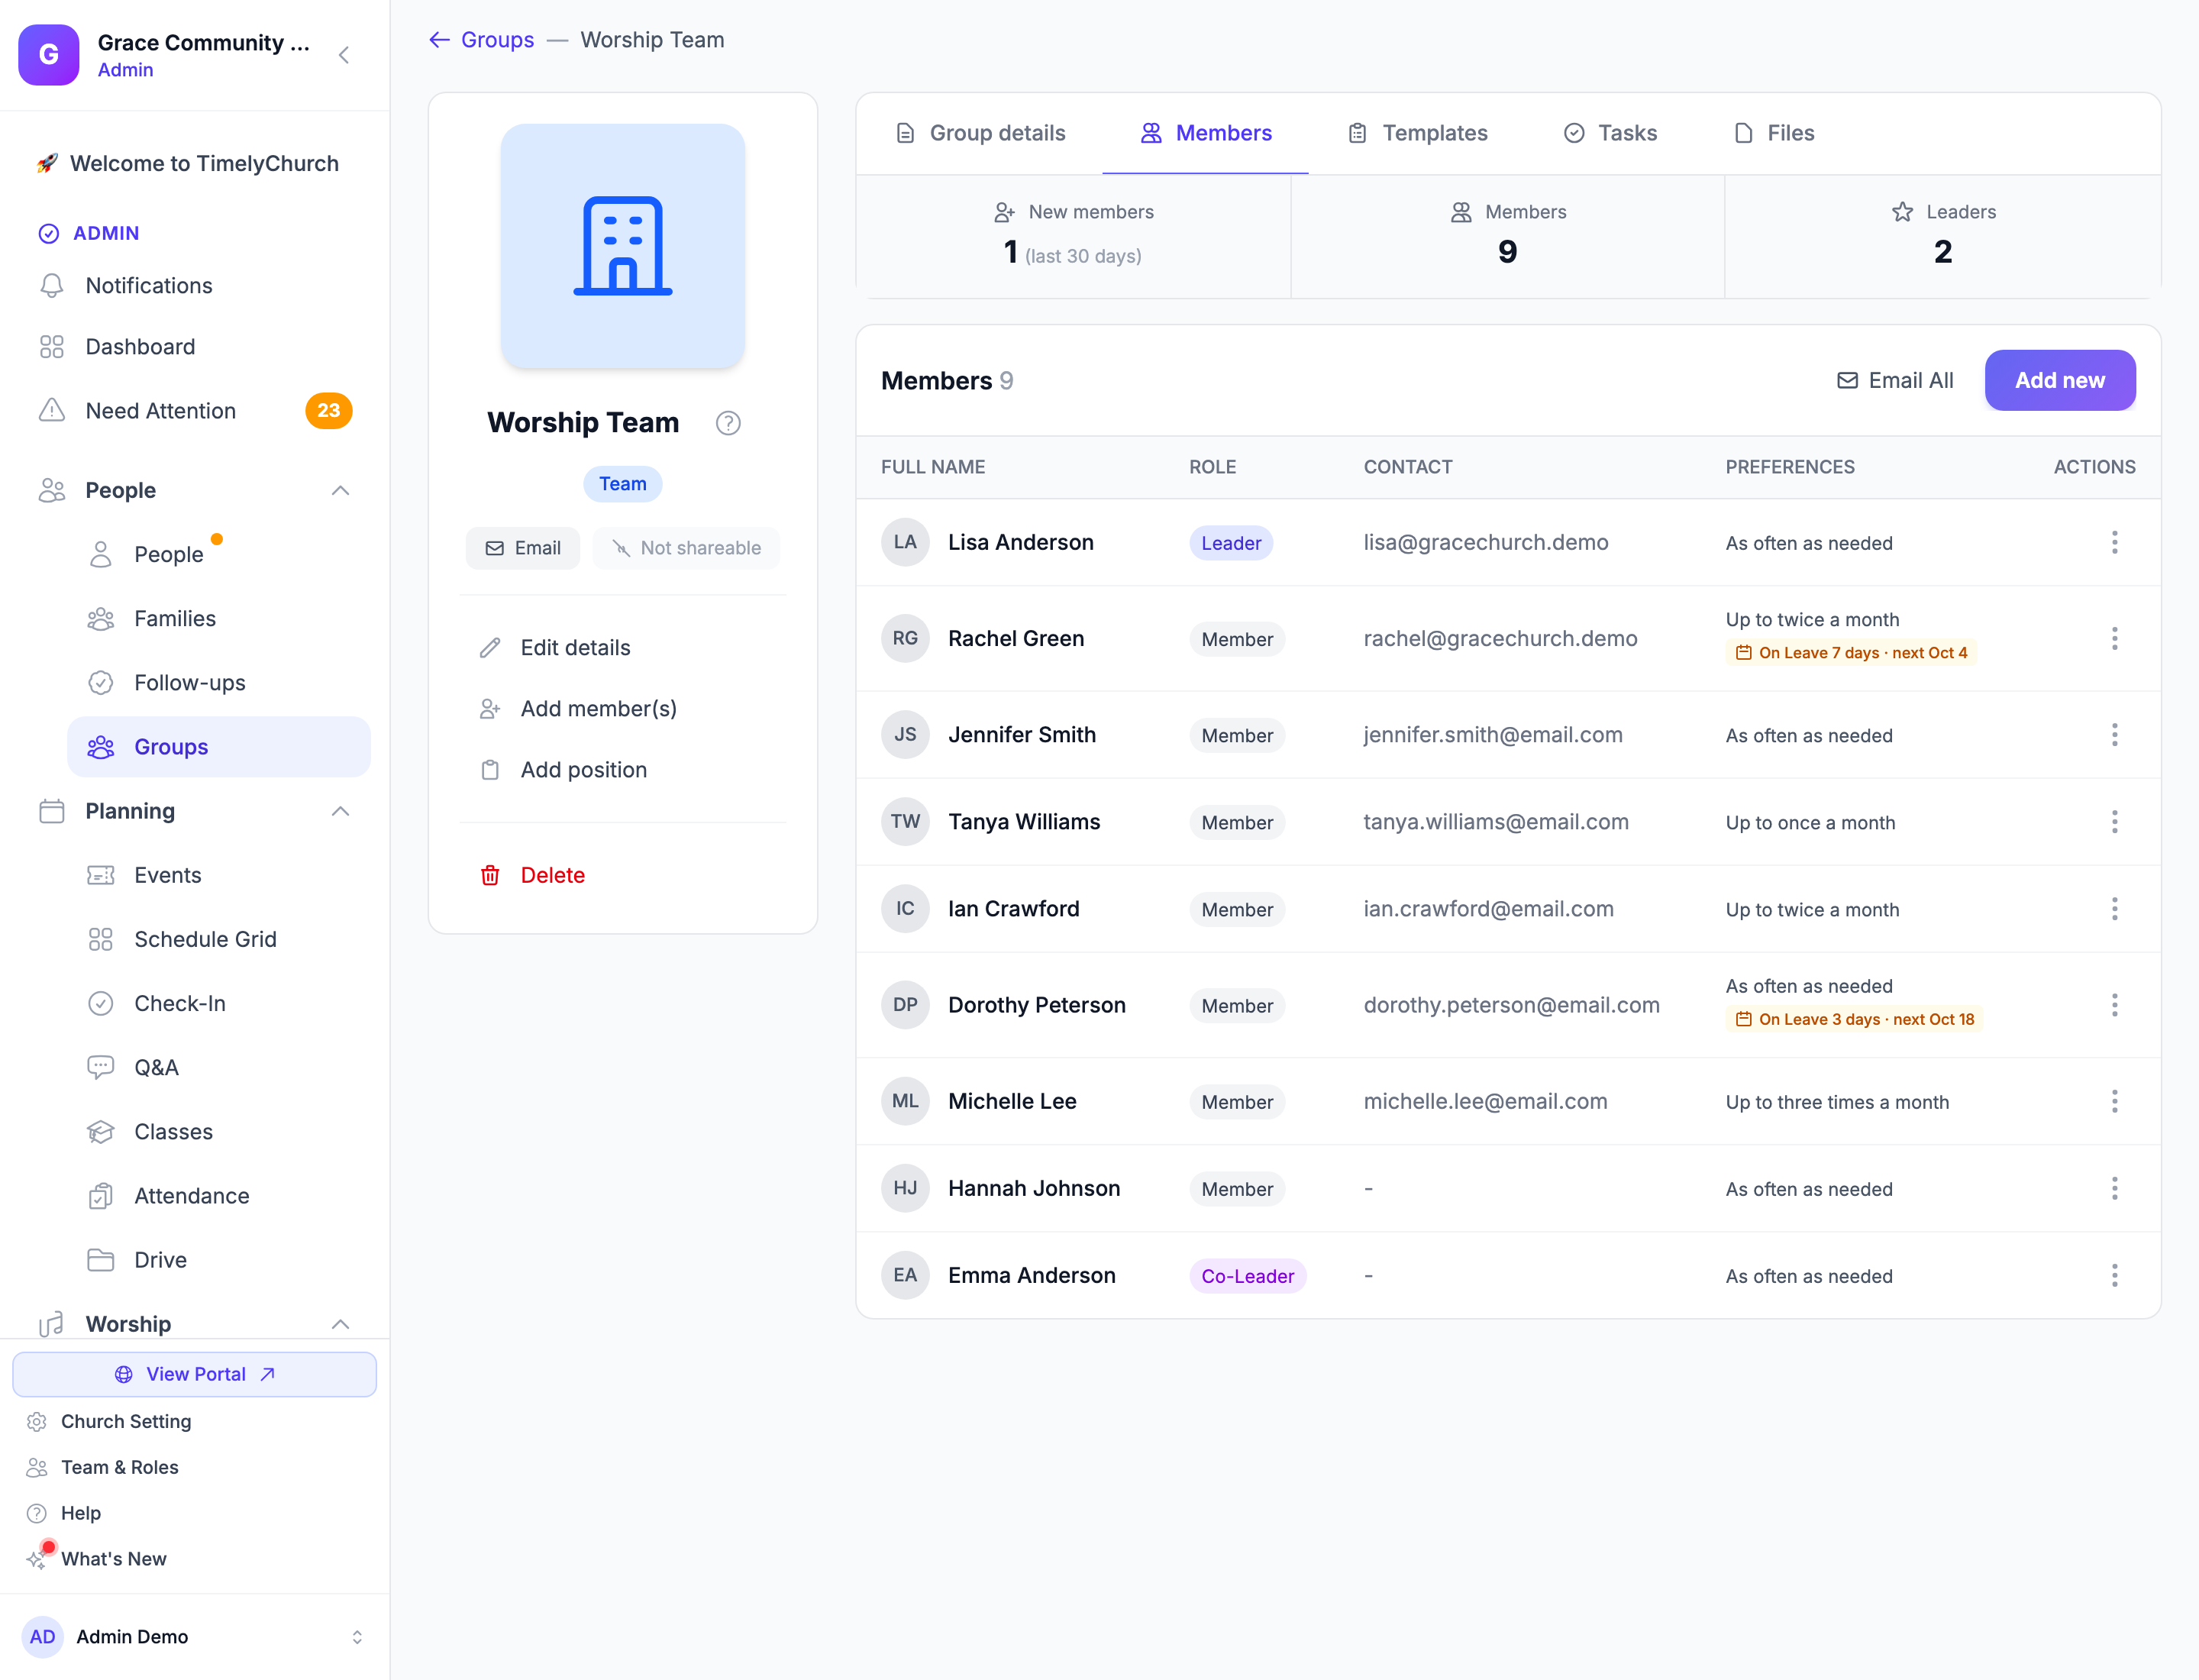
The amber badge counts:
- One-off unavailable dates the member added in their portal
- Dates blocked by an active recurring unavailability pattern
- Dates inside any date range they blocked out
A member with no upcoming blockouts has no badge — they're fully available for the next 60 days.
Tip: Encourage your team to set their availability in advance. The On Leave badges only show up when they've put it in the system — which makes your life so much easier.
For more on how members manage this, see Recurring Unavailability.
Step 3: Understand Rotation (Fair Rotation, Round Robin, or Manual Only)
Time: 3 minutes
The rotation strategy controls who the system suggests first — and who it auto-fills — when filling a position.
Heads up: Rotation settings live in the Scheduling Settings card on the Group details tab, which is admin-only. If you're a team-leader-only user, you won't see this tab. Ask your church admin to set the rotation for your team, or to grant you Groups admin access. The options below are what your admin will see.
- Open the Group details tab.
- Scroll to the Scheduling Settings card.
- Choose a Rotation Strategy:
- Fair Rotation (based on who served least recently) (recommended) — TimelyChurch tracks who served least recently and suggests them first. Everyone gets equal turns over time.
- Round Robin (fixed order) — the system cycles through the team in a set order.
- Manual Only (disable auto-fill) — turns auto-fill off so you assign everyone by hand. Use this for very small teams where rotation doesn't matter.
- Set Min Days Between Serving (default
7) to keep the same person from being scheduled too frequently. - Set Max Times Per Month — a soft cap so no one serves every single week. Leave it
0for unlimited. - Enable auto-scheduling is on by default — turn it off (or pick Manual Only) if this team should never be auto-filled. Optionally set the related checkboxes (Notify volunteers when auto-assigned, Auto-confirm assignments (skip pending status), Auto-pick replacement when someone declines).
- Click Save Scheduling Settings.
Step 4: Edit Your Team's Schedule Template
Time: 4 minutes
A schedule template is a reusable position list you can apply when setting up events, so you don't rebuild the same lineup every week. Templates can also be set to auto-apply to specific event types.
- Click the Templates tab. The heading reads Schedule Templates.
- You should see your team's existing template(s). The one marked Default is suggested first when creating events. If none exists, click New Template and create one.
- Click the chevron (⌄) on a template row to expand it and see the positions it includes.
- To edit the template's name, description, default status, or which event types it auto-applies to, click the ⋮ menu on the row and choose Edit Template, make your changes, then click Save Changes.
- In the expanded view, manage positions:
- Click Add Position to add a role. In the Add Position to Template dialog, pick the Position, set Number Needed (e.g.,
2for two vocalists), add optional Notes, and click Add Position. - Click the ✕ next to any position row to remove it.
- Click Add Position to add a role. In the Add Position to Template dialog, pick the Position, set Number Needed (e.g.,
- The ⋮ menu also lets you Duplicate the template, Set as Default, or Delete it.
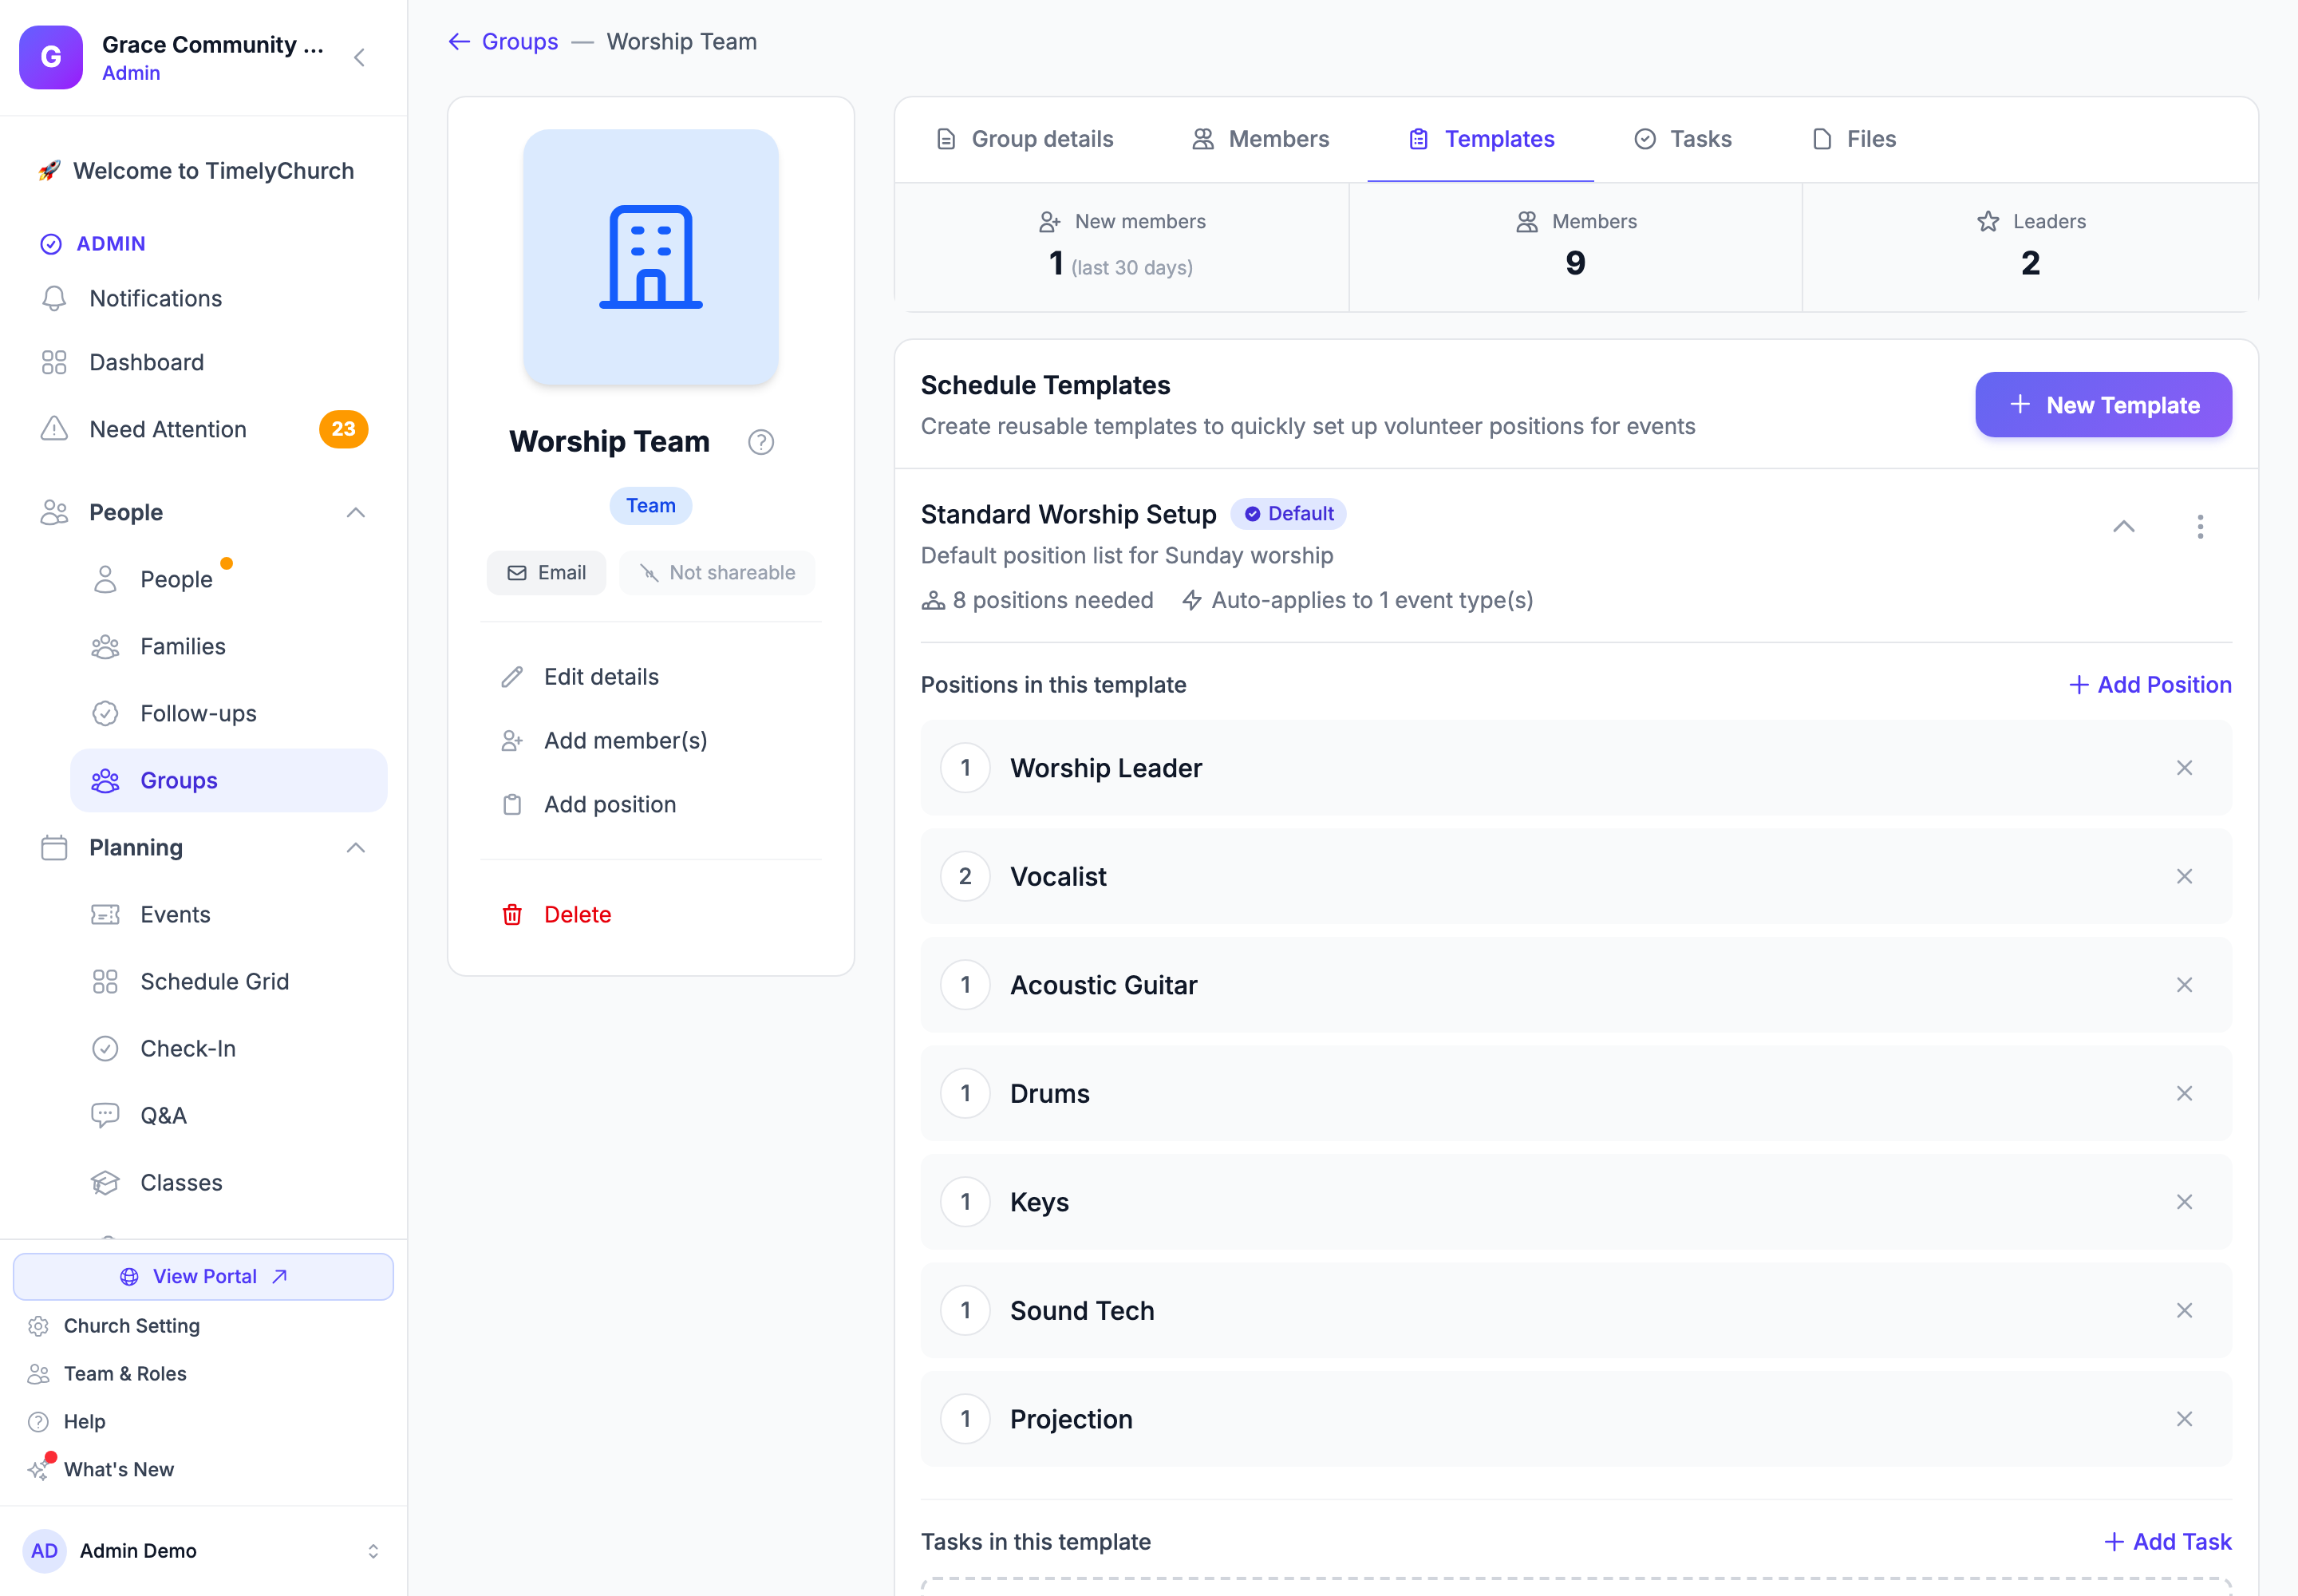
Existing events that have already had a template applied won't retroactively update — the template only flows forward to events you create or update afterward.
Step 5: View the Schedule Grid
Time: 4 minutes
The Schedule Grid is your "everything at a glance" view. It shows who's serving at each upcoming service so you can spot gaps before Sunday morning.
- In the sidebar, expand Planning and click Schedule Grid. (You can also click the Schedule Grid button in the Events page header; on a phone it folds into the More (⋮) menu.)
- The Who's serving when grid loads with:
- Rows: each team member, with their team and position
- Columns: one per upcoming event, headed with the day, date, event title, and time
- Cells: a status circle — ✓ Confirmed, ? Pending, ✕ Declined, – Unavailable, or a faint dot for an available, unassigned slot. The Legend at the bottom explains each.
- Use the arrows beside the date range to move backward or forward, Today to jump back, and the 4 / 8 / 12 wk picker to show more or fewer weeks.
- Use the Team filter button to narrow the grid to just one team if you lead more than one. If your church groups teams into ministries, a Ministry filter appears next to it.
- Click any cell to schedule that person for that service, re-invite them, send a reminder, or mark them unavailable.
- Click Auto-fill N open in the top-right to have the system fill open slots from your rotation (they go out as pending for volunteers to confirm). Teams set to Manual Only are skipped. Click Remind N to nudge anyone who hasn't responded yet.
- Click Export PDF if you want to print or share a snapshot with a co-leader.
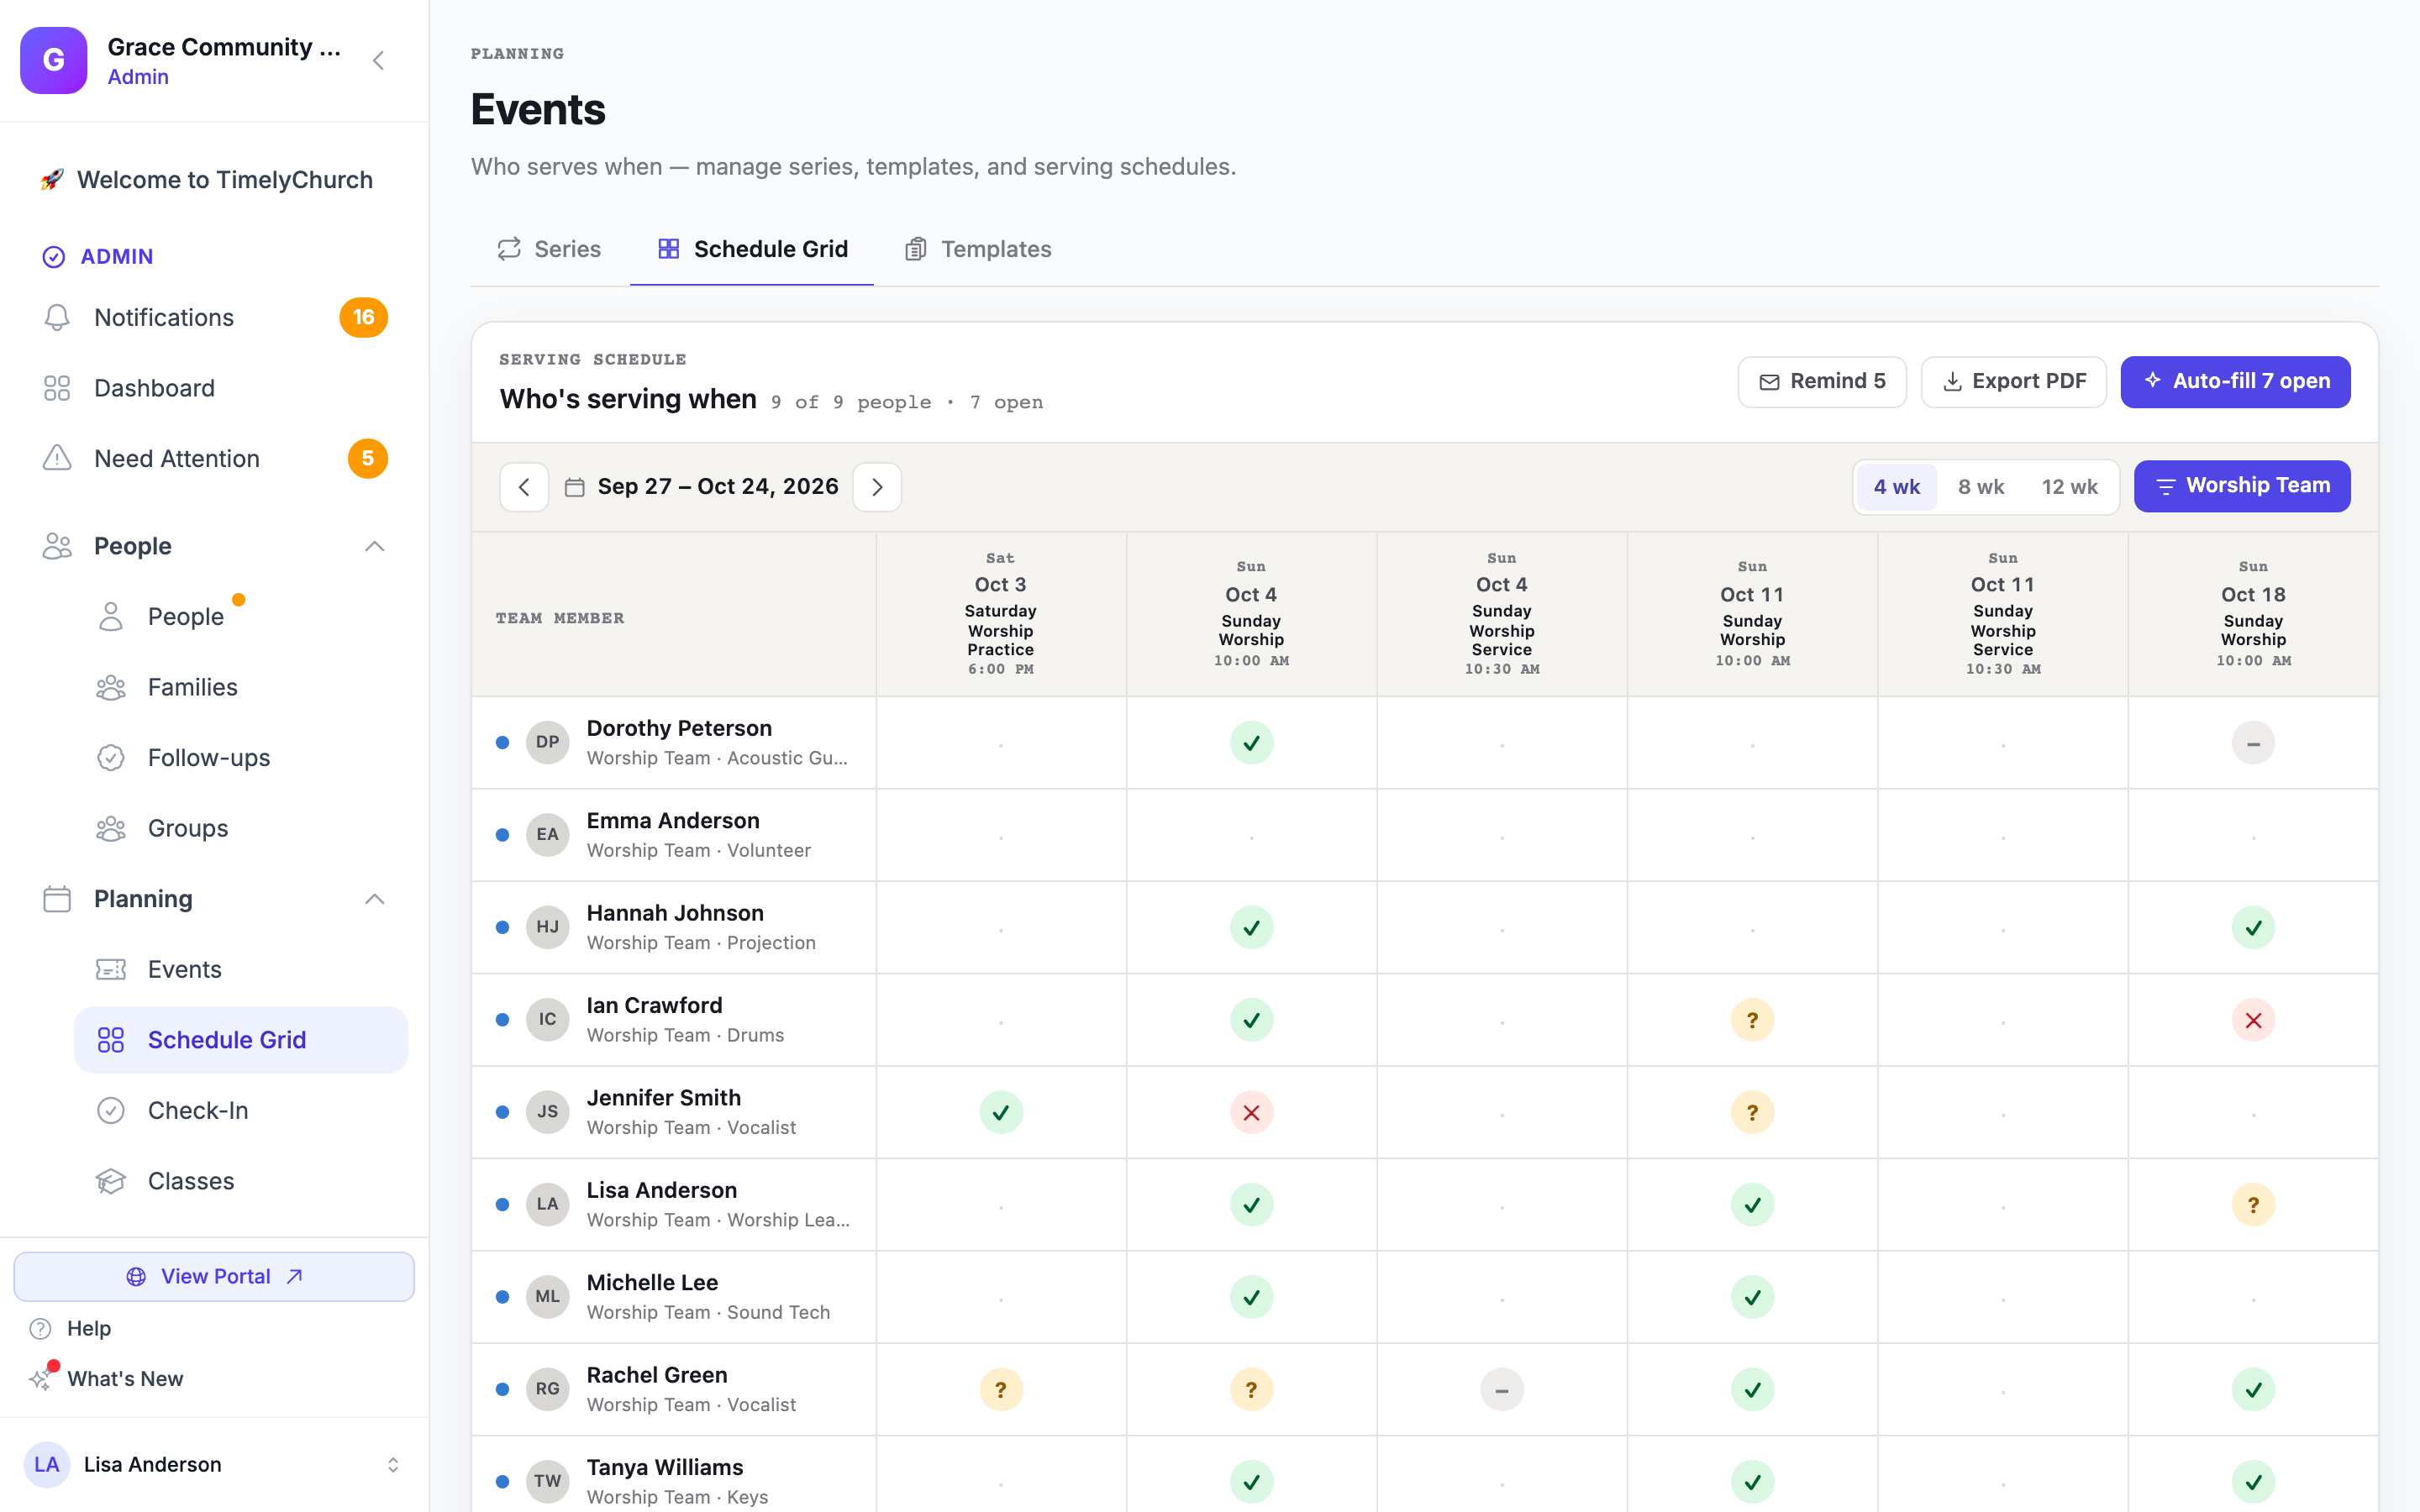
Tip: Open the Schedule Grid every Tuesday morning. Spotting a thin week on Tuesday gives you five days to fix it. Spotting it Saturday at 9 PM does not.
For deeper coverage, see Schedule Grid and Roster View.
What to Do Next
- Send Tutorial 03: Set Your Availability to every member of your team so the On Leave badges fill in.
- Bookmark Tutorial 04 for the weeks when someone bails last-minute — it shows how to fill the open slot with a fill request.
- Read Volunteer Swap and Trade Requests so you know how to handle peer-to-peer trades when team members swap among themselves.
You've got this. Your team will love how organized things feel.