
Adding People to Your Directory
TimelyChurch gives you three ways to add people to your directory: Quick Add for speed, the full Add Person form for detail, and CSV Import for adding many people at once. All three live under the Add Person ▾ dropdown at the top right of the People page -- just pick the option that fits your situation.
You only see the options your role allows: Add Person and Quick Add Multiple need permission to create people, and Import from File needs the People & Families Import permission.
Method 1: Quick Add (Multiple People at Once)
Quick Add is ideal when you need to enter several people fast -- for example, after a Sunday service when you have a stack of visitor cards.
- In the left sidebar, open People and click People.
- Click the Add Person ▾ button, then choose Quick Add Multiple.
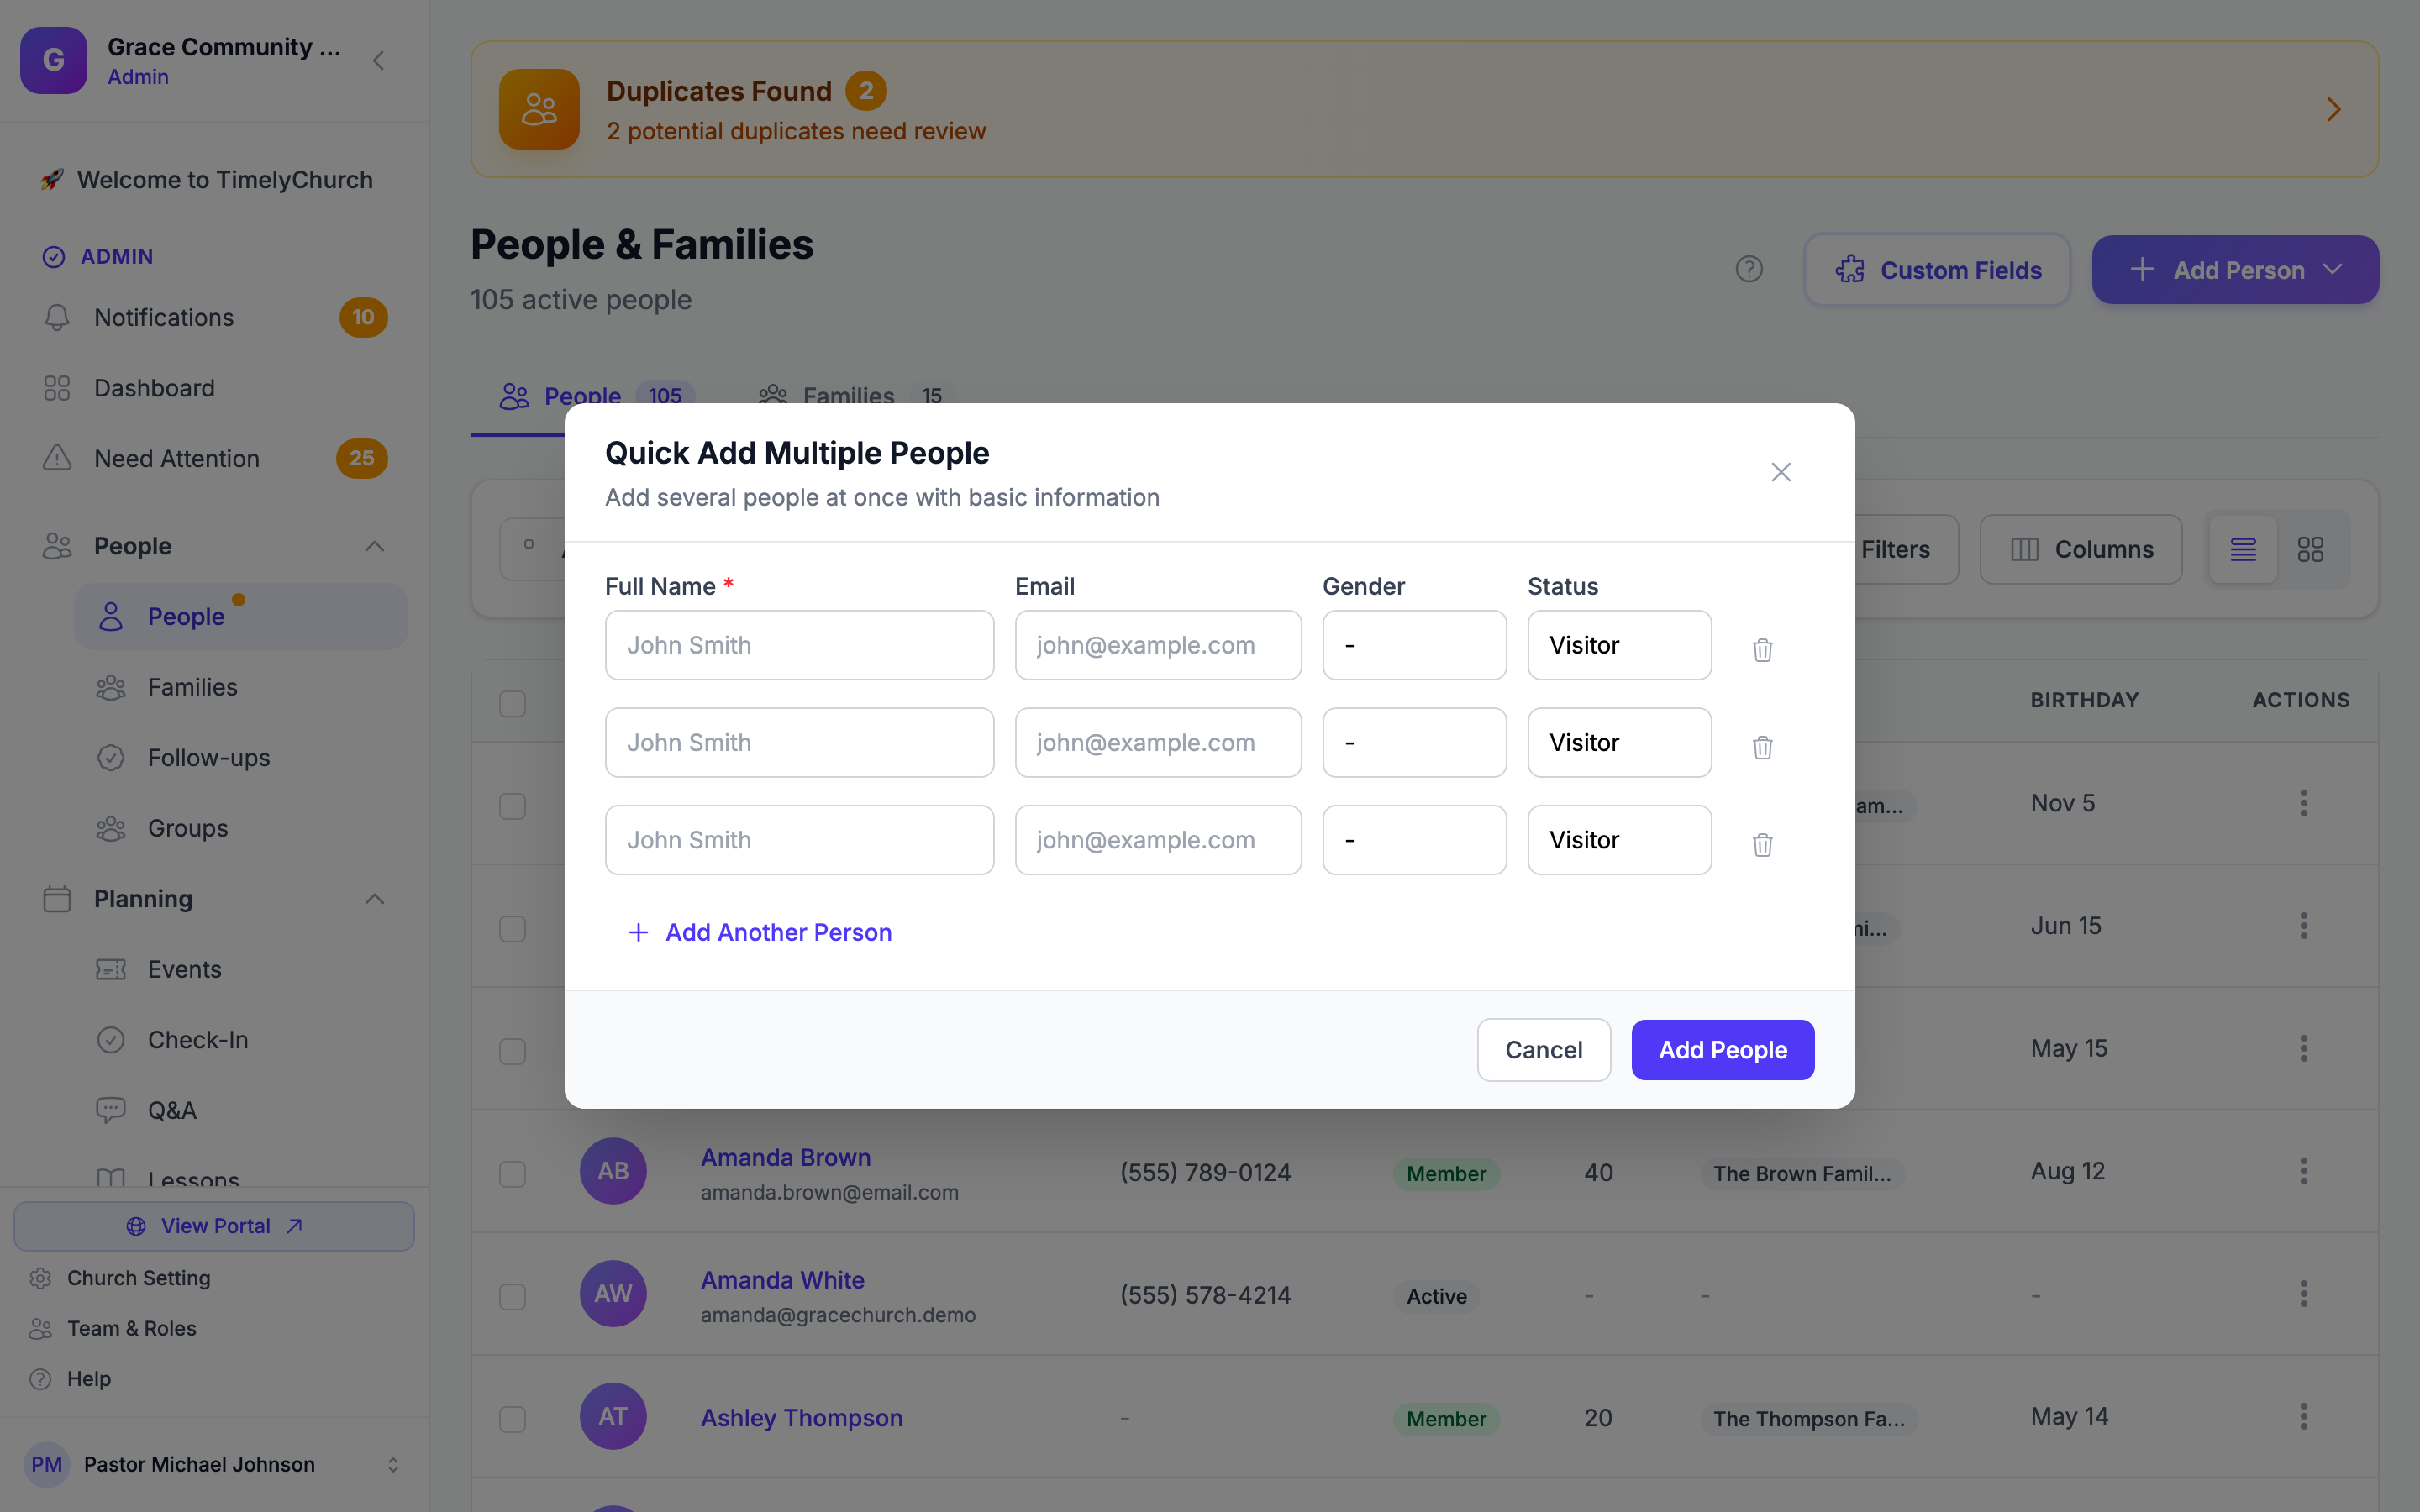
- A dialog titled Quick Add Multiple People opens with several blank rows.
- For each person, fill in:
- Full Name (required) -- Type the person's first and last name (e.g., "John Smith"). TimelyChurch will automatically split this into first and last name fields.
- Email (optional)
- Gender (optional)
- Status (optional) -- Choose Visitor, Regular, or Member. Defaults to "Visitor."
- Click Add Another Person to add more rows, as many as you need.
- Click Add People.
TimelyChurch will automatically check for duplicates as it adds each person. If a person with the same name or email already exists, that entry will be skipped and you will see a notification telling you how many duplicates were found.
Quick Add never sends welcome emails.
Tip: Quick Add is great for first-time visitors. Enter their name and email from a connection card, and they are immediately in your system and ready for a follow-up.
Method 2: Add Person (Full Details)
Use the Add Person form when you want to enter information for a single individual.
- In the left sidebar, open People and click People.
- Click the Add Person ▾ button, then choose Add Person.
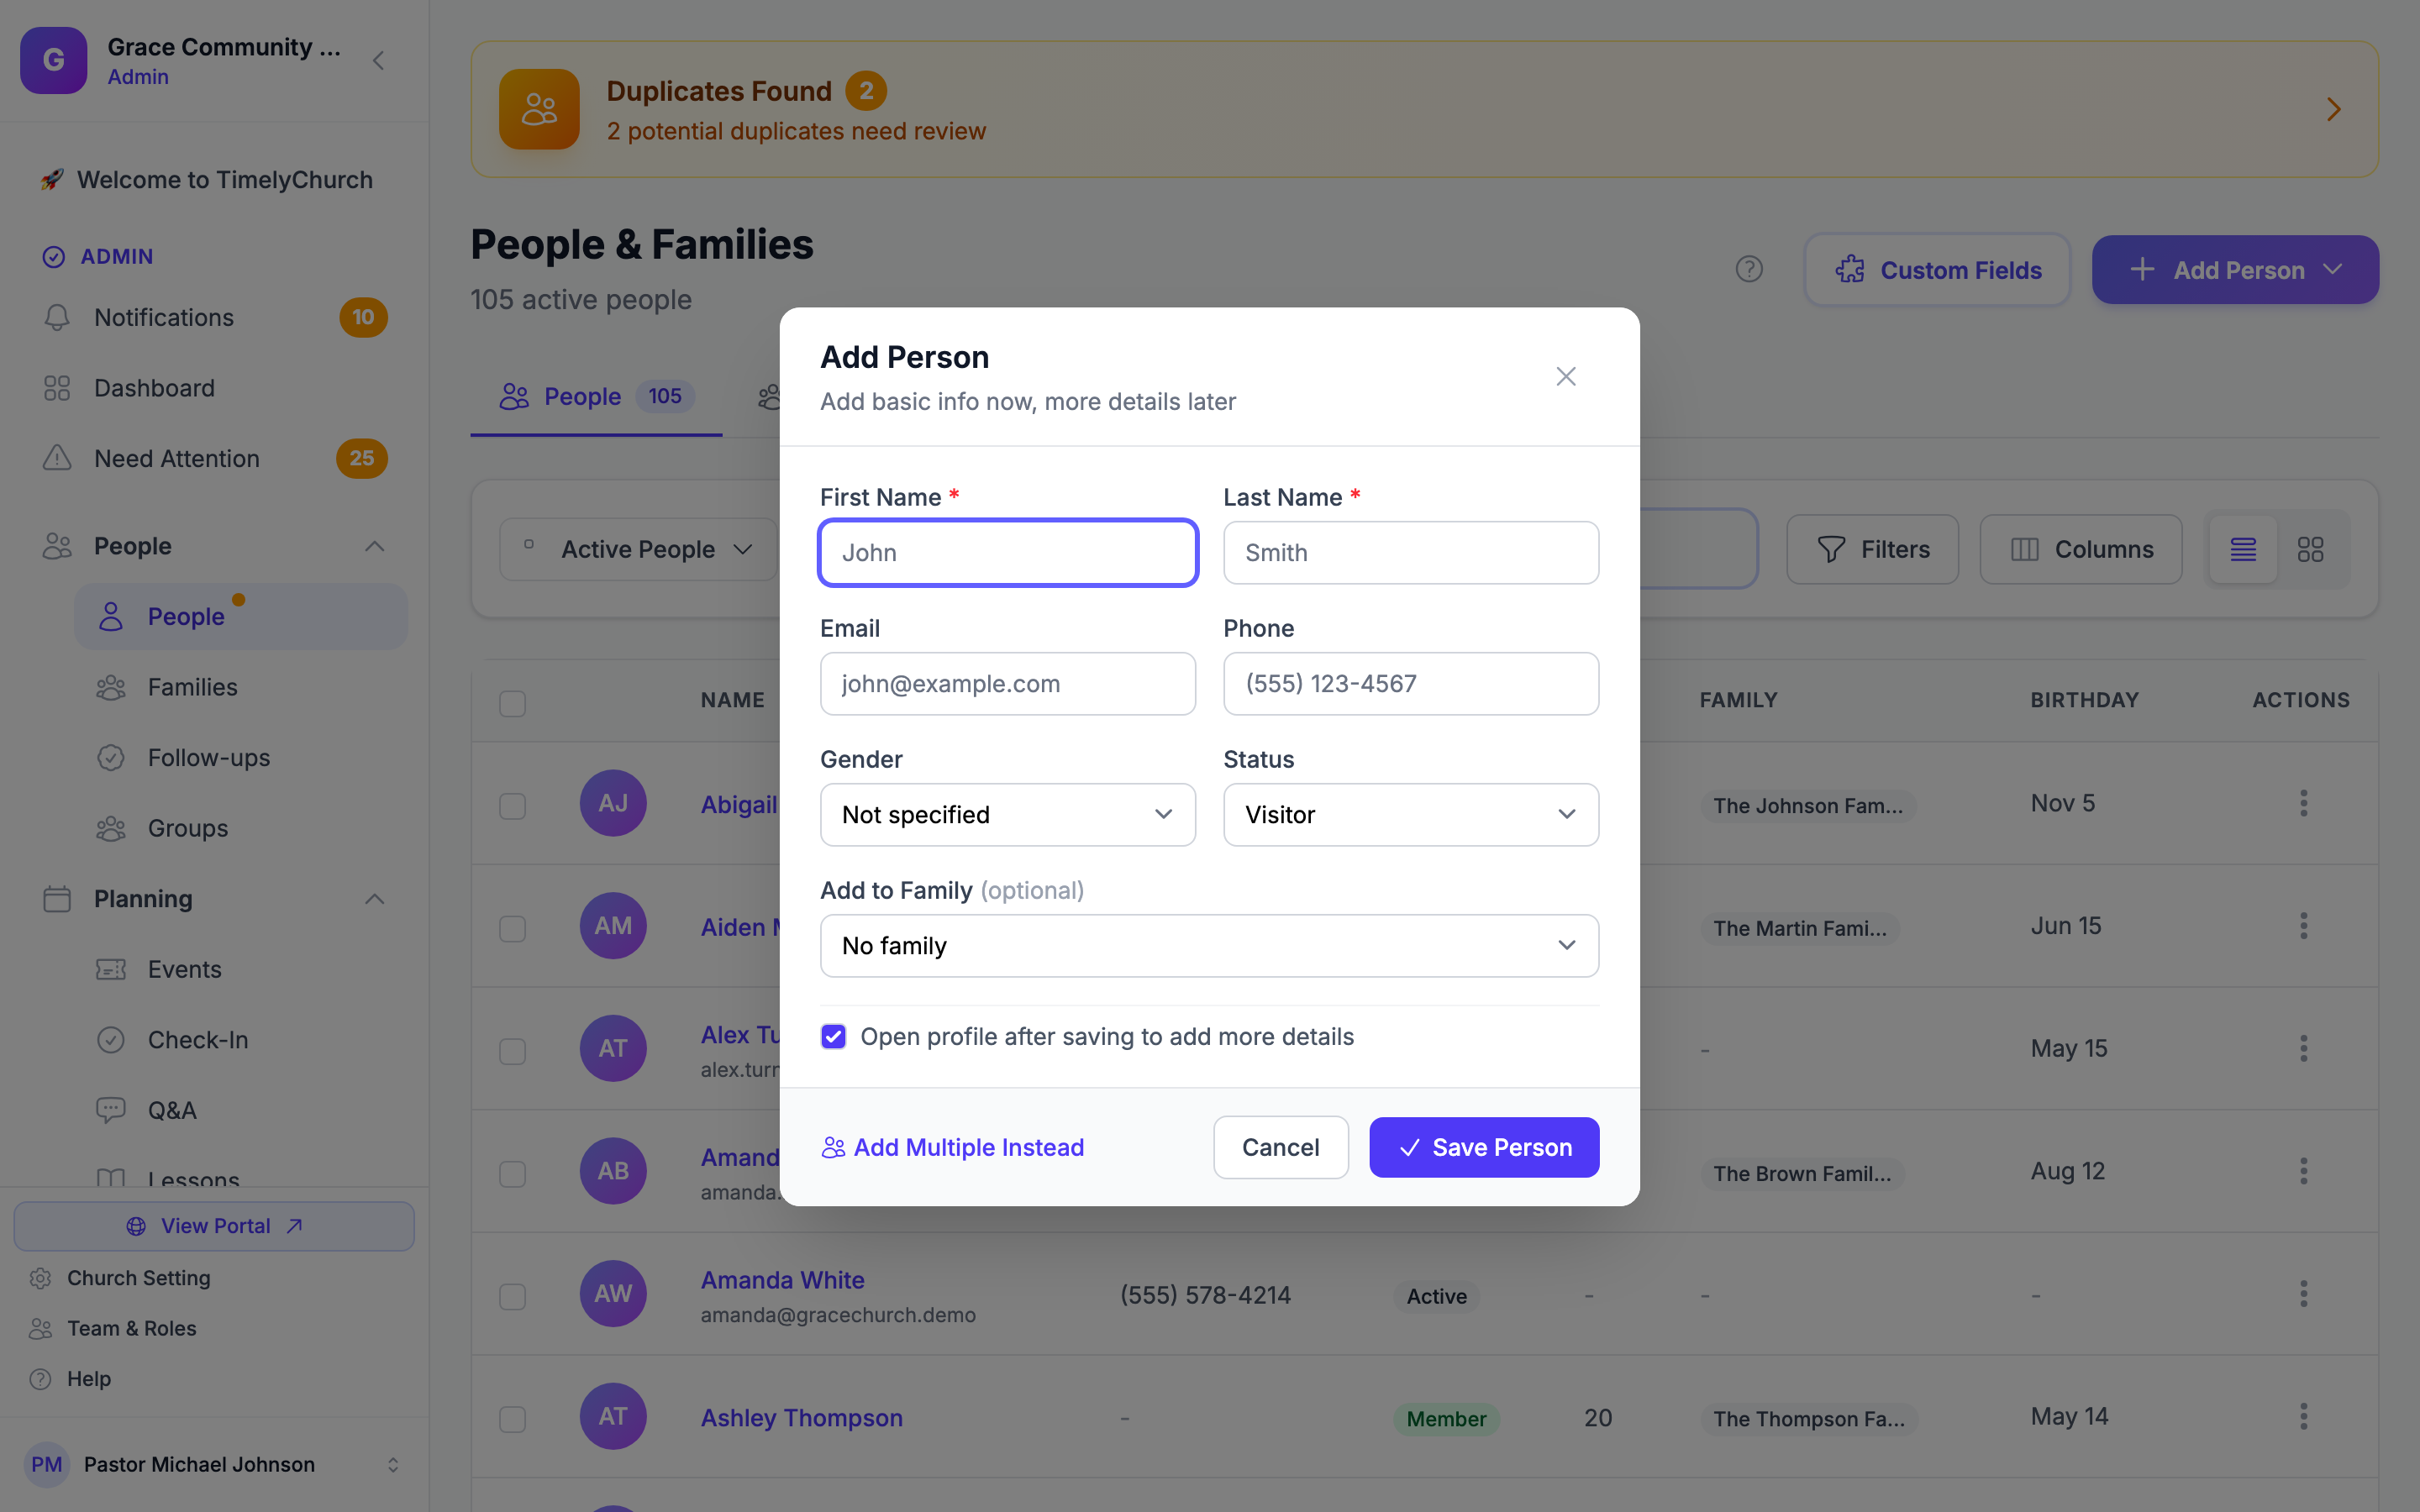
- A dialog opens ("Add basic info now, more details later"). Fill in the available fields:
- First Name (required)
- Last Name (required)
- Email (optional)
- Phone (optional)
- Gender (optional) -- Not specified, Male, or Female. (TimelyChurch currently supports these two values only. Imports from systems that use additional gender labels will need to be mapped or left blank.)
- Status (optional) -- Visitor, Regular Attendee, Member, or Inactive. Defaults to "Visitor." (More membership statuses are available later from the person's profile.)
- Add to Family (optional) -- Choose an existing family to add this person to.
- Decide whether to send a welcome email:
- Send a welcome email is ticked by default. The email includes a one-click button to connect on Telegram, and it is only sent if you entered an email address. Untick it if you don't want to email this person yet.
- Decide whether to keep going:
- Leave Open profile after saving to add more details checked (the default) to jump straight to the new person's full profile, where you can add an address, birthdate, custom fields, a photo, and more.
- Uncheck it to save and stay on the People directory.
- Click Save Person.
If you realise you have several people to enter, click Add Multiple Instead at the bottom of the dialog to switch to Quick Add.
If a matching person already exists, the dialog stays open with a warning and a link to the existing profile (View name →):
- Same email address -- The person is not saved: "[Name] already uses that email address. Open their profile instead of creating a duplicate." Two people in your church cannot share one email address.
- Same name -- You are asked to confirm, because two different people can share a name. Click Add anyway to save them as a separate person.
Tip: If you select a family when adding a person, they will automatically be linked as a member of that family. You can change their family role later from their profile.
Adding a Profile Photo
After saving a person, open their profile, click Edit Profile, and use the Upload photo button on the photo.
- Accepted formats -- Standard image files (JPEG, PNG, GIF, WebP). A normal phone photo is fine; very large files are refused.
- Photos can be removed at any time with the Remove photo button in the same place.
Members can also upload their own photo from My Profile in the member portal.
Method 3: CSV Import (Bulk)
CSV import is the fastest way to bring in a large number of people, especially when moving from another church app. TimelyChurch can automatically detect exports from several church apps.
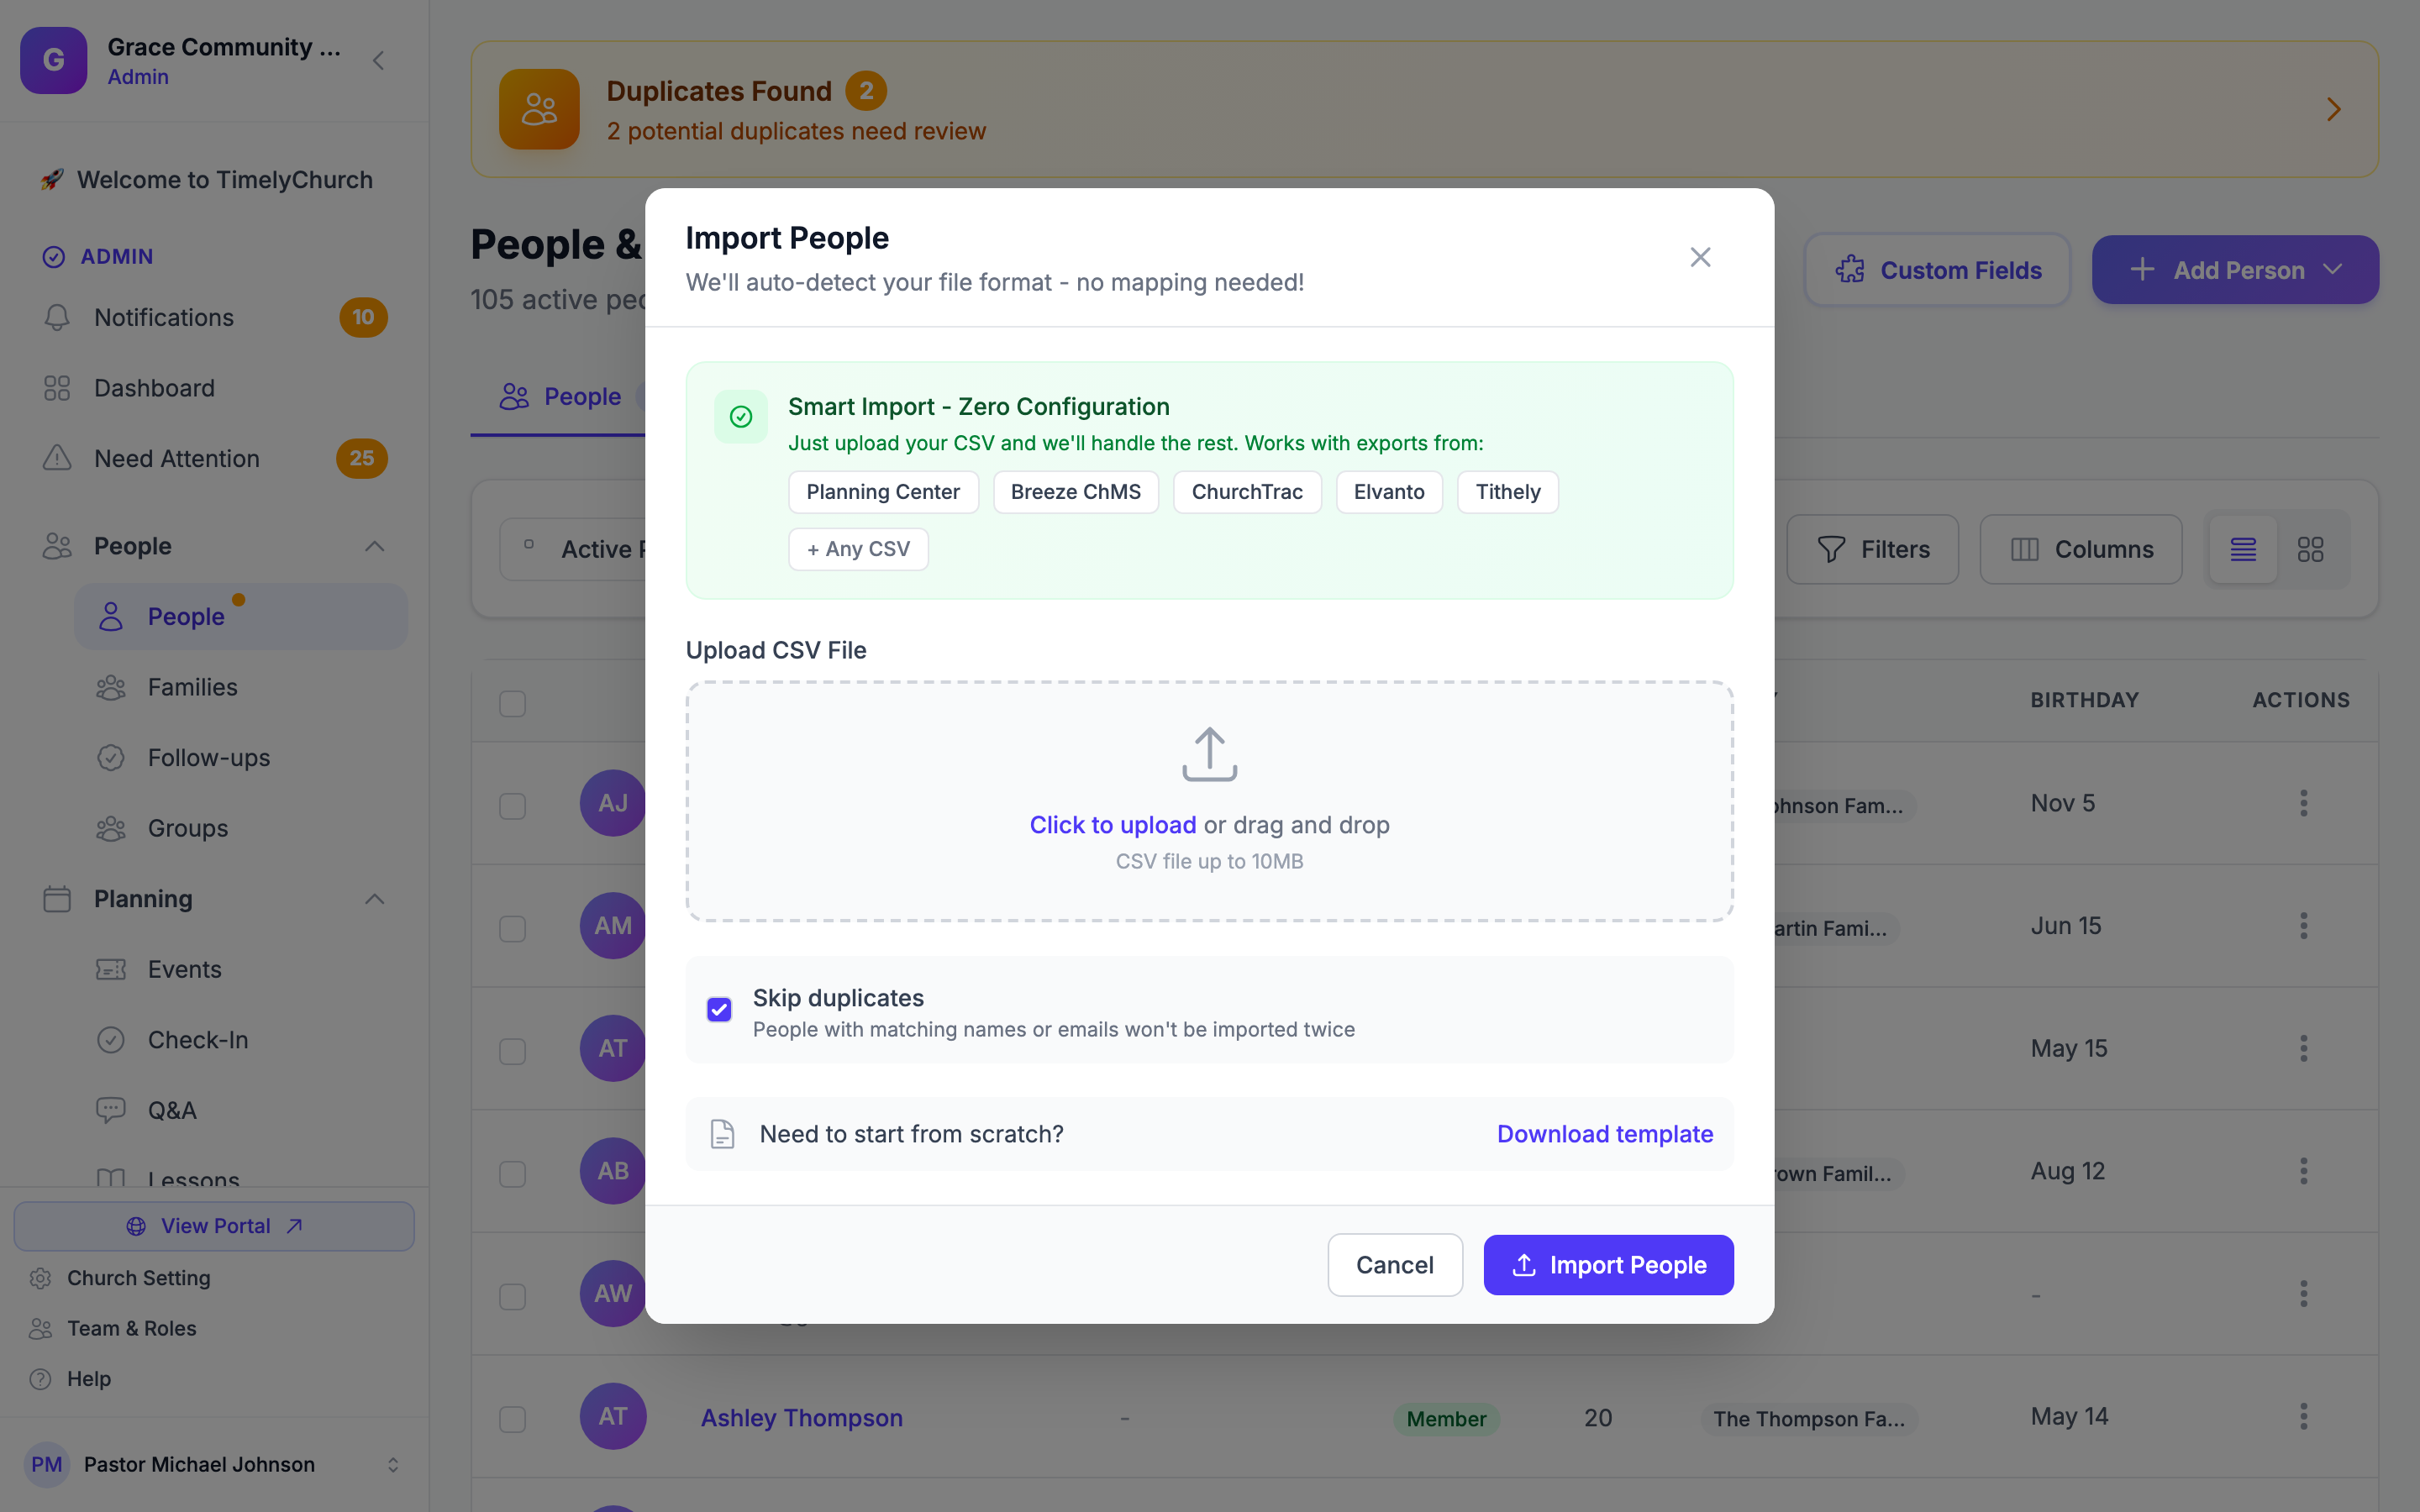
To open the importer, go to People, click the Add Person ▾ button, and choose Import from File. The Import People dialog opens.
Step 1: Download the Template (Optional)
Inside the Import People dialog, click Download template to get a pre-formatted CSV file.
The template includes these columns:
| Column | Required | Example |
|---|---|---|
| first_name | Yes | John |
| last_name | Yes | Smith |
| No | [email protected] | |
| phone_mobile | No | (555) 123-4567 |
| gender | No | male |
| membership_status | No | visitor |
| birthdate | No | 1990-05-15 |
| address_line_1 | No | 123 Main Street |
| city | No | Springfield |
| state | No | IL |
| postal_code | No | 62701 |
Tip: You do not have to use the TimelyChurch template. If you are exporting from another system, you can upload that file directly. TimelyChurch will try to match the columns automatically.
Step 2: Prepare Your Data
- Open the template (or your exported file) in a spreadsheet application like Excel or Google Sheets.
- Fill in your data. At minimum, every row needs a first name and last name.
- For the gender column, enter
maleorfemale(these are the only two values currently supported). - For the membership status column, enter a status such as
visitor,member, orregular_attendee(use the lowercase value that matches the status you want; people you leave blank default to Visitor). - For the birthdate column, use the format
YYYY-MM-DD(for example,1990-05-15). - Save the file as a CSV (Comma Separated Values).
Step 3: Upload Your File
- In the Import People dialog (People → Add Person ▾ → Import from File), click Click to upload or drag and drop your CSV file onto the upload area. The maximum file size is 10 MB.
- Leave the Skip duplicates option checked (recommended). When enabled, anyone whose name or email already exists in your directory will be skipped instead of creating a duplicate.
- Click Import People.
Step 4: Review Results
After the import completes, TimelyChurch shows a confirmation message summarizing what happened -- for example, how many people were imported, how many families were created (if your file included household data), how many duplicates were skipped, and how many rows were skipped due to errors.
If your file came from a recognized church app, the same message also tells you which format it detected (for example, "Detected Planning Center format").
Plan Limits
Your plan includes a maximum number of people (see Church Setting → Billing & Plans). If your directory is already at that limit, the import -- and adding a person -- is refused with a message asking you to upgrade. If you are close to the limit, the import adds people only up to the limit.
Auto-Detection of Other Church App Exports
When you upload a file, TimelyChurch automatically recognizes CSV exports from these apps and maps their columns accordingly:
- Planning Center
- Breeze ChMS
- ChurchTrac
- Elvanto
- Tithely
- Realm (ACS)
- Pushpay ChMS (CCB)
- Servant Keeper
- Church Windows
When TimelyChurch detects one of these formats, it will map the columns automatically. You do not need to reformat anything -- just export from your old system and import directly into TimelyChurch. Any other CSV works too; TimelyChurch will do its best to match the columns it recognizes.
If your file includes household or family data, TimelyChurch will also create family records and link people to their families automatically.
Tip: When migrating from another system, export your full people list as a CSV and import it directly. TimelyChurch handles the column mapping so you do not have to manually reformat anything.
What Happens After Adding People
- New people default to "Active" and "Show me in directory." You can change these settings on their profile.
- Duplicate checking happens automatically. If TimelyChurch finds a potential match, it will alert you rather than silently creating duplicates.
- Welcome emails go out only from the single Add Person dialog, and only when Send a welcome email is ticked. Quick Add and imports never email anyone.