
Setting Up Your Church Profile
Audience: This article is for church administrators.
Your church profile contains the foundational information that appears throughout TimelyChurch -- on public pages, in email communications, and in the admin panel header. Keeping this information accurate ensures your congregation and visitors always have the right details.
Accessing the Church Profile
- At the bottom of the left sidebar, click Church Setting.
- Select the Profile tab (this is the default tab when you open Church Settings).
Basic Information
The following fields are available on the Profile tab:
- Church Name (required)
- Contact Email (required)
- Phone Number
- Website
- Address
- About Your Church
- Timezone (required)
- Country (required)
- Default language
- Church Logo (Pro plan)
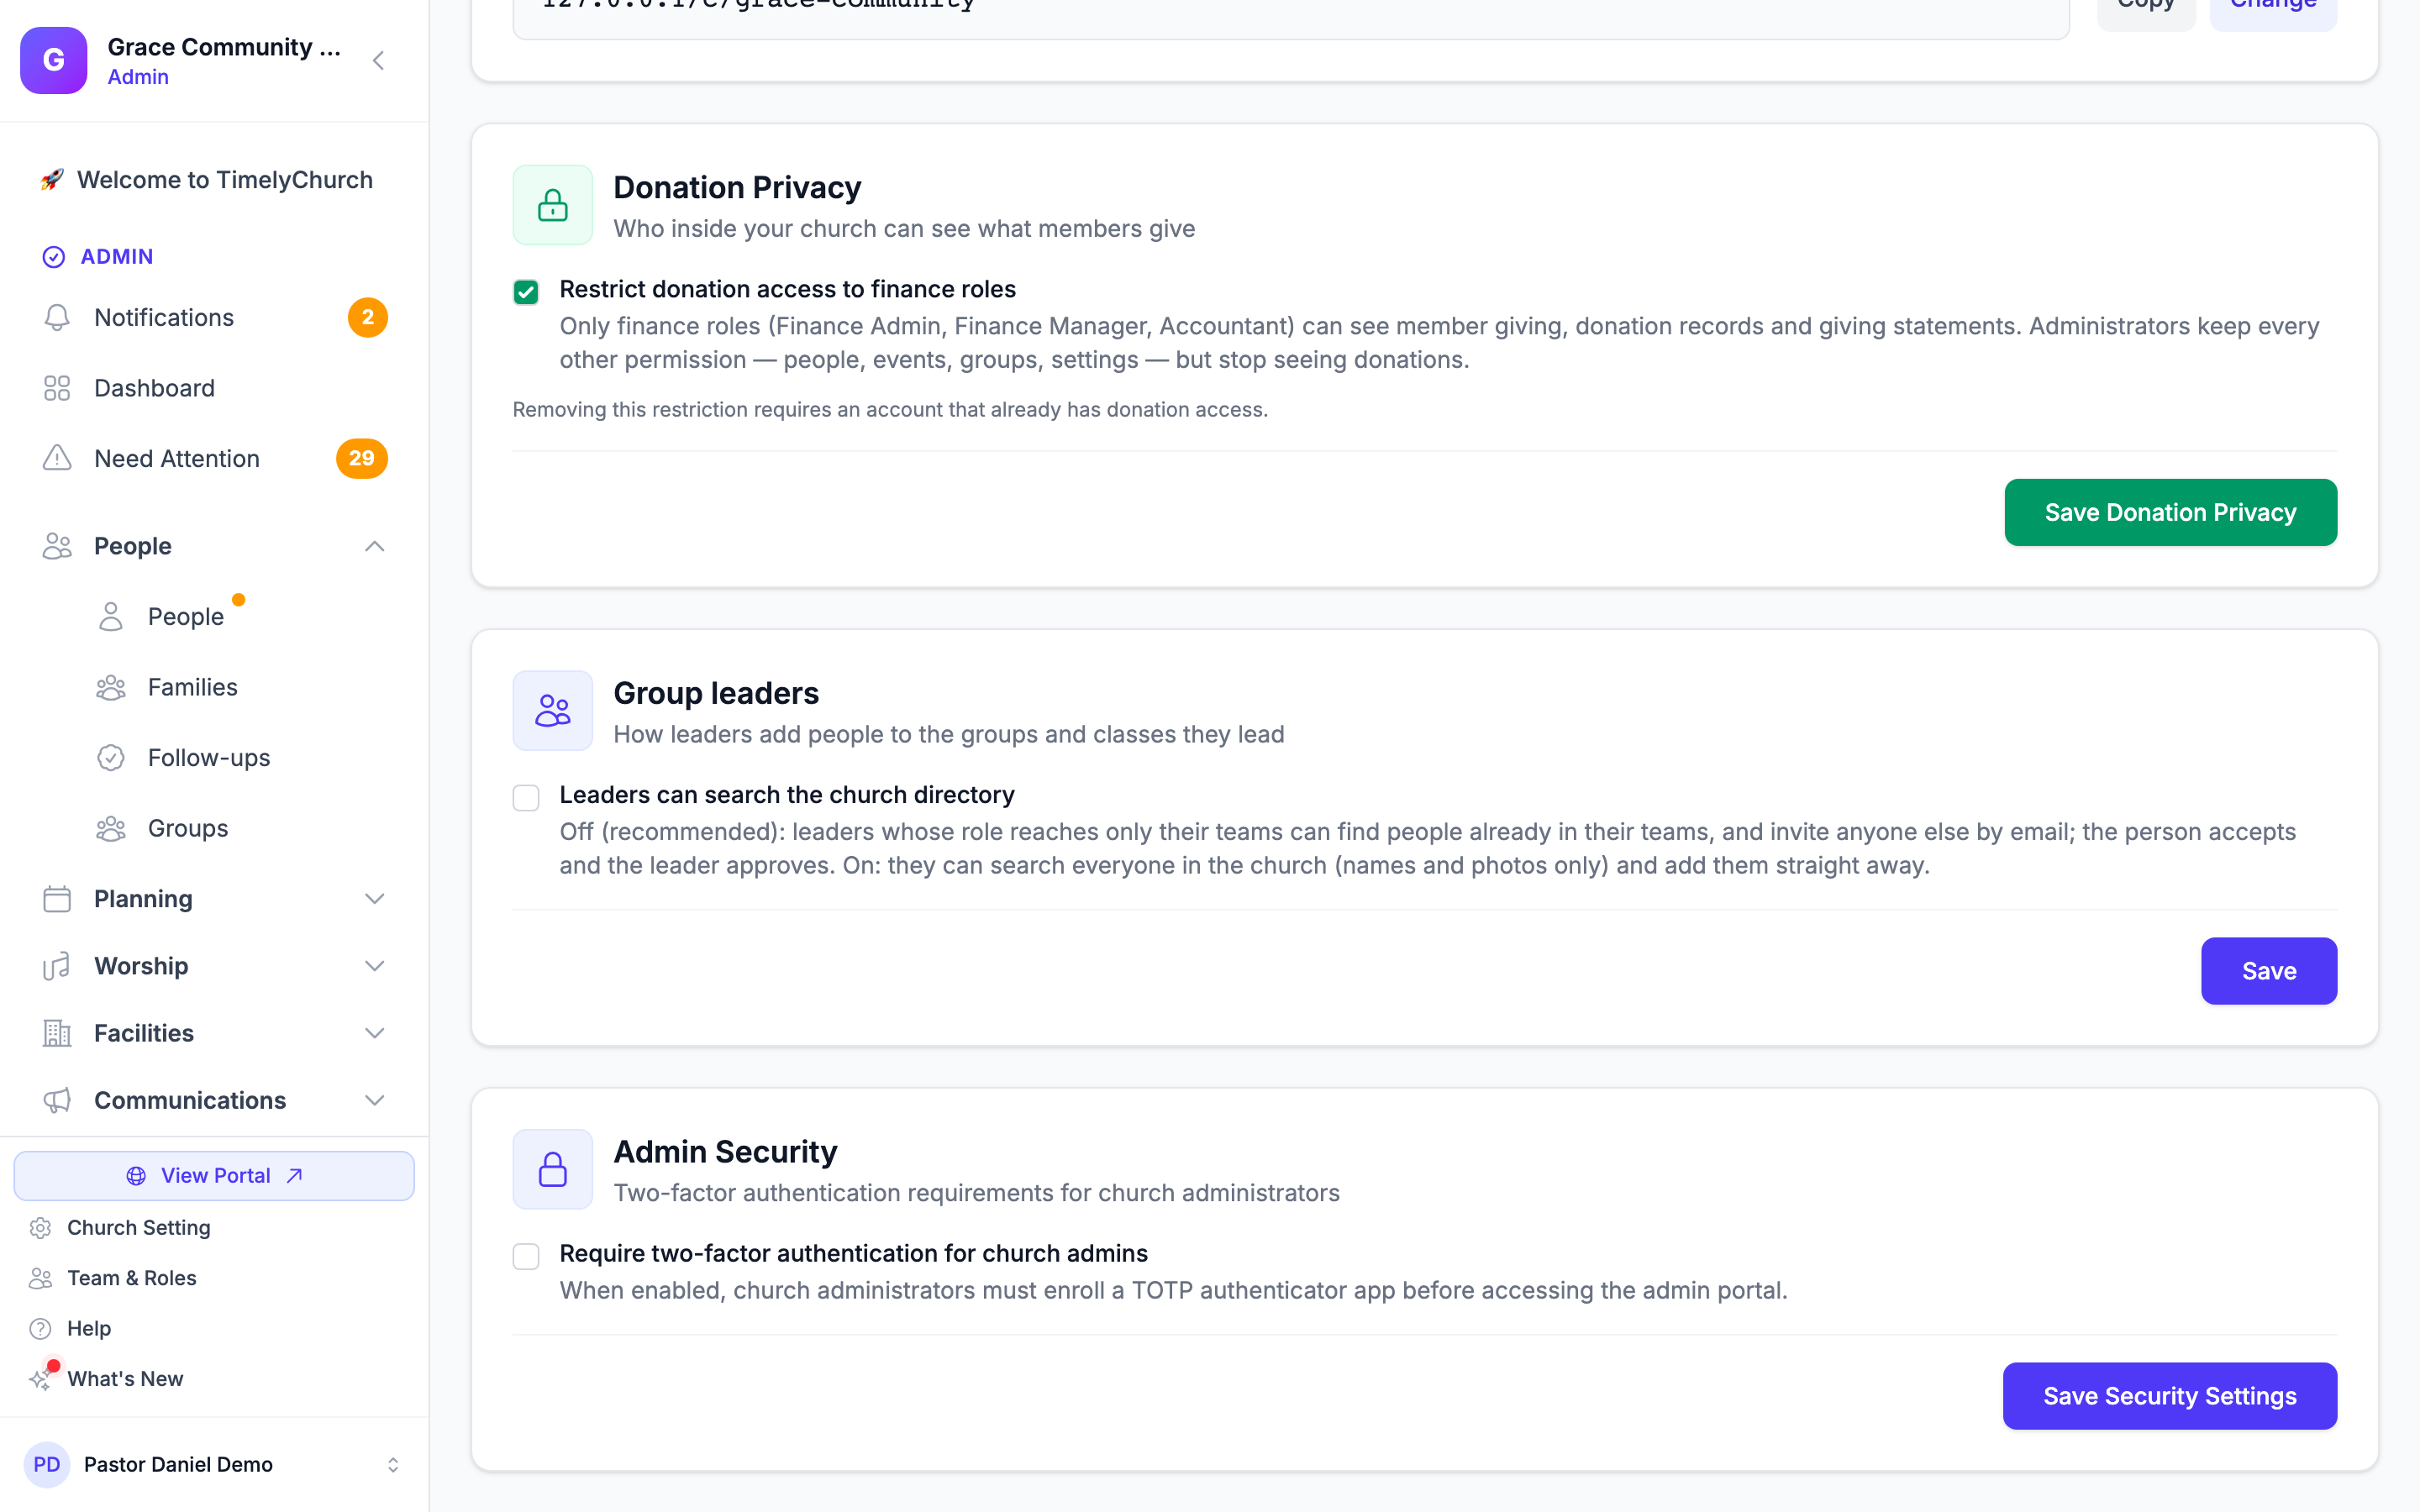
Below the main form, the Profile tab also has separate cards for Your church web address, Donation Privacy, Group leaders and Admin Security, each with its own save button (see below).
Church Name (Required)
The official name of your church. This name:
- Appears in the admin panel header and navigation
- Is displayed on all public-facing pages
- Is used in email invitations sent to team members
- Was used to suggest your web address when your church was first created (e.g., "Grace Community Church" suggested
grace-community-church)
Changing the church name does not change your web address. The two are separate once your church exists: editing the name here leaves your web address exactly as it is. To change the web address itself — and to see what happens to links and QR codes that already use the old one — see Your Church Web Address.
Contact Email (Required)
The primary email address for your church. This is used for:
- System notifications
- Display on public pages (if public sharing is enabled)
- Reply-to address for automated messages
Phone Number
Your church's main phone number. Enter it in a standard format such as (555) 123-4567.
Website
Your church's external website address. You can type it with or without https:// -- if you leave it off, https:// is added for you when you save.
Location & Details
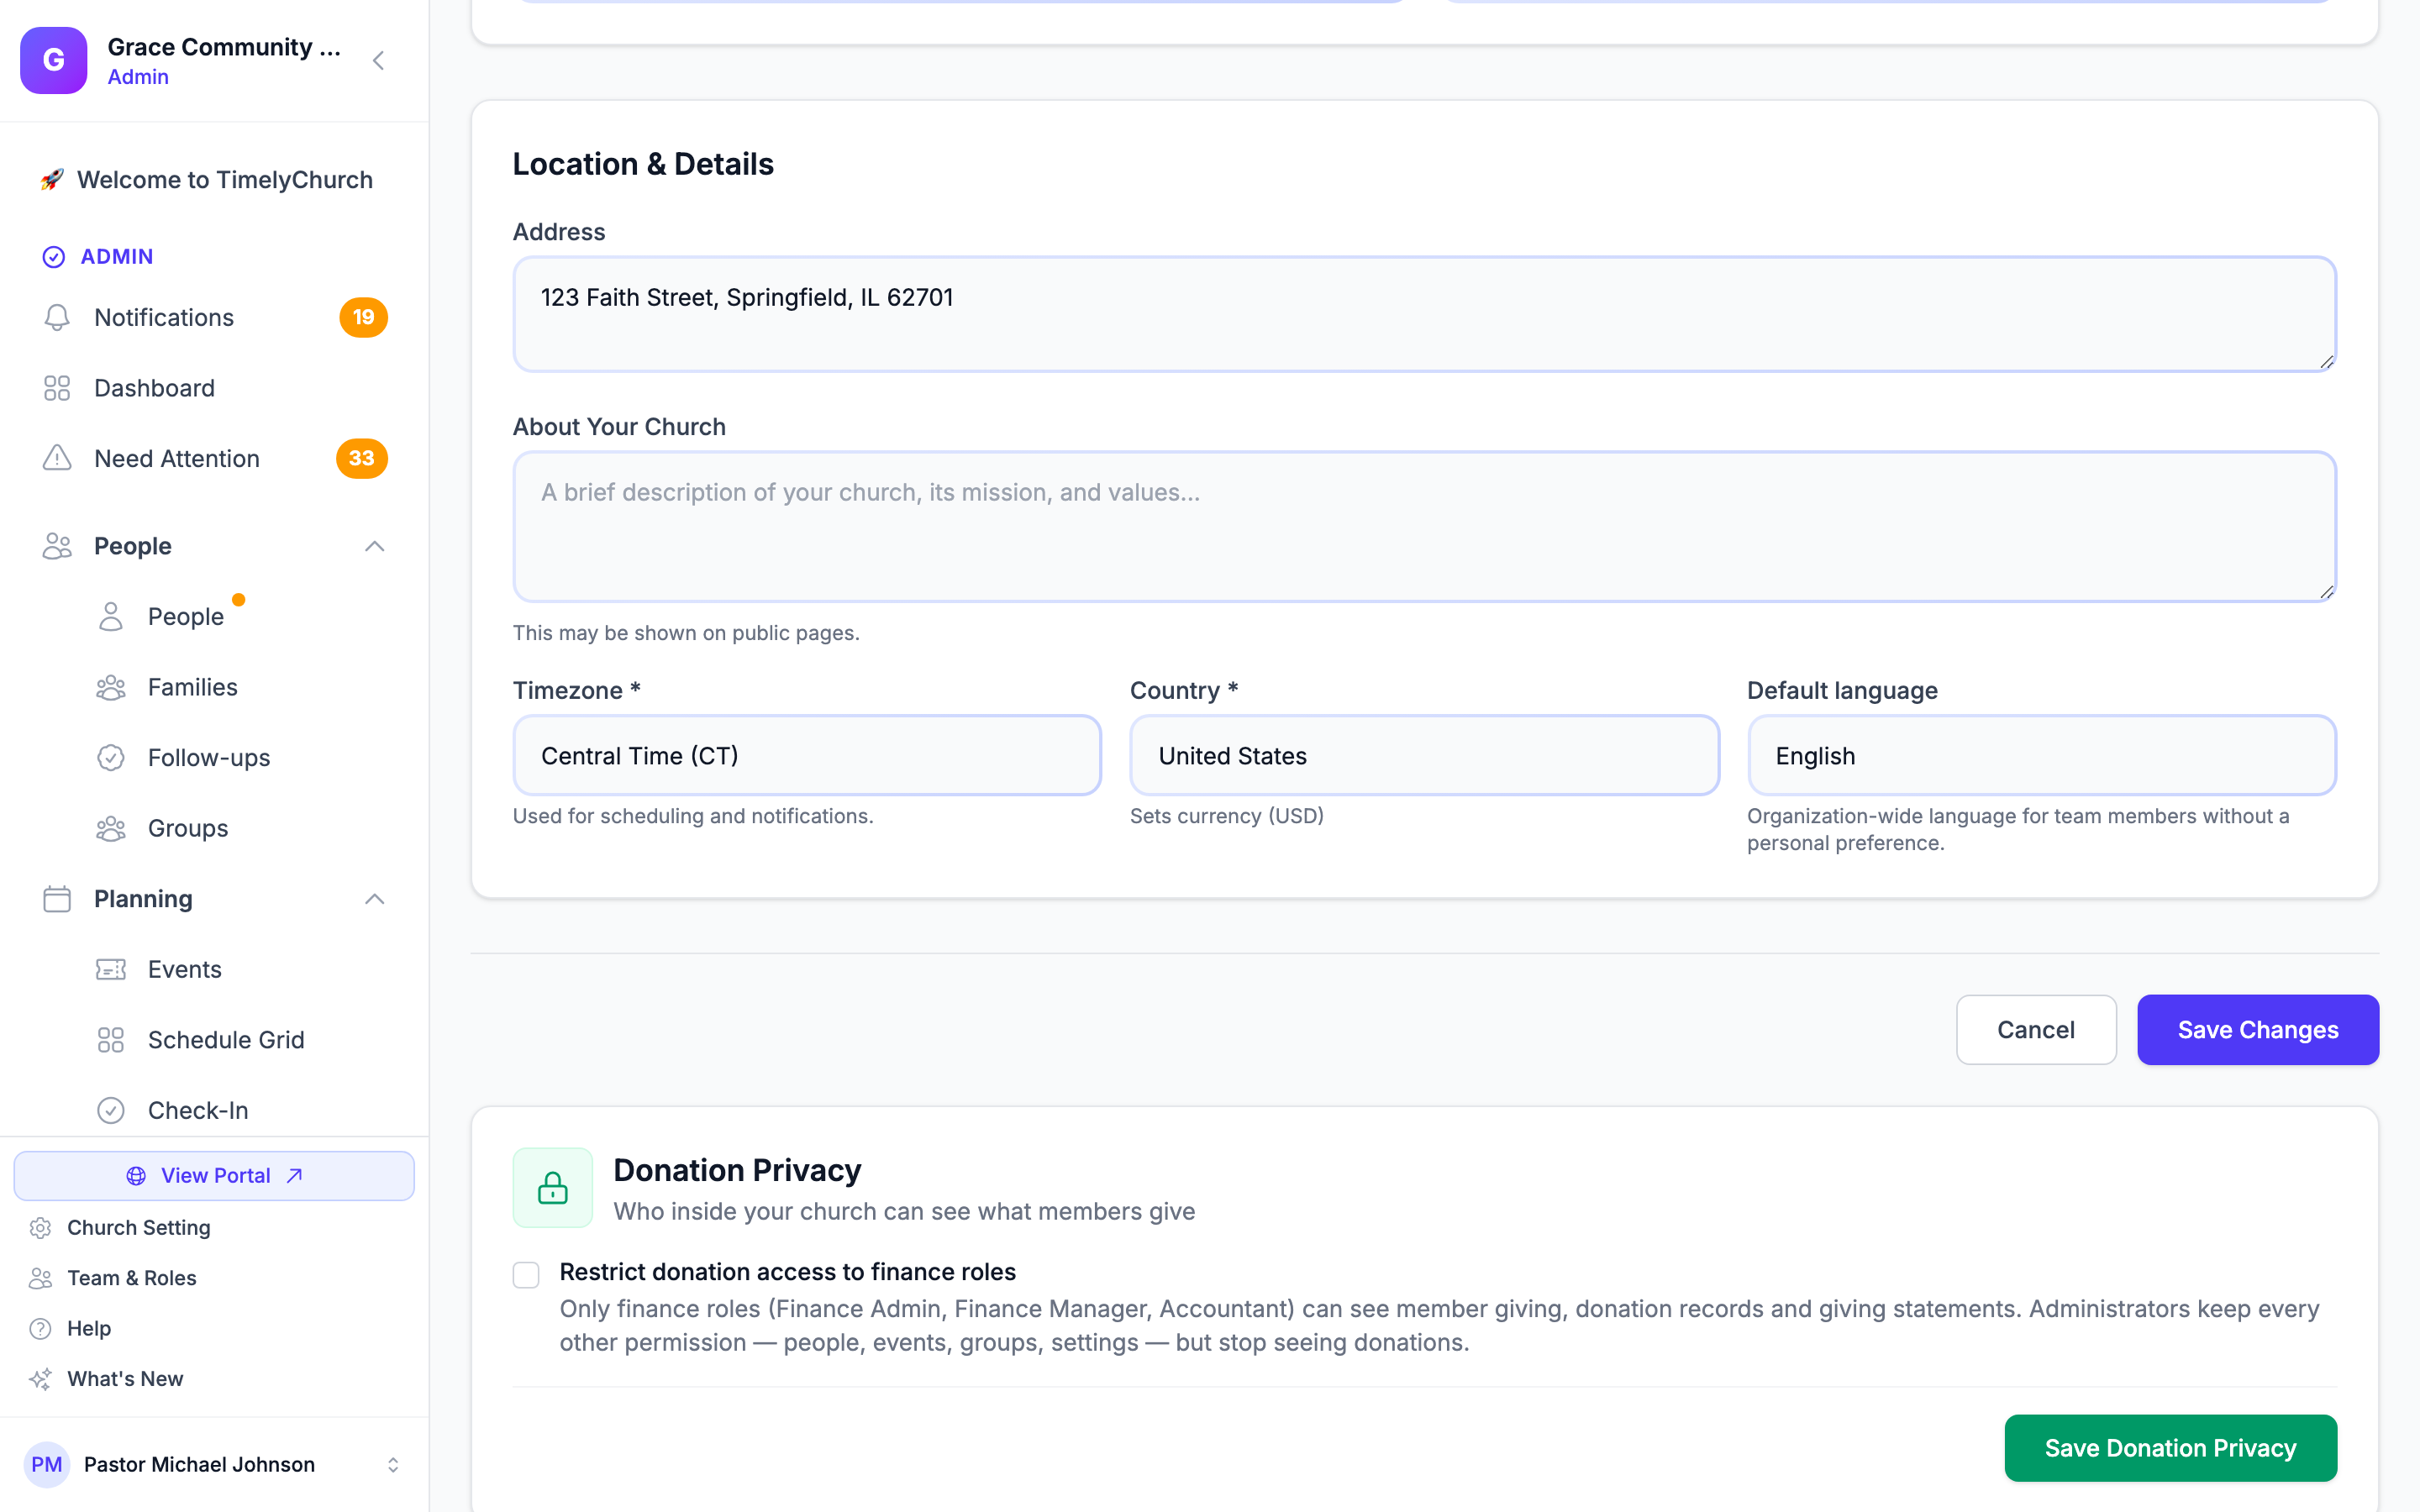
Address
Your church's physical address. This can be displayed on public pages and is useful for visitors finding your location. You can enter a multi-line address:
123 Main Street
City, State 12345
About Your Church
A brief description of your church, its mission, and values. This text may appear on public-facing pages such as your church schedule page or member portal.
Timezone (Required)
Select the timezone where your church is located. This setting affects:
- How dates and times are displayed throughout the system
- Scheduling for lessons, events, and services
- Notification delivery times
The Timezone list offers every time zone in the world. To make finding yours quick, a short group of common zones for the regions and languages TimelyChurch serves sits at the top of the list, above "All time zones":
- US Timezones -- Eastern, Central, Mountain, Pacific, Alaska, Hawaii, Arizona (no DST)
- Canada -- Eastern, Pacific, Mountain, and Central Time (Canada)
- Europe -- London, Lisbon, Madrid, Paris, Berlin, Rome, Amsterdam, Vienna, Zurich, Prague, Warsaw, Vilnius, Riga, Tallinn, Helsinki, Kyiv, Chișinău, Minsk, Moscow, Athens, Istanbul
- Latin America -- Mexico City, Guatemala, El Salvador, Honduras, Nicaragua, Costa Rica, Panama, Santo Domingo, Bogotá, Lima, Caracas, Santiago, Buenos Aires, São Paulo
- Asia Pacific -- Tbilisi, Yerevan, Almaty, Tokyo, Singapore, Sydney, Auckland
If your city isn't in the short list, scroll down to All time zones -- every IANA time zone is there, so your church's real time zone is always available and never approximated to a neighbor.
Tip: If your church recently changed locations across timezone boundaries, update this setting right away. All future schedules and events will use the new timezone.
Accuracy note: Saving checks that the value you picked is a real, recognized time zone -- so your church's Sunday start time can never be silently shifted to the wrong zone. If your church was already using an older or renamed zone name, that name still appears selected and keeps working.
Country (Required)
Your church's country. It sets the currency your church uses -- the current currency is shown under the field ("Sets currency (USD)", for example). When your church was created, the country was also used to pick its default language.
If you change the country, the currency and the default language follow the new country -- unless you had already changed them yourself.
Default Language
The language TimelyChurch uses for team members who haven't chosen their own -- "Organization-wide language for team members without a personal preference." Everyone can still pick their own language from their account menu. See Choosing Your Language.
Church Logo
Upload your church's logo to brand your TimelyChurch experience. The logo appears in the admin navigation, on public pages, and in check-in label printing.
Requirements:
- File type: PNG or JPG
- Maximum size: 2 MB
- Square images work best, but the system preserves aspect ratio for non-square logos
To upload a logo:
- Click the file picker in the Church Logo section.
- Select your image file.
- The preview will update immediately.
- Click Save Changes to finalize.
To remove a logo:
- Click the red X button on the current logo preview.
- Confirm the removal when prompted.
Note: The Church Logo feature requires a plan that includes Custom Branding (Pro plan and above). If you are on a Starter or Growth plan, the logo section will show a prompt to upgrade.
Your Church Web Address
The Your church web address card shows your church's address on TimelyChurch -- "Where visitors, links and QR codes find your church online" -- with a Copy button and, for people who can edit settings, a Change button. Changing it never breaks old links: the old address forwards to the new one. The full guide is Your Church Web Address.
Donation Privacy
The Donation Privacy card decides who inside your church can see what members give.
- Tick Restrict donation access to finance roles.
- Click Save Donation Privacy. You'll see "Donation access is now restricted to finance roles."
With the restriction on, only finance roles (Finance Admin, Finance Manager, Accountant) can see member giving, donation records and giving statements. Administrators keep every other permission -- people, events, groups, settings -- but stop seeing donations.
To remove the restriction, untick the box and save. Only someone who already has donation access can do this; anyone else sees "Only someone with donation access can remove this restriction. Ask a finance admin or the church owner."
See Who Can See Giving and Donations.
Group Leaders
The Group leaders card (shown to church administrators only) sets how leaders add people to the groups and classes they lead. It has one switch, Leaders can search the church directory:
- Off (recommended): leaders whose role reaches only their teams can find people already in their teams, and invite anyone else by email; the person accepts and the leader approves.
- On: they can search everyone in the church (names and photos only) and add them straight away.
Click Save. You'll see "Group leader settings updated." For what a "Their teams" role can see, see Roles & Permissions.
Admin Security
The Admin Security card sets two-factor authentication requirements for church administrators.
- Tick Require two-factor authentication for church admins.
- Click Save Security Settings.
From then on, church administrators must enroll an authenticator app before they can use the admin portal. See Security Settings.
Support Verification
The Profile tab also includes a Support Verification section with two important identifiers:
Church ID
A unique numeric identifier for your church account. You may be asked to provide this when contacting TimelyChurch support. Click the copy button to copy it to your clipboard.
Support PIN
A 6-digit PIN used to verify your identity when contacting support. This PIN:
- Is unique to your church
- Should never be shared publicly
- Can be regenerated if you believe it has been compromised
To regenerate your Support PIN:
- Click the refresh icon next to the current PIN.
- A confirmation dialog will appear warning that the old PIN will be invalidated.
- Click Regenerate PIN to confirm.
- Your new PIN will be displayed and the old one will stop working.
Important: Only provide your Support PIN to verified TimelyChurch support staff. Never share it in public forums, social media, or unsolicited emails.
Saving Your Changes
After making changes to the profile fields (name, contact details, location, timezone, country, language, logo):
- Review your changes.
- Click the Save Changes button at the end of the form.
- A success message will confirm your profile has been updated.
If you want to discard your changes, click Cancel to return to the dashboard.
The web address, Donation Privacy, Group leaders and Admin Security cards are saved with their own buttons, not with Save Changes.
Note: If your role can view but not edit settings, the Profile tab is read-only.