
Creating and Managing Pages
Pages are the building blocks of your website. Each page has its own URL, can contain multiple sections of content, and can be included in your site navigation. Website Studio supports seven page types and walks you through page creation with a guided wizard that can pre-build your sections from a template.
Page Types
When you start a new page, the wizard asks you to pick one of seven page types. The page type controls which templates are offered and (in some cases) how the page appears on your site.
| Page Type | Description |
|---|---|
| Home | Your main landing page. Only one Home page is allowed per site. |
| About | Share your church story, staff, and beliefs. |
| Contact | Help visitors reach you with a form, map, and service times. |
| Events | Showcase upcoming events from the Events module. |
| Groups | List your small groups and ministries from the Groups module. |
| Giving | Encourage generosity with a giving call-to-action page. |
| Custom Page | Build any page from scratch. |
Note: You can only have one Home page. If a Home page already exists, the wizard will not let you create a second one -- that option will be disabled.
The Page Wizard
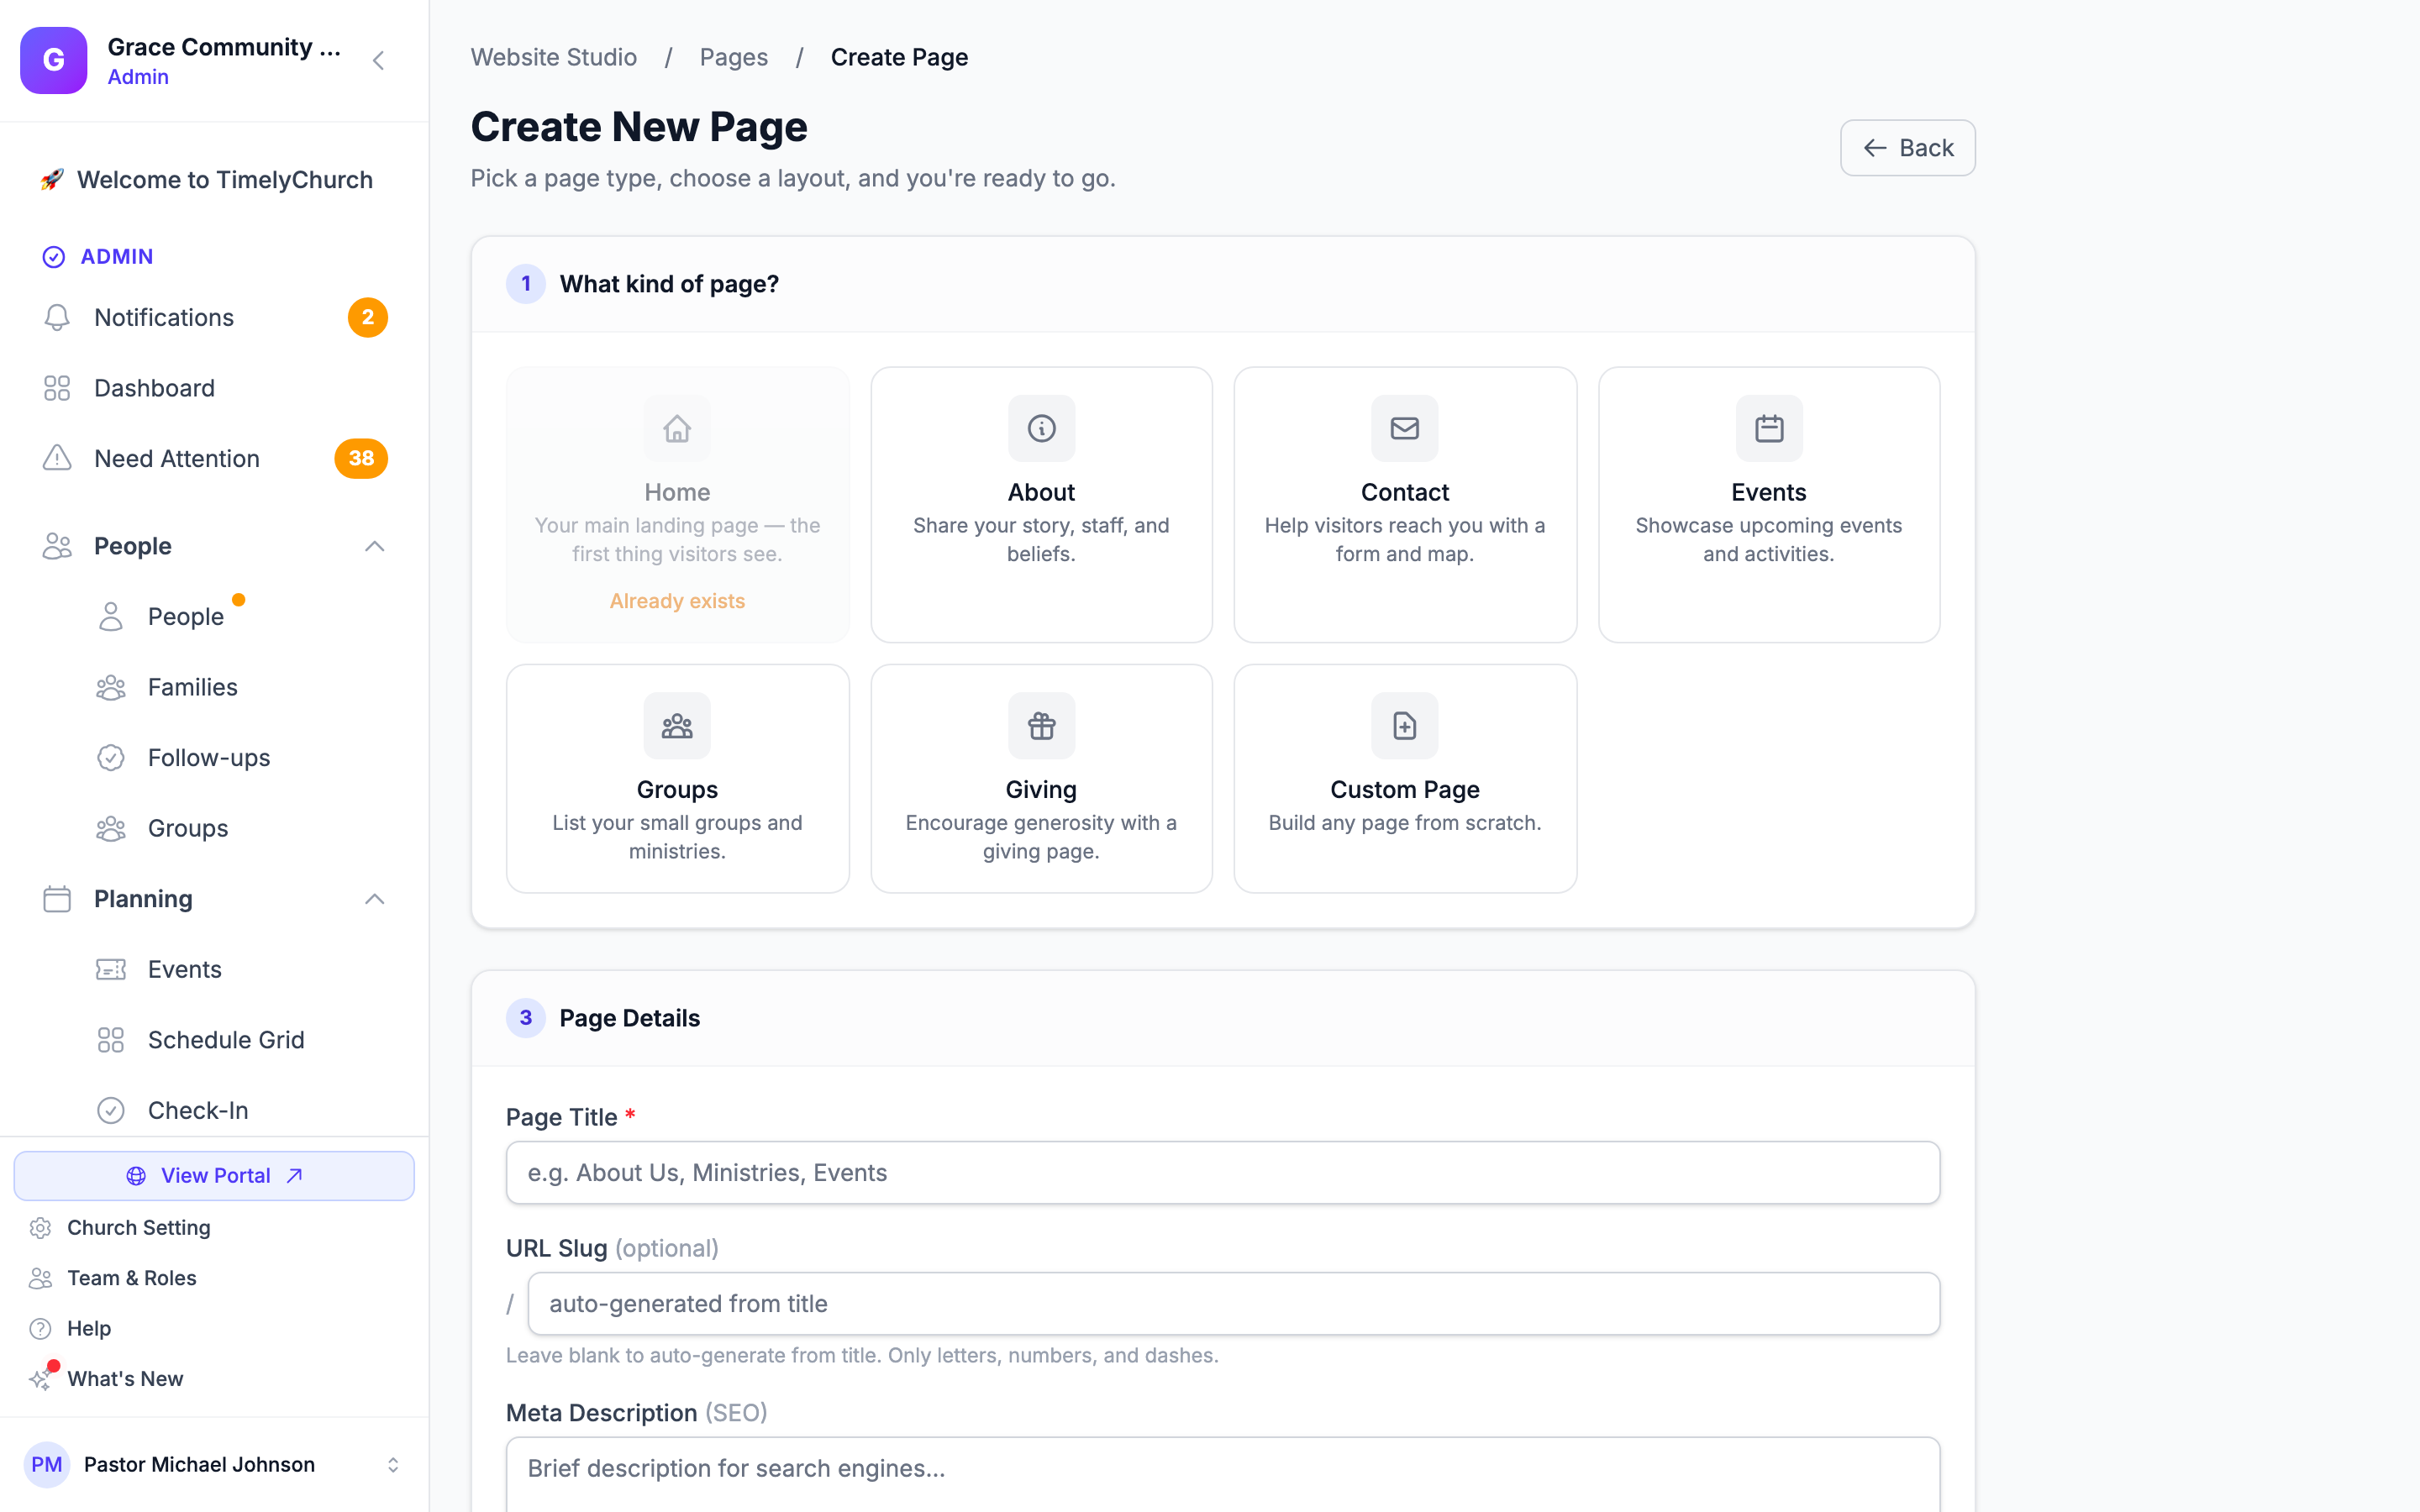
Page creation in Website Studio is a multi-step wizard. The wizard walks you through three steps before saving the page.
To launch it:
- Go to Website Studio > Pages.
- Click the Create Page button.
Step 1 -- Pick a Page Type
The wizard shows a card for each of the seven page types (Home, About, Contact, Events, Groups, Giving, Custom). Click the card that matches the page you want to build. The Home card is disabled if a Home page already exists.
Step 2 -- Pick a Template
After choosing a page type, the wizard offers one to three templates depending on the type. Each template is a starting point: when you save, Website Studio automatically creates the listed sections in the new page so you do not start with a blank canvas.
| Page Type | Templates Offered | Sections Created Automatically |
|---|---|---|
| Home | Blank / Starter / Full | Starter: hero, service times, content, events. Full: hero, service times, plan your visit, latest sermon, events, testimonials, next steps, giving. |
| About | Blank / Starter / Full | Starter: hero, content, staff, beliefs. Full: hero, content, staff, beliefs, testimonials, FAQ. |
| Contact | Blank / Starter | Starter: hero, contact form, map, service times. |
| Events | Blank / Starter | Starter: hero, events. |
| Groups | Blank / Starter | Starter: hero, groups, next steps. |
| Giving | Blank / Starter | Starter: hero, giving, FAQ. |
| Custom | Blank / Starter | Starter: hero, content. |
Tip: Pick Blank if you want to design the page from scratch, Starter for the essentials, and Full (Home and About only) if you want a feature-rich page out of the box. You can always add, remove, or reorder sections after the page is created.
For deeper guidance on choosing the right template, see Page Templates and the Wizard.
Step 3 -- Page Details
In the final step you fill in the Page Details:
- Page Title -- The page name (e.g., "About Us"). This is pre-filled from the page type's default title (for example, "Home" or "Contact Us").
- URL Slug (optional) -- The web address for the page (e.g.,
about-us); the preview underneath shows it as/page/about-us. Leave it blank to build it from the title automatically. See Choosing a page address below. - Meta Description (SEO) -- A brief summary for search engines. 150-160 characters is recommended.
Then, under Navigation & Publishing:
- Show in Navigation -- Add this page to your website's menu.
- Nav Label (optional) -- A shorter label for the menu (uses the page title if blank).
- Nav Order -- Position in the menu (lower numbers appear first).
- Publish Immediately -- Make the page live right away. Leave it off to start as a draft. This option only appears for roles allowed to publish pages.
Click Create Page to save. The page is created, the template's sections are inserted in order, and you are taken to the page editor to start customizing content.
Tip: URL slugs use lowercase letters, numbers, and dashes. Spaces, capitals, and other punctuation are converted automatically, so typing "Our Story" gives you
our-story.
Page limit: On the Growth plan the number of pages is capped. When you reach it, you see "You've reached the maximum of … website pages on your current plan."
Choosing a page address
Almost any address you want is yours to use, including the ones churches ask for most: donate, give, giving, home, index, about, calendar, events, campaign. Your website is your own, so a page address on your site never clashes with another church's.
A few addresses are kept back because they are used for signing in and for system pages, and a page there would never open: login, admin, portal, and other system pages. If you try one of those, TimelyChurch tells you why and suggests an address that works.
On a custom domain, some addresses at the top level of your site already show a built-in page -- for example /events, /give, /sermons, /groups and /service-times. You can still create a page with one of those addresses; TimelyChurch warns you that on your domain it will live at /page/ followed by the address instead, so nobody is surprised.
"That address is already used"
This means another page on your site already has it. The message names the page that has it and suggests a free alternative — for example, Your page "Donate" already uses the address "donate". Try "donate-2" instead.
Deleting a page frees its address immediately. If you delete a page and want to reuse its name for a new one, you can — there is no waiting and nothing to clean up first.
Editing a Page
- Go to Website Studio > Pages.
- Click on the page title or the edit icon to open the page editor.
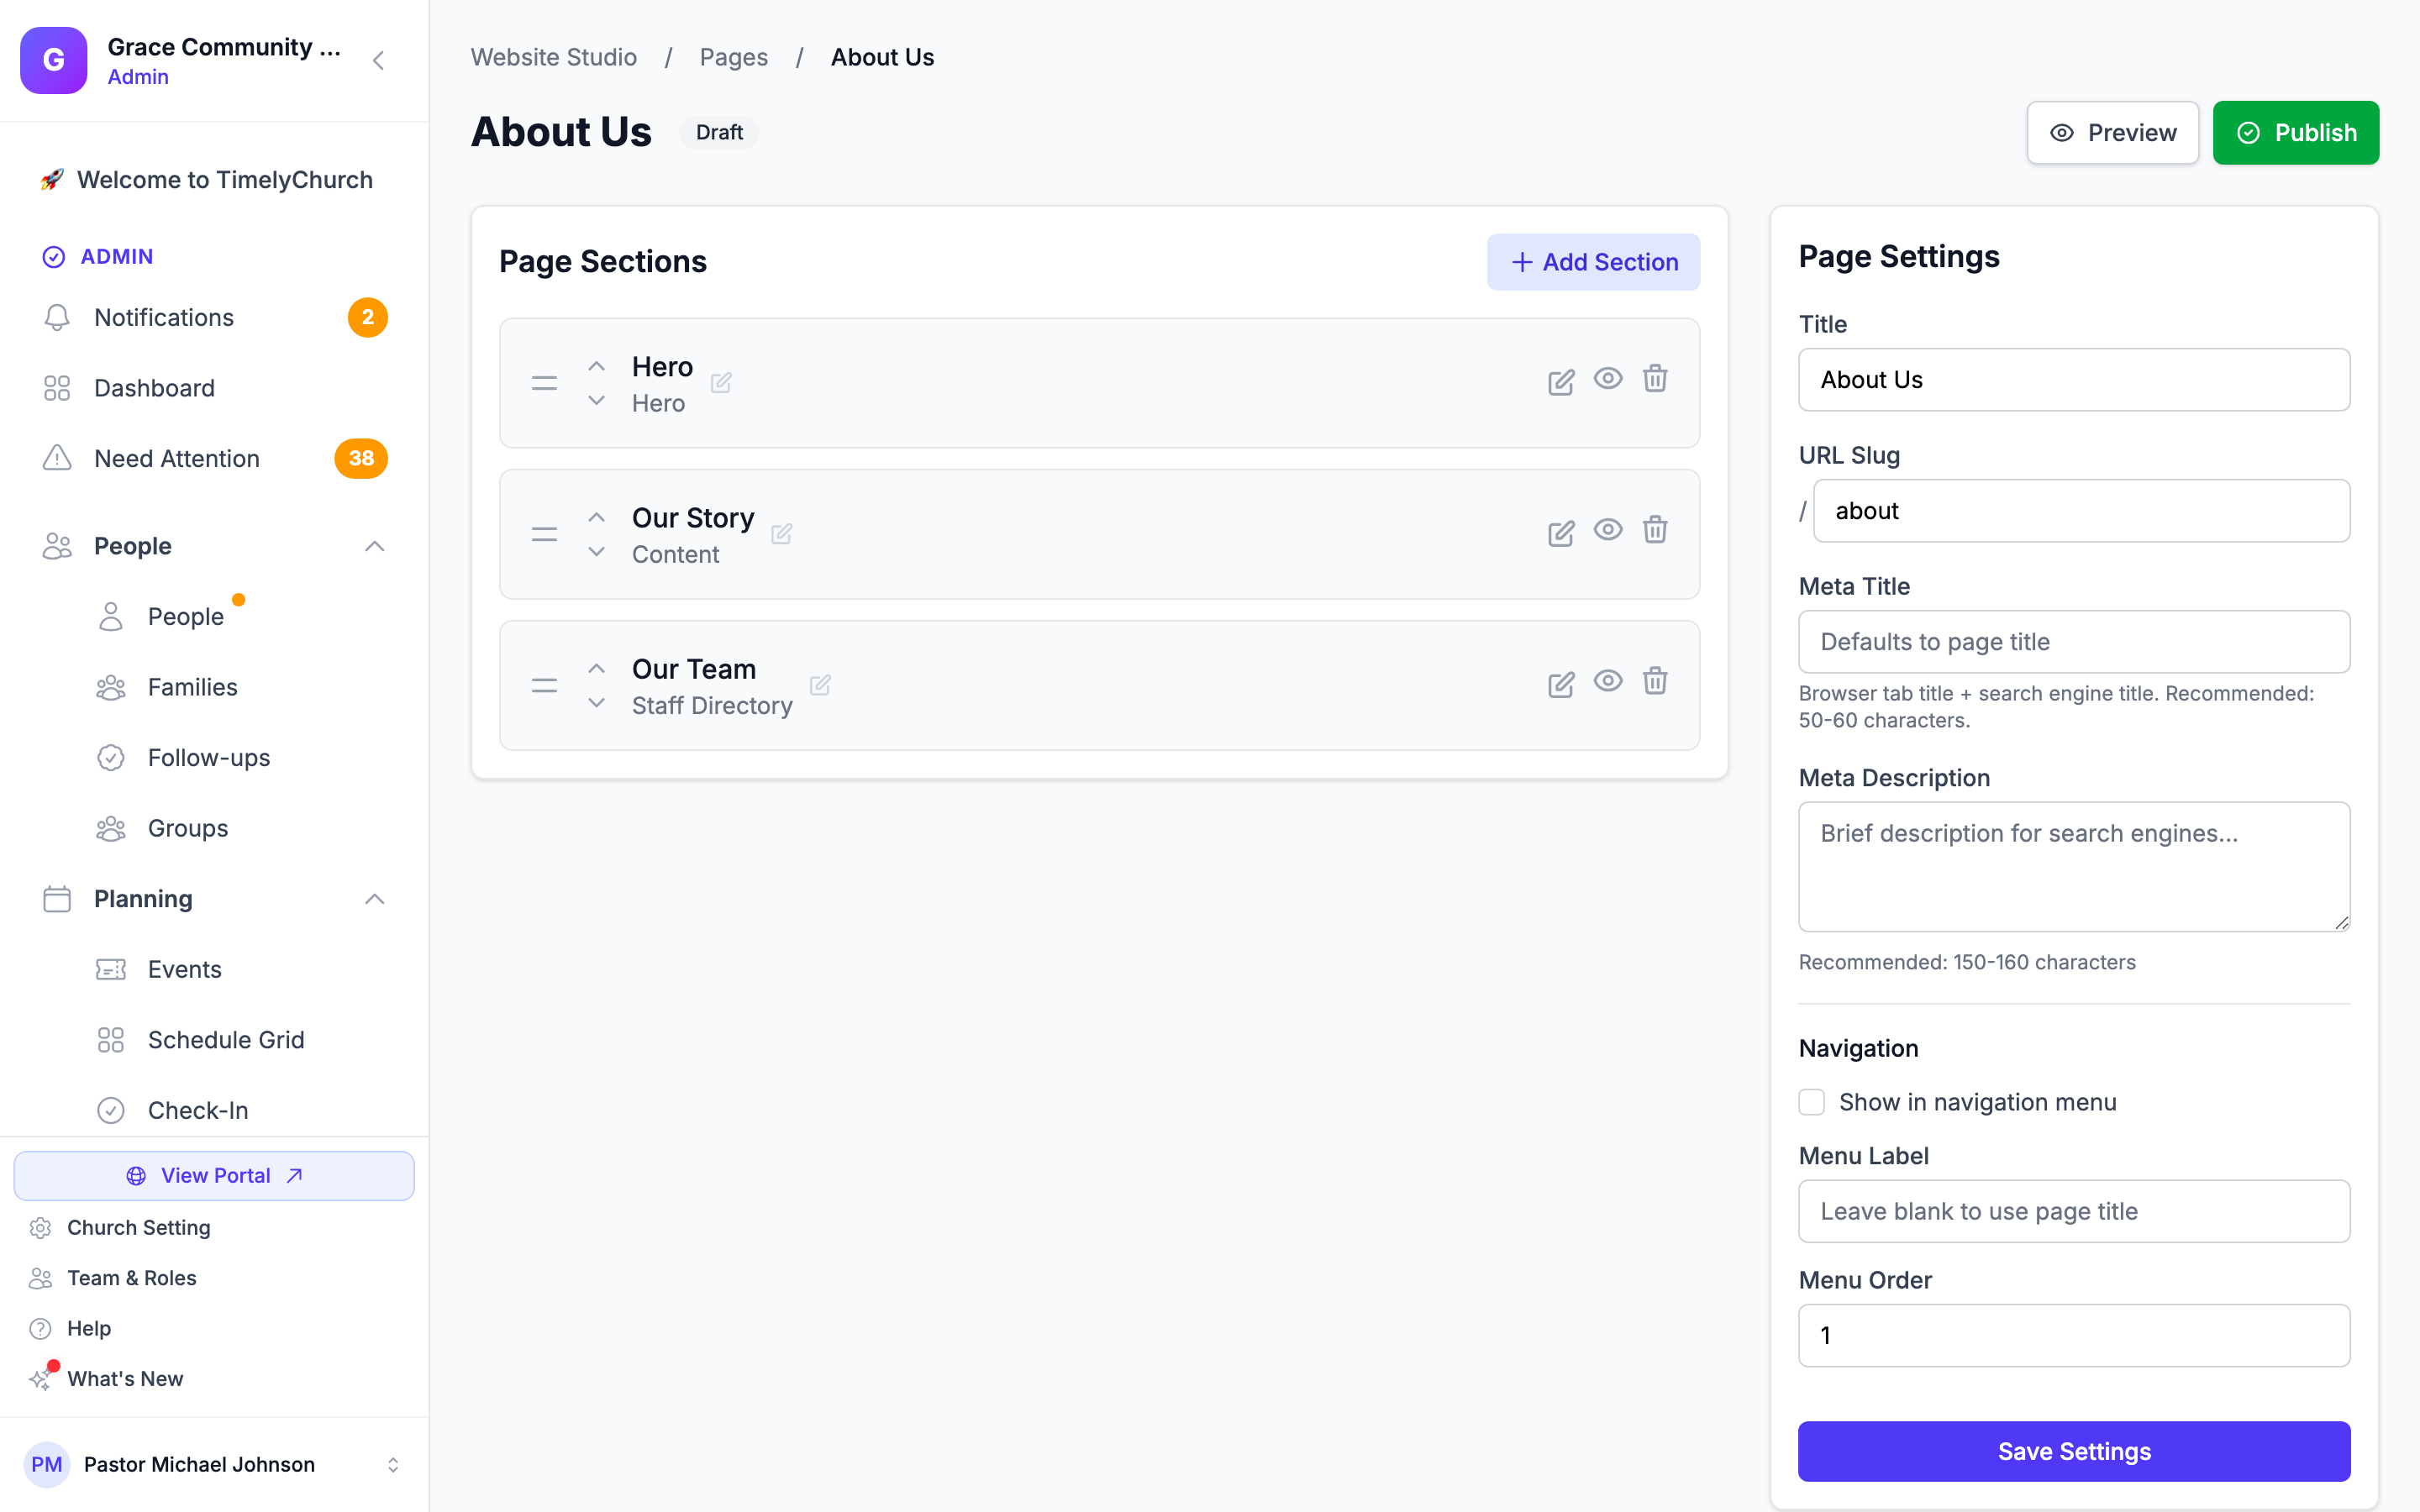
- The page editor has two areas:
- Left side (main area): Page Sections, listed in order, with Add Section. You can add, reorder (drag), rename, edit, toggle visibility, and delete sections here. Below them, an Activity list shows who changed the page and when.
- Right side (sidebar): Page Settings including title, URL slug, meta title, meta description, and navigation options.
- Make your changes and click Save Settings to update the page configuration.
Page Settings
In the page editor sidebar, you can configure:
- Title -- The page name.
- URL Slug -- The URL path. The home page slug cannot be changed.
- Meta Title -- The browser tab title and search engine title (up to 70 characters; 50-60 recommended). Defaults to the page title.
- Meta Description -- A short description for search engine results (recommended: 150-160 characters).
- Show in navigation menu -- Whether this page appears in your site navigation.
- Menu Label -- An optional short label for the menu (if different from the title).
- Menu Order -- The position of this page in the navigation (0 = first).
Pages share your site-wide social-share image; there is no per-page image. See SEO Settings.
Publishing and Unpublishing Pages
Pages can be in one of two states:
- Published -- The page is live and visible to the public.
- Draft -- The page is only visible to admins in the admin panel.
A Published or Draft badge sits at the top of the editor.
To publish a page:
- Open the page in the editor.
- Click the Publish button in the top right corner.
To unpublish a page:
- Open a published page in the editor.
- Click the Unpublish button.
The Publish and Unpublish buttons only appear for roles allowed to publish pages -- see Website Studio Overview.
Deleting a Page
- Go to Website Studio > Pages.
- Find the page you want to delete.
- Click the delete (trash) icon.
- Confirm the deletion when prompted.
Important: The Home page cannot be deleted -- edit it instead. Deleting any other page removes it and all its sections, and cannot be undone from Website Studio. If you only want to hide a page, unpublish it instead.
Filtering and Searching Pages
The pages list includes filters to help you find pages quickly:
- Search -- Type a page title or slug to filter the list.
- Status -- All Status, Published, or Draft.
- Type -- All Types or a single page type (Home, About, Contact, etc.).
Click Filter to apply your selections, or Clear to reset all filters.
Previewing a Page
From the page editor, click the Preview button to open the page in a new browser tab. This lets you see exactly how the page looks to visitors.
Note: Draft pages can still be previewed by admins using the direct URL, but they will not appear in the public navigation or be accessible to regular visitors.
Next Steps
- Page Templates and the Wizard -- Deep dive into each template
- Website Sections -- Learn about the different section types you can add to your pages
- Publishing Your Website -- Understand the publish workflow