
Managing Group Members
This article explains how to add, update, and remove members from groups, including the roles available and the tools on the Members tab.
Member Roles
Every group member has one of these roles:
| Role | Description |
|---|---|
| Leader | Primary group leader with full management access. A group can have more than one. |
| Co-Leader | Shares leadership responsibilities with the primary leader. |
| Member | A regular participant in the group. |
Leaders and Co-Leaders are collectively treated as the group's leadership team. They can manage prayer requests, tasks, files, and members from the group page.
When Someone Leaves or Is Removed
Removing a member does not erase them. Their membership is marked inactive and the date they left is recorded, so their name still appears in past meeting attendance and health reports. The Health tab's Member Status Breakdown counts active and inactive members separately.
Adding Members
From the Admin Panel
- Open the group page.
- Click Add member(s) in the left-hand panel, or Add new on the Members tab.
- In the Add Member window, type at least two letters under Search person and pick the person from your church directory.
- Click Add member.
The person is added as a regular Member and is active from today. To make them a Leader or Co-Leader, use Add Leader afterwards (see below); to give a team or class member a fixed position, use the Members tab.
Note: Only people who are already in your church directory and marked as active can be added. The search automatically leaves out people who are already members of the group. If the group is full, you'll see "This group is at capacity. Consider adding to waitlist." -- raise Max Members or remove someone first.
Leaders whose role reaches only their teams: once team reach is in effect for your church, a leader whose role is set to Their teams finds only people who are already in the teams they lead -- the window says "You can find people in the teams you lead. To add someone else, invite them below." An administrator can let such leaders search everyone by turning on Leaders can search the church directory in Church Settings → Profile → Group leaders. See Roles & Permissions.
Inviting Someone by Email
Use this to bring in someone who isn't in your directory yet -- or anyone a leader can't add directly, including people outside the teams they lead.
- Open the group and click Add member(s).
- At the bottom of the Add Member window, under Invite by email, enter the person's Email and, optionally, their Name (optional).
- Click Send group invitation.
TimelyChurch confirms "Invitation sent to ... They will appear under Requests once they accept." Here is what happens next:
- The person receives an email with a personal link to the group. The link is valid for 14 days. Sending another invitation to the same address resends it and restarts the 14 days.
- On the invitation page they confirm their name and click Accept invitation. They see "Thank you! A leader of the group will confirm your membership, and you will hear from them soon."
- They then appear on the group's Requests tab as a pending join request, and the group's leaders are notified. A leader clicks Approve (or Deny), exactly as for any other join request.
Accepting never adds someone straight into the group -- a leader always approves first. If the link has expired, the page says so and asks them to get a new one from a leader. Group leaders can send the same invitation from the member portal (Invite to group on the group's page), and the same form appears on a class's roster.
If sharing is turned on for the group, the window also shows the group's shareable link ("Or share the group's link:").
Join Requests (the Requests Tab)
When there are pending requests -- from accepted invitations, or from people who asked to join a group that requires approval -- the group page shows a Requests tab with a count. Click Approve to make the person an active member, or Deny to decline the request.
When Leaders Are Assigned During Group Creation
When you select leaders while creating a group, they are automatically added as members with the "Leader" role.
Reactivating a Former Member
If you add someone who was previously removed from the group, their existing membership record is reactivated rather than creating a duplicate.
The Members Tab
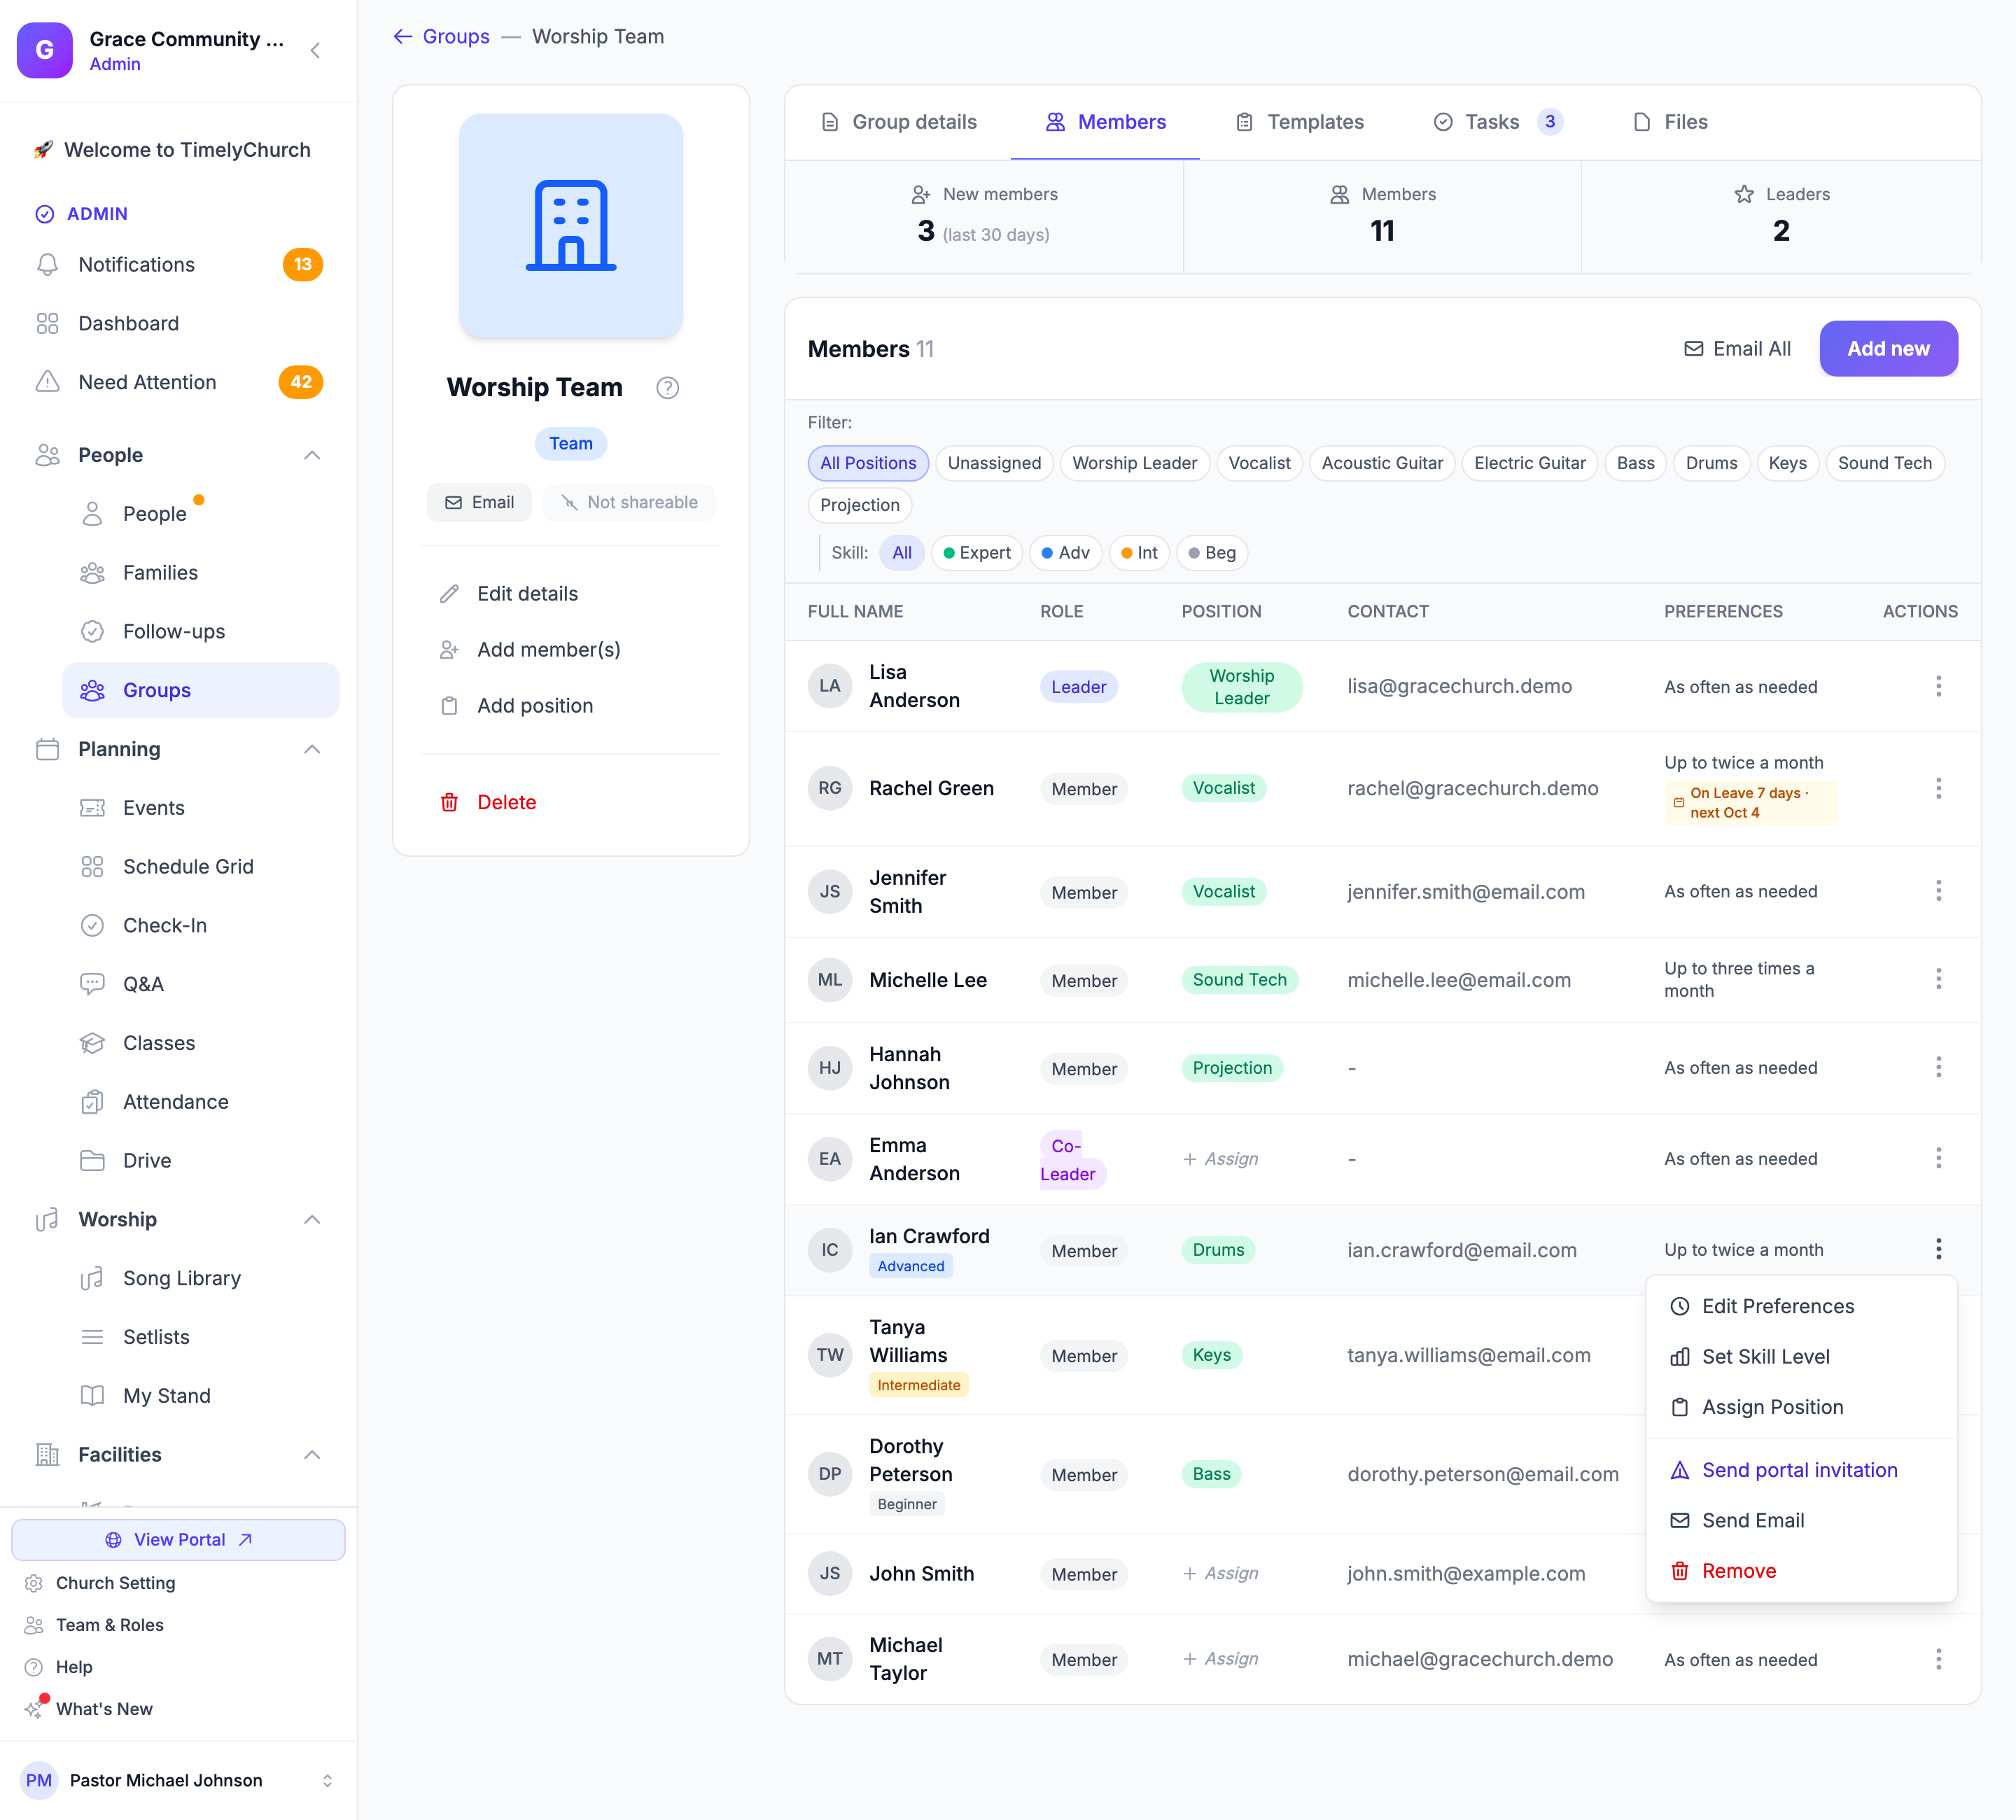
The Members tab lists every active member with their Role, Contact details, and serving Preferences. At the top you'll find:
- Email All -- Email every member who has an email address.
- Telegram invites -- Teams only, when your church has Telegram connected. Emails a Telegram connect invite to team members who haven't connected yet. Members who have connected show a Telegram badge.
- Add new -- Opens the Add Member window.
- Filter: -- When fixed positions are on, filter by position (All Positions, Unassigned, or one position). When skill levels are set, filter by Skill: (Expert, Adv, Int, Beg).
Each row's actions menu offers:
- Edit Preferences -- Serving frequency and available days (see "Serving Preferences" below).
- Set Skill Level
- Assign Position -- When fixed positions are on.
- Send portal invitation / Resend portal invitation -- Emails the person a sign-in link to the member portal. People who already have a login show Has a login (a Joined badge on phones).
- Send Email
- Make member -- For leaders and co-leaders (see below).
- Remove
Promoting a Current Member to Leader or Co-Leader
You don't have to remove someone and add them back to make them a leader. If a person is already an active member of the group, you can promote them straight to Leader or Co-Leader using the Add Leader picker.
- Open the group and go to the Group details tab.
- In the Group leaders card, click Add Leader.
- In the "Add Leader" window, type at least two letters into Search person.
- Pick the person from the results. The picker shows your current members -- it only hides people who are already a leader or co-leader of this group, so a regular member is searchable here.
- Choose the Role: Leader (labeled Primary leader) or Co-Leader (labeled Assistant leader).
- Click Add Leader.
TimelyChurch updates the person's existing membership record in place rather than creating a second one, so their join date and history carry over -- only their role changes. On success you're returned to the Members tab with a confirmation such as "Jordan is now a group leader." or "Jordan is now a co-leader."
Because this is a role change (not a fresh join), promoting a current member does not send them a "you've been added to the group" welcome email. Promoting to Leader or Co-Leader does automatically provision the person's team-leader access so they can manage their team right away.
Note: Assigning the full Leader (primary) role requires a church administrator. A group leader who is not an administrator can still assign Co-Leader -- only the top primary-Leader role is admin-only. If a non-admin tries to assign Leader, they will see "Only a church administrator can assign the group leader role."
Note: You cannot change your own group role -- if you try to promote yourself, TimelyChurch stops you with "You cannot change your own group role." If the person already holds the exact role you pick, you'll see "This person is already a member." because there is nothing to change.
Changing a Leader Back to a Member
To step someone down from leading without removing them from the group:
- On the Members tab, find the leader or co-leader.
- Click Make member on their row (on a phone, it is in the row's menu).
- Confirm. The dialog reads "[Name] stays in the group as a member and will no longer lead it."
Make member does not appear for yourself or for the group's only leader. Changing a primary Leader back to a member needs the same permission as appointing one. In the member portal, a group's Leader can also change a Co-Leader back to a member.
If TimelyChurch had automatically moved the person up to the Team Leader role when they became a leader, and they no longer lead any group, their role goes back to what it was before (unless an administrator has changed it since).
Removing Members
- On the Members tab, locate the member.
- Click Remove in the row's actions.
- Confirm the removal.
Removing a member marks their membership inactive and records the departure date. The membership record is kept for historical reporting, so the member's name still appears in past meeting attendance and health reports.
The person is told they are no longer a member of the group: by email (unless they have opted out of email), and -- if they have a login -- with an in-app notice titled "Your membership in [group] was updated".
Members can also leave a group themselves from the member portal with Leave group -- see Member Portal -- My Groups.
Position Assignments (Teams and Classes)
Teams and classes can tie each member to specific positions.
Assign Fixed Positions
The Assign fixed positions switch sits in the Positions card on the Group details tab (it appears once the group has at least one position):
- On -- Each member is tied to specific positions. When scheduling, members can only be assigned to their fixed positions. Best for tech teams, worship teams, or roles needing specific skills.
- Off -- Members can serve in any position. When scheduling, anyone on the team can be assigned to any role. Best for ushers, greeters, or teams where members fill roles interchangeably.
Assigning a Position
When fixed positions are on, the Members tab gains a Position column.
- Open the row's actions menu and choose Assign Position (or use Quick Assign from the Position column).
- Under Select Position, choose a position.
- Optionally tick Set as primary position -- primary positions are shown first and preferred during scheduling.
- Click Assign Position.
When a position is marked as primary, any other primary assignment for that member is cleared.
Serving Preferences
You can set each member's serving preferences with Edit Preferences (or from the Preferences column):
| Setting | Options |
|---|---|
| How often can they serve? | As often as needed, Up to once a month, Up to twice a month, Up to three times a month |
| Available days (leave empty for all days) | Select which days of the week the member is available to serve |
These preferences are used by the scheduler to avoid over-scheduling volunteers. When a member has blocked dates coming up, the Preferences column shows an On Leave badge with the number of days and the next date.
Skill Levels
Members can be given a skill level with Set Skill Level to help with scheduling decisions. Skill levels are only visible to leaders.
| Level | Label |
|---|---|
| 1 | Beginner |
| 2 | Intermediate |
| 3 | Advanced |
| 4 | Expert |
Automatic Skill Suggestions
TimelyChurch tracks each member's assignment acceptance rate and suggests skill upgrades based on their track record:
- Beginner -- Suggested after 3 or more accepted assignments
- Intermediate -- Suggested after 8+ accepted with 75%+ acceptance rate
- Advanced -- Suggested after 15+ accepted with 80%+ acceptance rate
- Expert -- Suggested after 25+ accepted with 90%+ acceptance rate
When members qualify, a banner on the Members tab says they are "ready for skill upgrade". Leaders can click Approve Upgrade (which updates the skill level) or Dismiss Suggestion.
Emailing Group Members
From the group page, you can send emails to members:
- Click Email in the left-hand panel, or Email All on the Members tab. The recipients are all members who have email addresses.
- To email only the leaders, use Email All on the Group leaders card of the Group details tab. To email one person, use Send Email on their row.
- Enter a Subject and Message.
- Click Send Email.
Emails are sent individually to each recipient.
Tip: When a member has three or more consecutive absences, they appear in the Health tab's "Members with Consecutive Absences" section. Use the Send Email link there to reach out to them directly.