
Accounting Overview
Why TimelyChurch Includes Built-In Accounting
Keeping giving in one system and the church's books in another means entering the same numbers twice and reconciling two sets of records. TimelyChurch includes a full-featured accounting module in the same platform as your giving, so every gift you record already appears in your books.
Plan Requirements: The Accounting module (Chart of Accounts, Transactions, Reconciliation, Bills, Journal Entries, full Reports), the Giving module, and the Budgets module are included on the Pro plan ($129/mo founding price for the first 25 churches, then $149/mo list). On lower plans these items appear in the navigation as "locked" with an upgrade prompt.
When a member gives online or a treasurer records a cash offering, TimelyChurch automatically creates the corresponding income transaction in your books. There is no CSV export, no manual posting, and no risk of data falling through the cracks. Your giving data and your financial records live in one place.
Key Benefits
- Automatic donation posting -- Every donation recorded in the Giving module is automatically posted as an income transaction in Accounting, mapped to the correct fund.
- Split donation support -- When a donor splits a gift across multiple funds (for example, $500 to General Fund and $300 to Building Fund), TimelyChurch creates separate accounting transactions for each allocation so fund-level reporting is always accurate.
- One login, one platform -- Treasurers, pastors, and administrators access giving records and financial reports from the same dashboard. No switching between apps.
- Real-time balances -- Account balances update instantly when transactions are created, edited, or deleted.
- Church-specific defaults -- The built-in Chart of Accounts template follows nonprofit accounting standards with account numbers and categories that make sense for churches.
How Giving Flows Into Accounting
Here is how the automated bridge between Giving and Accounting works:
- A donation is recorded -- either through online giving, a manual entry by the treasurer, or a deposit batch.
- TimelyChurch looks for an active income account (account 4000 "Tithes & Offerings" first, then any active income account).
- If the donation has fund allocations, one income transaction is created per fund allocation. If there are no allocations, a single transaction is created for the full amount.
- Each transaction includes the donor name, payment method, fund name, check number (if applicable), and a reference number linking back to the original donation.
- The account balance is recalculated automatically.
Tip: If a donation is later edited, the corresponding accounting transactions are updated automatically. If it is deleted, its accounting entries are removed (and come back if the gift is restored from Recently Deleted). A donation whose accounting entry has already been reconciled cannot be deleted, which protects your completed reconciliations.
Two Views: Simple and Full Accounting
TimelyChurch offers two ways to look at the same books. The view is a personal setting -- each person chooses their own, and switching it changes only what you see.
Simple Checkbook
A streamlined view that works like a digital checkbook. You record money coming in and going out, see a running list of deposits and payments in the Check Register, and produce a one-page Treasurer's Report. This is ideal for smaller churches where a volunteer treasurer, pastor, or admin manages the finances and full double-entry accounting is not needed. In Simple mode, the Transactions tab is relabeled Money In / Out, income and expenses appear as Money In and Money Out, and the more technical screens (Chart of Accounts, Budgets in the Setup menu, Journal Entries) are hidden.
Full Accounting
The complete accounting experience with a Chart of Accounts, categorized transactions, manual journal entries, bank reconciliation, budgets, bills, and full financial reports including a Trial Balance, General Ledger, and audit trail. This mode is designed for churches with a treasurer or finance committee -- or a bookkeeper or CPA -- that needs standard nonprofit financial statements.
Switch your view at any time from the Accounting Mode button in the header of the Finance Dashboard (it reads Simple Mode or Full Accounting). No data is lost when switching -- both views use the same underlying numbers, and the mode only changes labels and which screens are visible. The church's default view for new members is set on the Finance Settings page -- see Simple vs. Advanced Accounting Mode.
What Is Included in the Accounting Module
| Feature | Description |
|---|---|
| Chart of Accounts | Asset, liability, equity, income, and expense accounts with a church-specific default template (Full mode) |
| Transactions | Record income, expenses, transfers, and journal entries, with receipts and invoices attached (relabeled "Money In / Out" in Simple mode) |
| Deleted Transactions | Restore a transaction you deleted, or delete it permanently |
| Categories | Classify transactions with income and expense categories |
| Check Register | Checkbook-style view with running balance per bank account |
| Bank CSV Import | Upload a bank or processor file and review each row before it posts |
| Bank Reconciliation | Step-by-step flow to match your books to your bank statement |
| Journal Entries | Manual double-entry postings for adjustments and corrections (Full mode) |
| Recurring Transactions | Income and expenses that repeat on a schedule, posted automatically or with one click |
| Budgets | Annual, quarterly, or monthly budgets with variance tracking |
| Bills | Record vendor bills, track due dates, and record payments |
| Payees/Vendors | Maintain a directory of vendors with 1099 tracking |
| Opening/Starting Balances | Set your account balances as of a cutover date when you move to TimelyChurch |
| Financial Reports | Balance sheet, income statement, treasurer's report, budget vs. actual, giving statements, and 1099 vendor report |
| Trial Balance & General Ledger | CPA-grade trial balance snapshot and per-account drill-down |
| Audit Log | A record of who created or changed each finance record |
| Close Fiscal Year | Lock a finished calendar year's transactions |
| CSV Export | Export filtered transaction lists for external use |
| PDF Reports | Download treasurer's reports and reconciliation summaries as PDFs |
Finding Your Way Around
The Accounting module is organized as a tab bar across the top of the page:
- Dashboard -- your financial overview (the Finance Dashboard).
- Check Register -- the checkbook-style running list per bank account.
- Transactions -- record and manage income, expenses, transfers, and journal entries (shown as Money In / Out in Simple mode).
- Giving -- the Giving module.
- Bills -- vendor bills and payments.
- Reports -- the reporting hub.
The remaining setup and configuration screens live under a single dropdown at the end of the tab bar. In Full Accounting it is labeled Setup ▾ and contains Chart of Accounts, Categories, Payees, Budgets, Reconciliation, Recurring, Journal Entries, Trial Balance, General Ledger, Audit Log, 1099 Report, and Close Fiscal Year. In Simple Checkbook the same dropdown is labeled More ▾ and shows a reduced set: Categories, Payees, Reconciliation, Recurring, Trial Balance, General Ledger, Audit Log, 1099 Report, and Close Fiscal Year. Budgets is also always available from the Finances section of the sidebar.
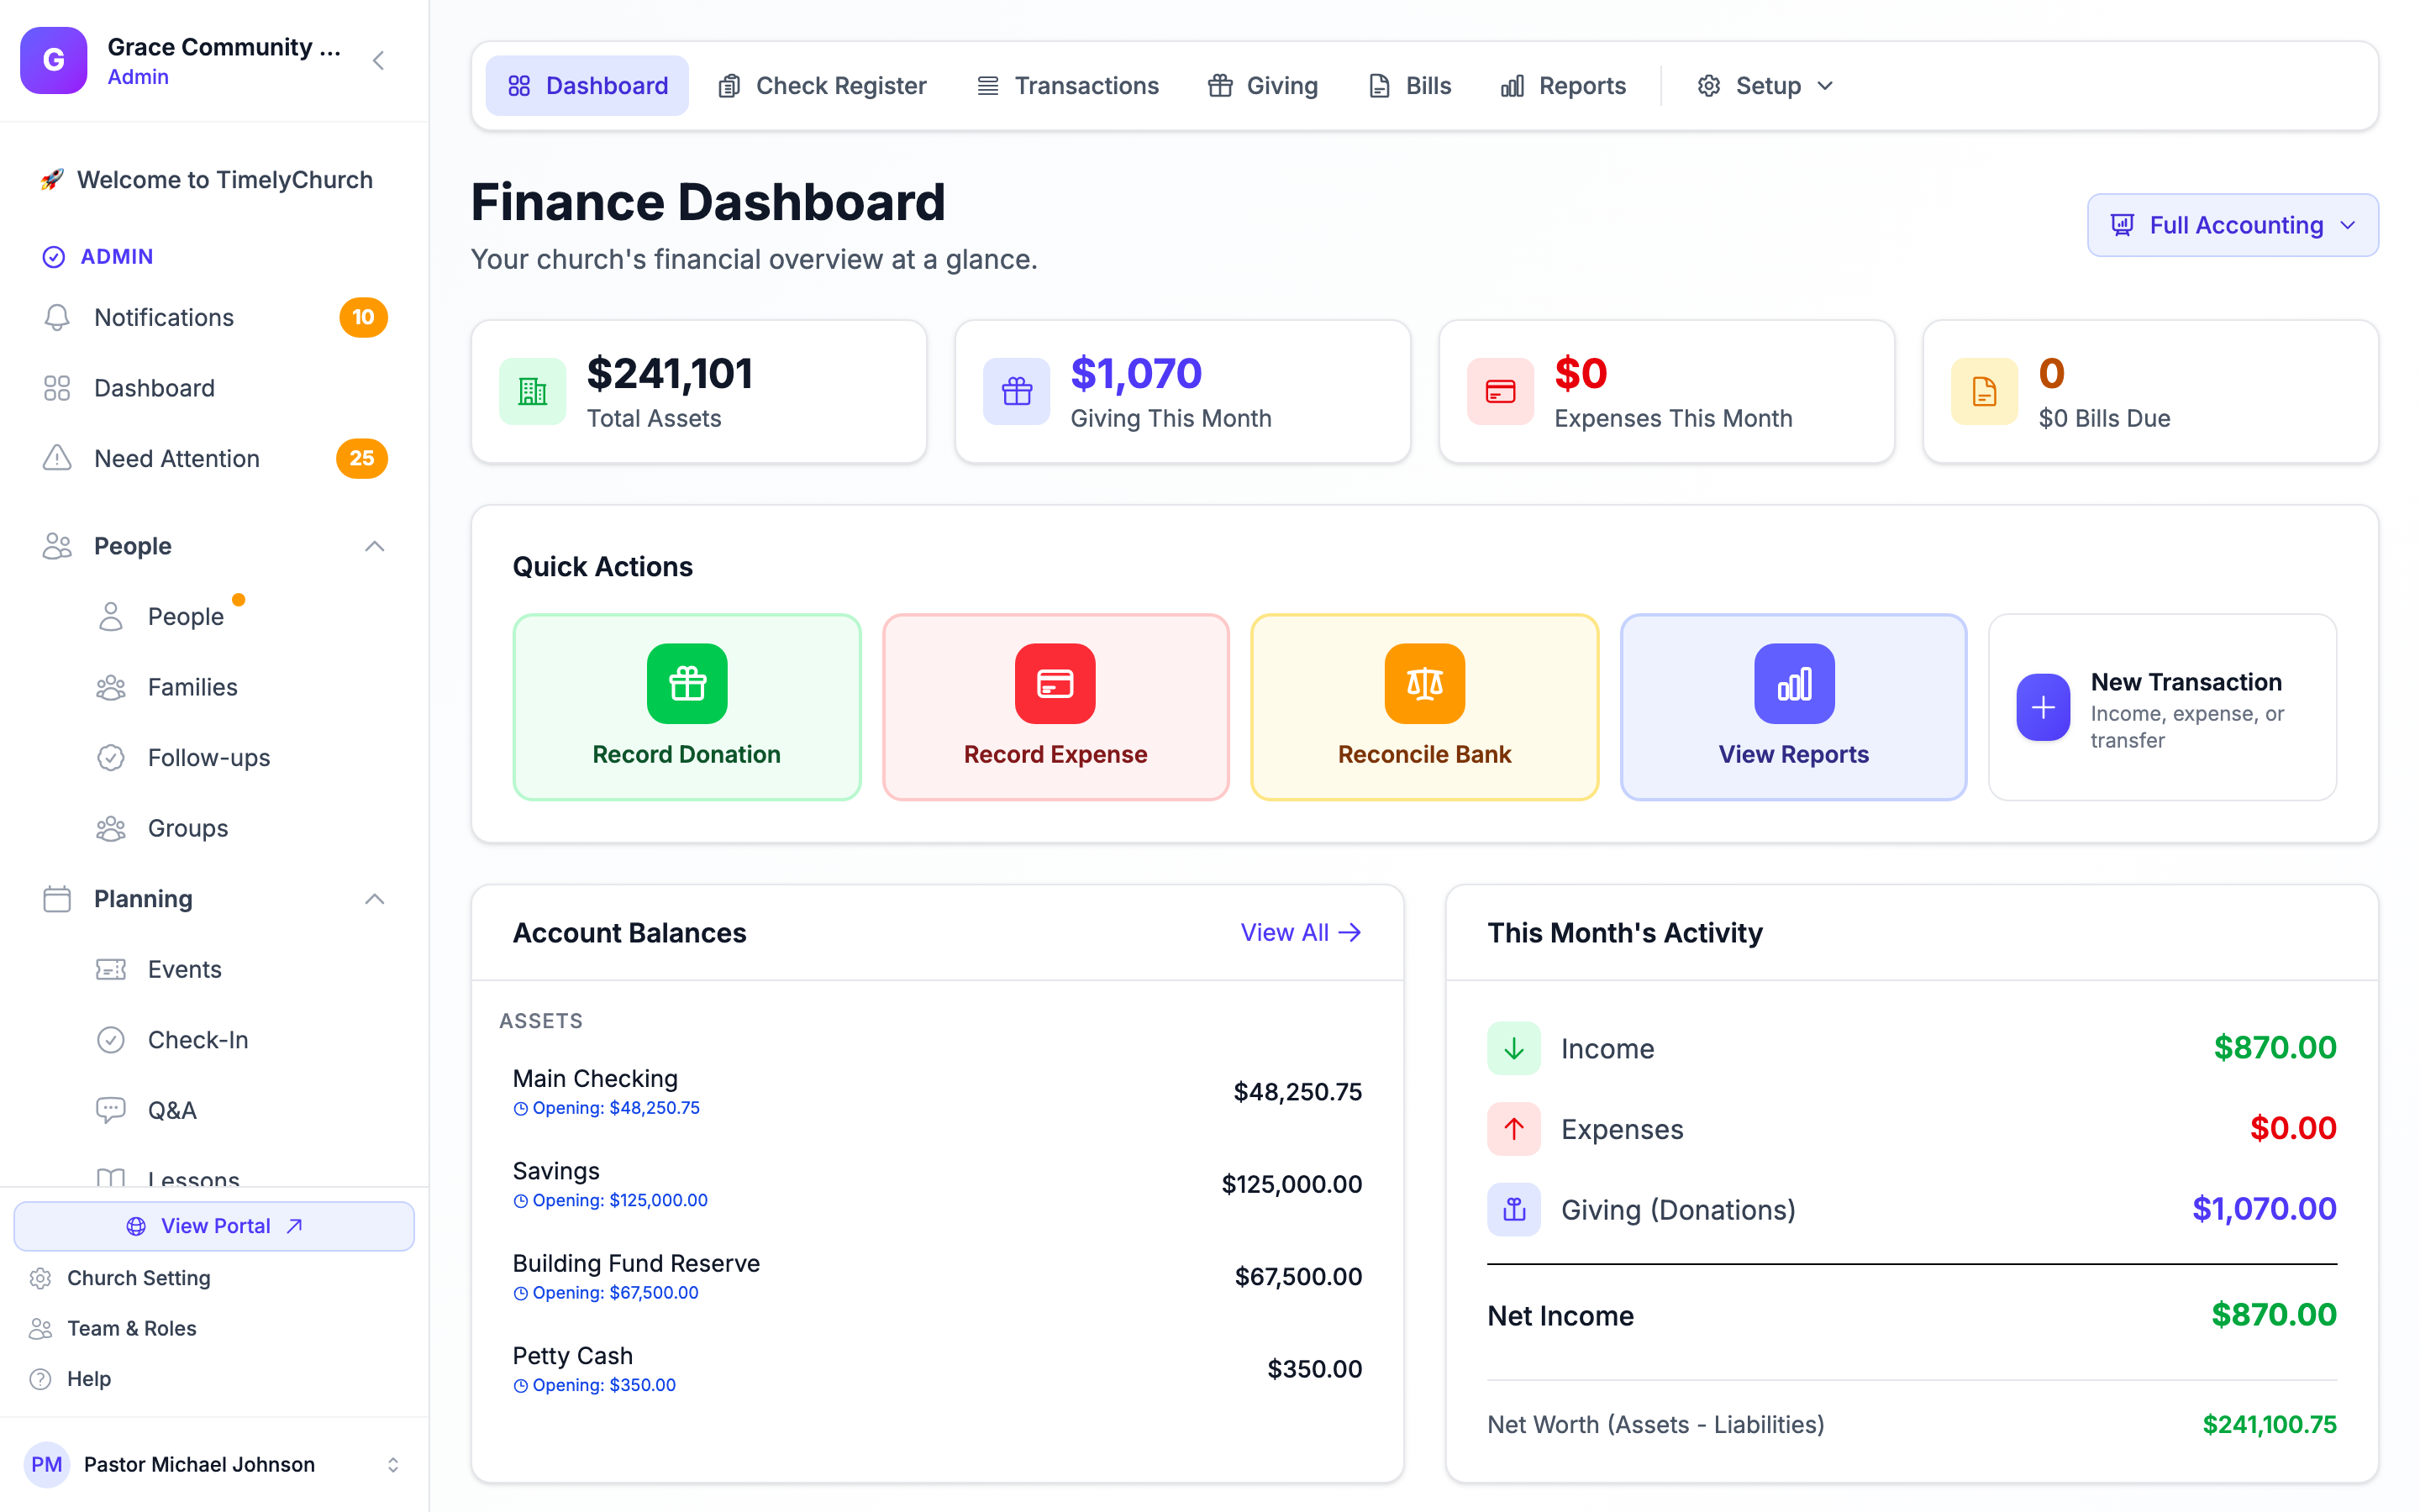
To add a record, use the New Transaction button on the Transactions page. It is a split-action menu with options for New Expense, New Income, New Transfer, New Journal Entry, Import from CSV, Export CSV, and Deleted Transactions.
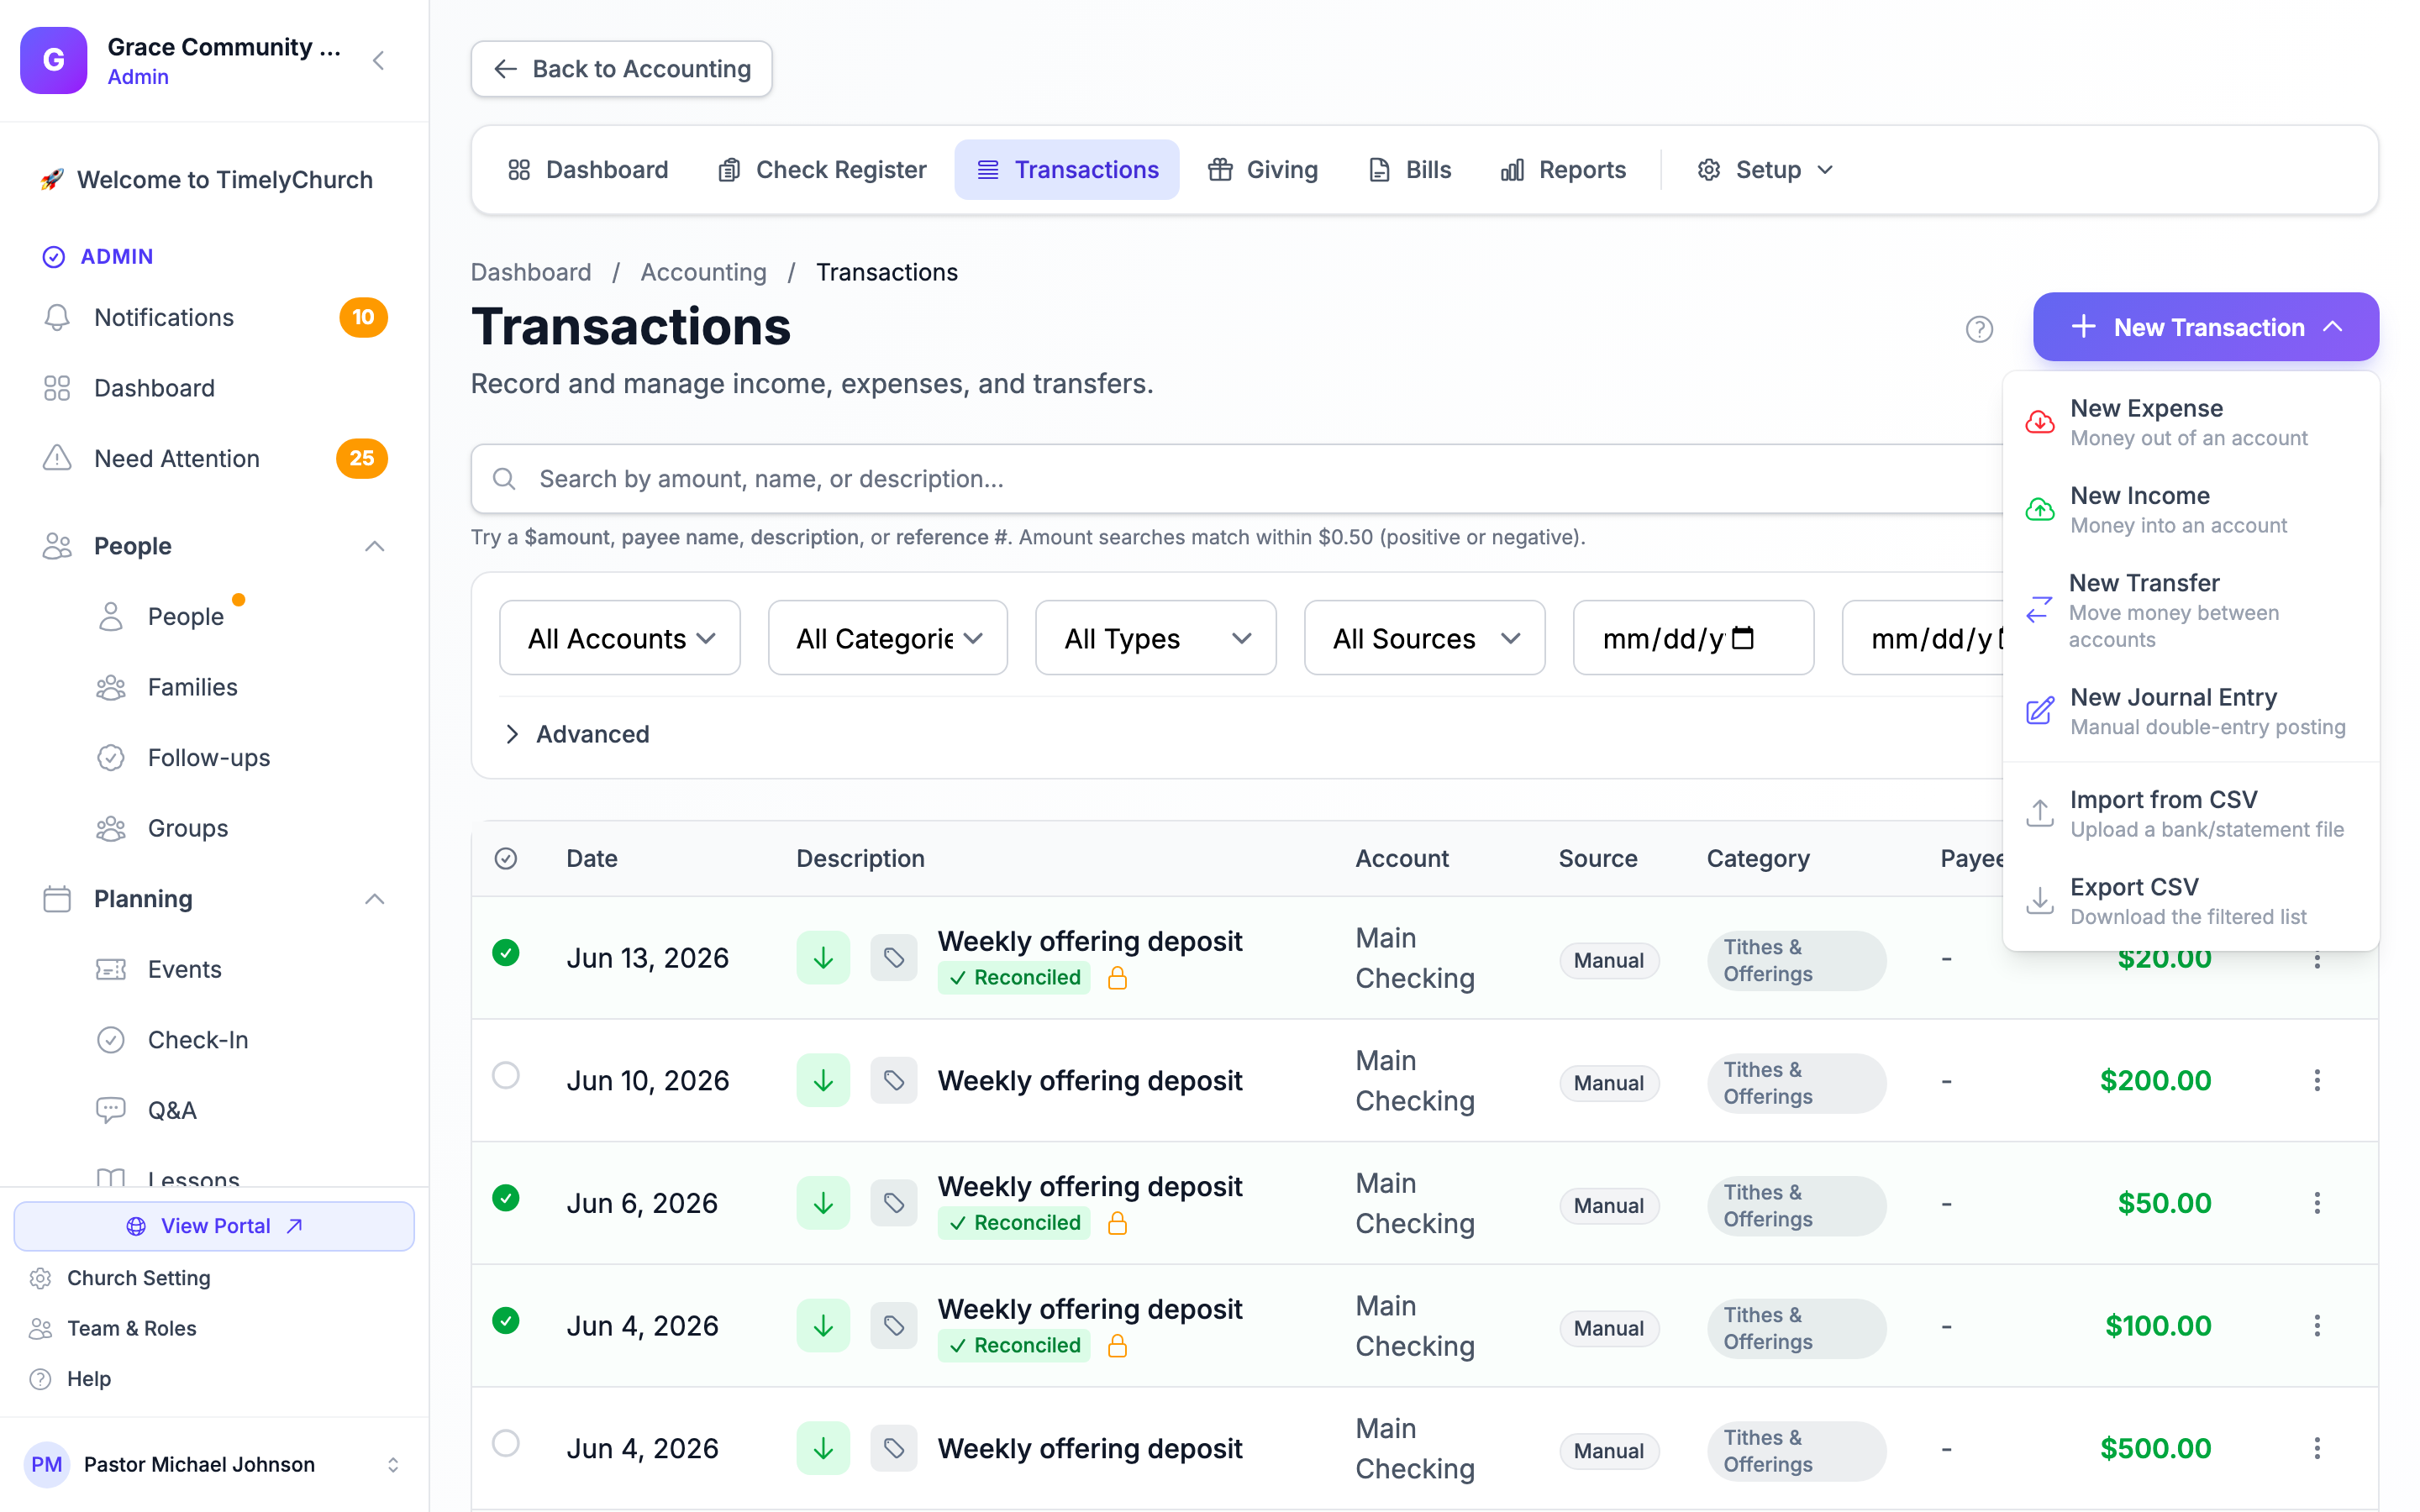
The Finance Dashboard also has quick Record Donation and Record Expense buttons for the most common entries.
Getting Started
If you are setting up accounting for the first time:
- Open Accounting from the Finances area. The first time, a short setup question asks who does the bookkeeping for your church -- pick Simple Checkbook or Full Accounting. This sets your church's default view; anyone can switch their own view later with the Accounting Mode button on the Finance Dashboard.
- (Full mode) On the Chart of Accounts page, click Load Template to populate it with the standard nonprofit church account list, then review and customize the accounts -- rename them, add account numbers, or archive any you do not need.
- Set up your income and expense categories from the Categories page (under Setup ▾ / More ▾). Click Create Defaults for a starter set of standard church income and expense categories, then customize from there.
- Enter your account balances as of the day you started using TimelyChurch -- click Set Starting Balances (Simple) or Set Conversion Balances (Full) on the Finance Dashboard, or Opening Balances on the Chart of Accounts page. See Opening and Starting Balances.
- Start recording transactions. Any donations already entered in the Giving module will automatically appear as income transactions.
Tip: You do not need to set up everything at once. Start with your bank accounts, opening balances, and categories, then add budgets and bills as you get comfortable with the system.
Closing the Year
When a calendar year is finished and your books are reconciled, Close Fiscal Year (in the Setup ▾ / More ▾ menu) locks that year's transactions so they can no longer be changed. See Year-End Close for the checklist and what closing does.