
Recording Transactions
Transaction Types
TimelyChurch supports four kinds of entries from the Transactions page:
- Income -- Money coming into an account (donations, offerings, interest, rental income, etc.). In Simple mode this is labeled Money In.
- Expense -- Money going out of an account (bills, purchases, payroll, utilities, etc.). In Simple mode this is labeled Money Out.
- Transfer -- Moving money between two accounts (e.g., from checking to savings).
- Journal Entry -- A manual double-entry posting where debits must equal credits. This is an Advanced-mode tool for accountants making adjustments. See Journal Entries and Adjustments.
Note: Income, Expense, and Transfer are everyday transactions recorded from the same quick form. Journal Entries open their own dedicated double-entry page.
Finding the Accounting Module
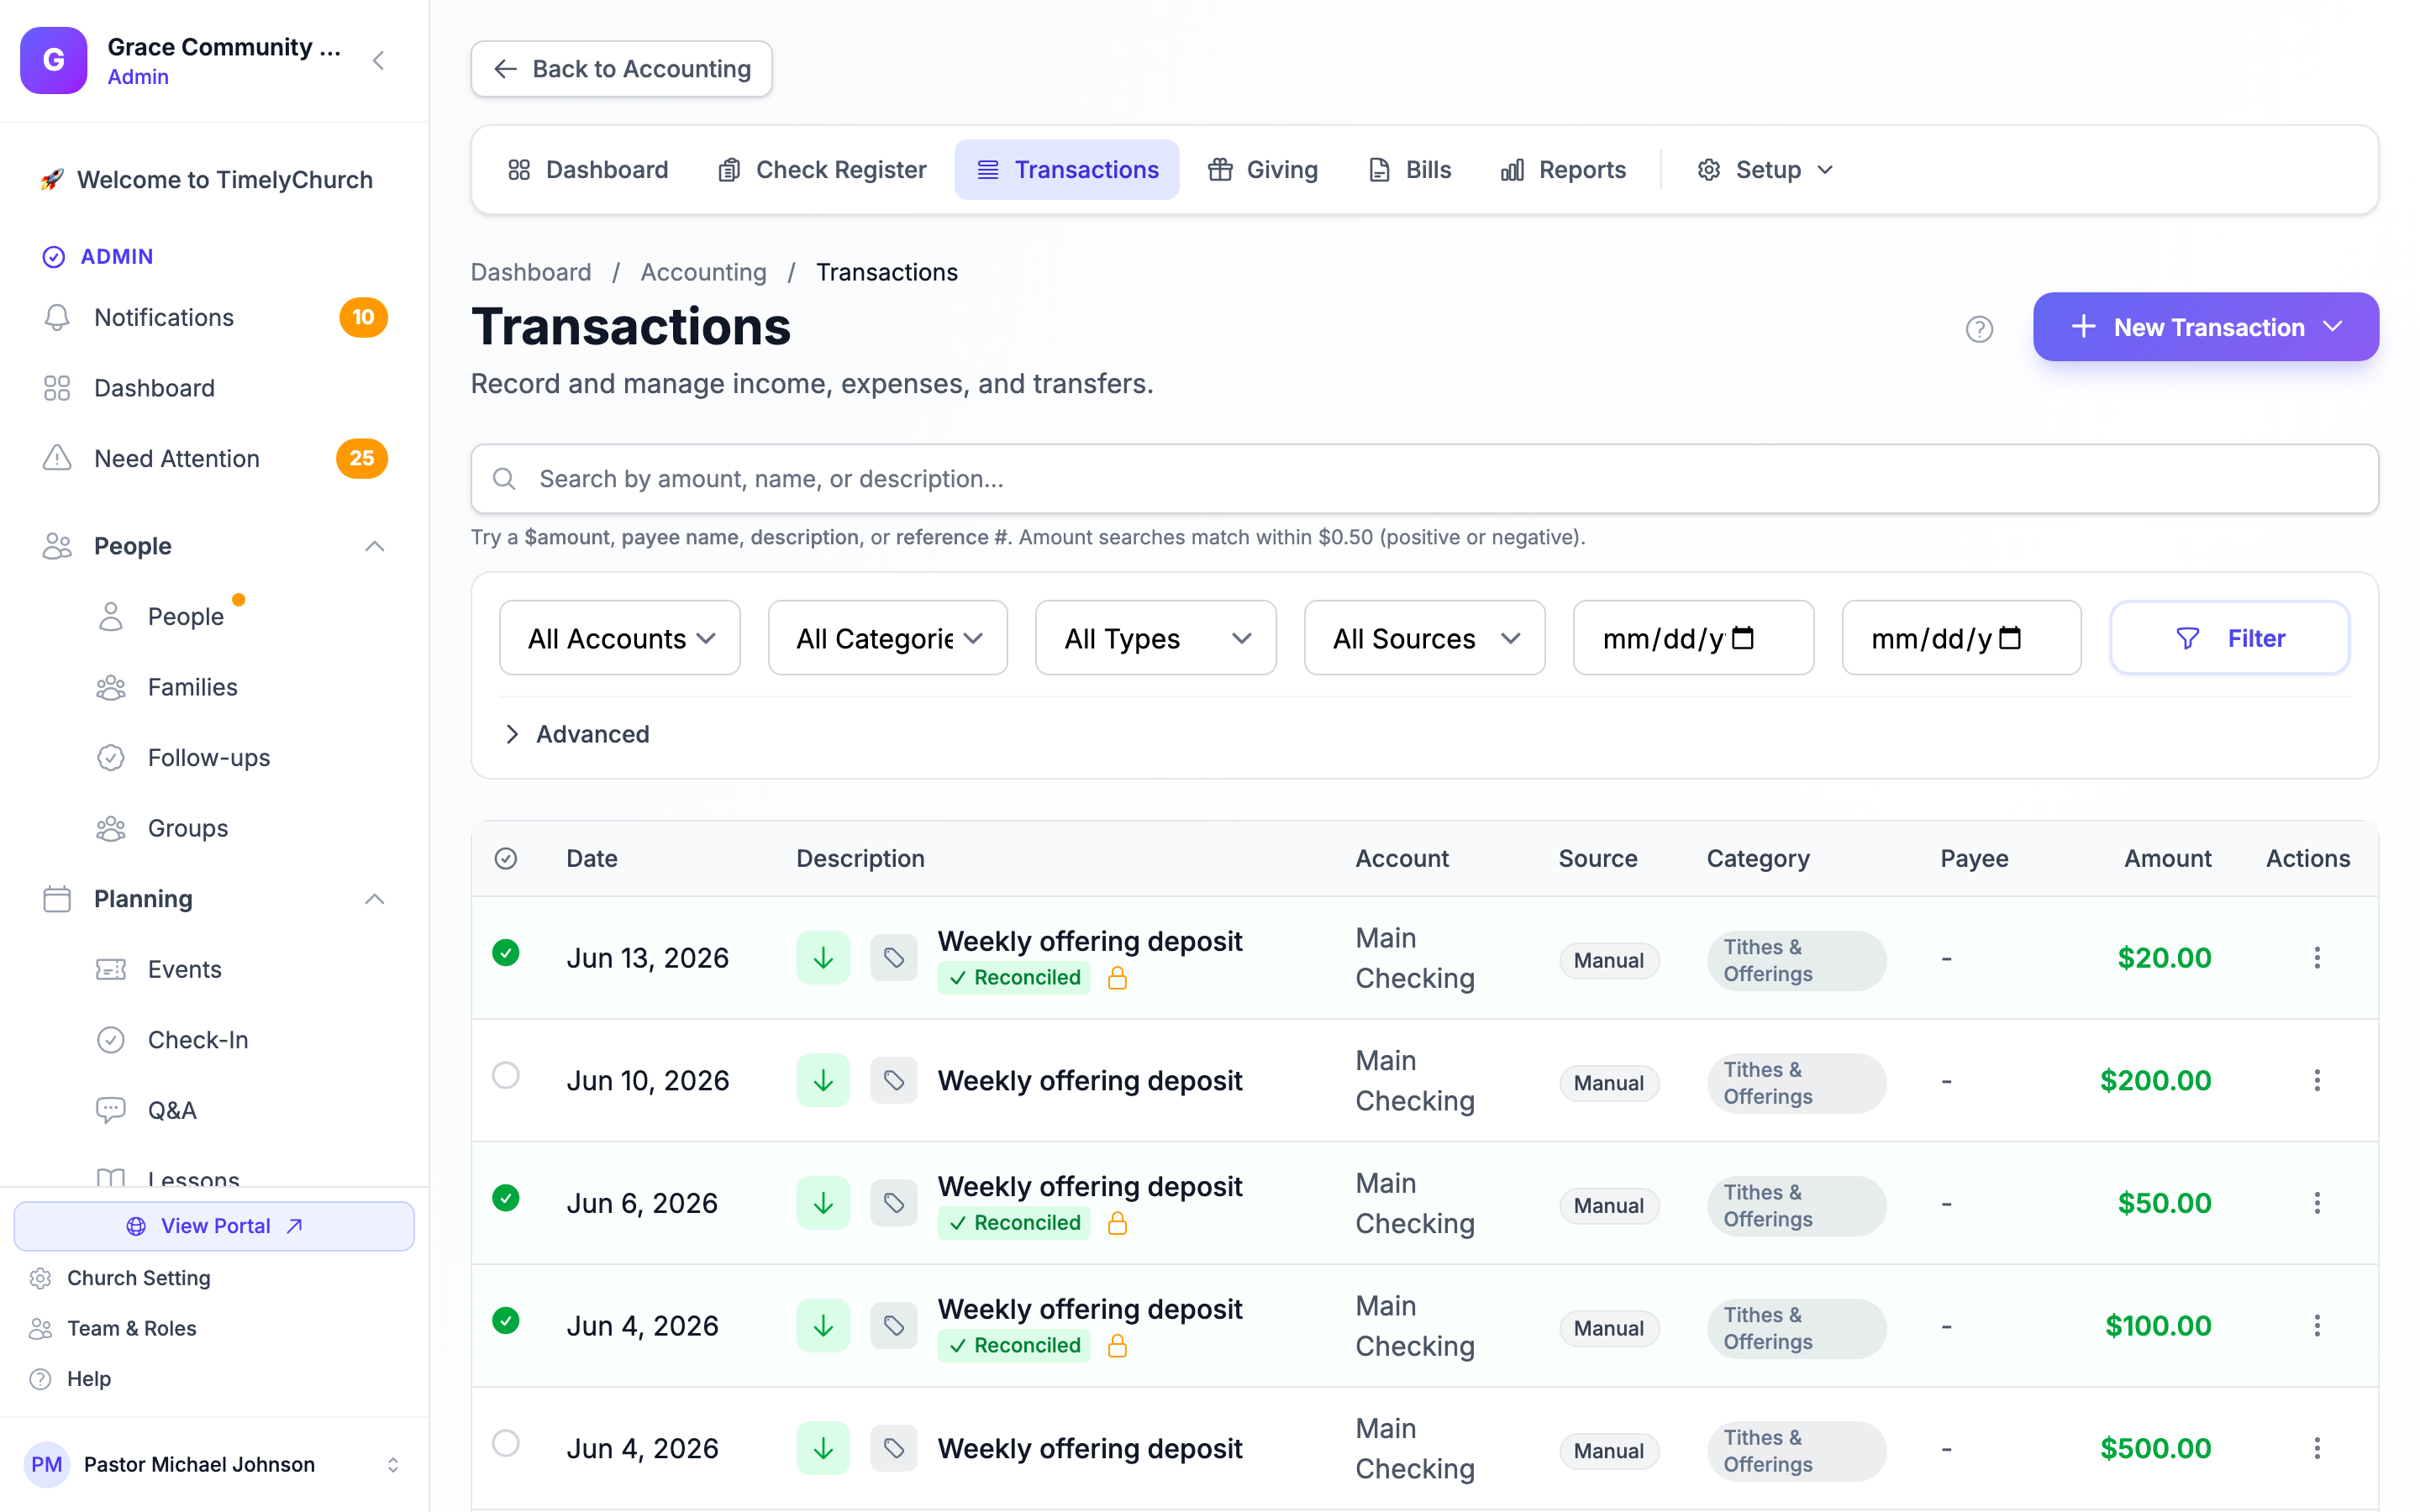
The Accounting module uses a tab bar across the top: Dashboard · Check Register · Transactions · Giving · Bills · Reports. To the right is a Setup ▾ dropdown (in Advanced mode) or More ▾ dropdown (in Simple mode) that holds the configuration surfaces (Chart of Accounts, Categories, Payees, Reconciliation, and more).
Simple vs. Advanced mode: In Simple mode some surfaces are relabeled to be friendlier. The Transactions tab becomes Money In / Out, and the type labels become Money In and Money Out. The data is identical -- only the labels change. See Simple vs. Advanced Accounting Mode.
Where to Record Transactions
There are two places to record transactions in TimelyChurch:
Transactions Page
Open the Transactions tab (shown as Money In / Out in Simple mode). This page shows all transactions across all accounts and provides the full record form with every available field.
Check Register (Quick Entry)
Open the Check Register tab. This is a streamlined, checkbook-style view filtered to a single bank account. It includes a Quick Entry option for rapid data entry.
Recording a Transaction (Transactions Page)
- Open the Transactions tab.
- Click the New Transaction button. It is a split-action button -- clicking the arrow on the right opens a menu with:
- New Expense -- Money out of an account
- New Income -- Money into an account
- New Transfer -- Move money between accounts
- New Journal Entry -- Manual double-entry posting (opens its own page)
- Import from CSV -- Upload a bank/statement file
- Export CSV -- Download the filtered list
- Deleted Transactions -- View and restore deleted items
- Choose New Expense, New Income, or New Transfer. The record form opens with that type pre-selected. You can switch the type at any time using the Income / Expense / Transfer tabs at the top of the form.
- Fill in the following fields:
- Amount -- The dollar amount (must be greater than $0.00). Required.
- Date -- The transaction date. Required.
- Description -- Brief description of the transaction.
- Account -- The bank or financial account this transaction belongs to. (For a Transfer, this is labeled From Account.) Required.
- Category -- Select an income or expense category to classify the transaction. (Not shown for Transfers.)
- To Account -- Transfers only -- the account the money moves into.
- Payee -- Expenses only. Select a payee/vendor, search for one, or add a new payee inline -- see Managing Payees and Vendors.
- Donation Details -- Income only. Optionally link a donor, record a payment method, and enter a processing fee (see the Processing Fee note below).
- Fund -- Optionally assign the transaction to a specific fund.
- Tracking Class -- Full Accounting only. Optionally tag the transaction with a tracking class (e.g., a ministry, campus, or program). See Tracking Classes.
- Reference # -- Invoice number, receipt number, or any reference.
- Check # -- Expenses only, for transactions paid by check.
- Notes -- Additional details (internal use only).
- Receipts & Invoices -- Attach the receipt or invoice (see Receipts and Invoices below).
- Click Record Transaction.
Processing Fee (income only): If a third-party processor (PayPal, Cash App, etc.) deducted a fee from the deposit, enter it in the Fee: box in the Donation Details section ("Donor gets full credit"). The system records the gross amount as income and the fee as a separate expense so reports show both gross giving and net deposits accurately.
Which account the gift lands in: On an income entry, the Account field is the bank or asset account the money was deposited to, so the gift shows up in that account's register, ready to reconcile. If a processing fee was withheld, only the net amount is added to the bank account, while the gift is still recorded at its full gross value for giving and fund reports.
Quick Record Donation / Record Expense: The Finance Dashboard has two quick forms. Record Donation asks for the donor, Fund, Deposit to account, payment method, date, amount, and a memo, and saves with Save Donation. Record Expense includes Fund, Reference #, and Check #, and saves with Save Expense. Use them to capture the common details without opening the full form.
Tip: Need to allocate a single deposit or expense across multiple categories? Turn on the Split Transaction toggle in the form to add per-category split lines -- see Split Transactions. (Splits are not available for Transfers.)
Quick Entry in Check Register
The Check Register provides a fast way to enter transactions without opening the full record form.
- Open the Check Register tab (titled Checkbook in Simple mode).
- Select the bank account from the Account dropdown at the top. The running balance for that account is shown alongside it.
- Click Quick Entry and use the entry panel:
- Choose Payment or Deposit, then enter the Amount, Date, and Check # (optional).
- Pick who you paid under Pay to (search, or add a new payee), or for a deposit fill in the Donation Details (donor, payment method, and an optional processing fee).
- Choose a Category and add a Note.
- Click Save.
The transaction appears immediately in the register and the account balance updates in real time. The register marks reconciled lines with R, and Export CSV downloads the selected account's transactions.
Tip: The Check Register is the best option for day-to-day bookkeeping tasks like recording checks, deposits, and debit card purchases.
Automatic Donation Transactions
When donations are recorded through the Giving module (manual entry, online giving, or deposit batches), TimelyChurch automatically creates corresponding income transactions in the Accounting module. These auto-generated transactions include:
- The donor's name in the description (or "Anonymous" for anonymous gifts)
- The payment method (cash, check, online, etc.)
- The check number (for check payments)
- The fund allocation
- A reference number linking back to the original donation
If a donor splits a gift across multiple funds, separate transactions are created for each allocation.
Donor names in the ledger: Who gave is Giving information. People whose role is below the Bookkeeper Giving level -- including people who only have Accounting -- see these lines as "Donation from Donor (Cash)", and a gift's edit window opens without the donor. Linking a donor when you record income here needs the Counter Giving level or higher, and changing the donor on an existing gift needs the Bookkeeper level. See Who Can See Giving and Donations.
Important: You do not need to manually enter donation income. The system does it automatically. If you also enter it manually, you will have duplicate records.
Transfers Between Accounts
To record a transfer (e.g., moving money from checking to savings):
- Click the New Transaction arrow and choose New Transfer.
- Select the From Account (the account the money leaves).
- Select the To Account (the account the money enters).
- Enter the amount and date.
- Click Record Transaction.
Both account balances will update automatically. The source account decreases and the destination account increases by the transfer amount.
Editing a Transaction
- Find the transaction on the Transactions page or in the Check Register.
- Open its actions menu and choose Edit.
- Update any fields as needed in the Edit Transaction window. You can also add or remove attachments under Receipts & Invoices.
- Click Update Transaction.
Editing a reconciled transaction: If the transaction is already reconciled, a warning opens first ("Editing it may cause your bank reconciliation to be out of balance."). Click Edit Anyway (Continue editing in Simple mode) only if you are sure -- fixing a typo in the memo or payee is fine, but changing the amount or date can unbalance your last reconciliation.
Account balances are recalculated automatically after any edit. If you change the account assignment, both the old and new accounts will have their balances updated.
Editing splits: If the transaction is split across categories, the Split Transaction panel opens pre-filled with its current split lines, so you can change the categories or amounts directly instead of deleting and re-creating the transaction -- see Split Transactions.
Duplicating a Transaction
For transactions that repeat frequently (but are not set up as recurring), you can duplicate an existing transaction.
- Find the transaction in the Transactions list.
- Open its actions menu and choose Duplicate.
- A copy is created with today's date and "(Copy)" appended to the description.
- Edit the duplicated transaction to update any details.
Note: Duplicated transactions are not marked as reconciled, even if the original was.
Deleting a Transaction
Deleting needs the Delete permission on the Accounting row of your role.
- Find the transaction you want to remove.
- Open its actions menu and choose Delete.
- Confirm the deletion.
The transaction moves to Deleted Transactions (see below) and the account balance is recalculated automatically.
Important: You cannot delete a transaction that has been reconciled (the Delete option is not shown) or that has an issued donation receipt. This protects the audit trail: the integrity of completed bank reconciliations and of receipts already given to donors. If you need to reverse a locked transaction, create a new offsetting transaction instead.
Deleted Transactions (Restore or Delete Permanently)
Deleted transactions are not gone yet. To see them, click the New Transaction arrow on the Transactions page and choose Deleted Transactions.
The Deleted Transactions page ("Recently deleted transactions can be restored or permanently removed here.") lists each one with its date, description, account, amount, Deleted by, and when it was Deleted:
- Restore adds the transaction back to your live register and updates account balances ("Restore this transaction? It will be added back to your live register."). Needs the Edit permission.
- Delete removes it for good after you confirm Delete Permanently -- this cannot be undone. Needs the Delete permission. Reconciled or receipted transactions cannot be permanently deleted.
Journal entries are not listed here -- see Journal Entries and Adjustments.
Reconciled Status
The narrow first column of the Transactions table (headed by a check-mark icon) shows whether each transaction is reconciled, and reconciled rows are shaded green with a Reconciled badge. The column is read-only: transactions are reconciled in the Bank Reconciliation wizard -- see Bank Reconciliation.
Filtering and Searching Transactions
The Transactions page provides several filters:
- Account -- Show transactions for a specific account.
- Category -- Show transactions in a specific category.
- Type -- Filter by income, expense, or transfer.
- Source -- Filter by where the transaction came from (manual entry or a specific import source).
- Date Range -- Show transactions within a specific date range.
An Advanced panel adds an amount range, payee, and reconciliation-status filter (Reconciled only / Unreconciled only). There is also a search bar at the top ("Search by amount, name, or description...") that matches an amount, payee name, description, or reference number. Filters apply as you select them.
All filters can be combined. The current filters are preserved in the URL, so you can bookmark a filtered view or share it with another admin.
Exporting Transactions to CSV
You can export your filtered transaction list to a CSV file for use in spreadsheets or external accounting tools.
- Apply any desired filters on the Transactions page.
- Click the New Transaction arrow and choose Export CSV.
- The download will include all transactions matching your current filters.
The exported CSV honors your current filters.
Tip: The CSV export uses UTF-8 encoding with a BOM (Byte Order Mark) for proper display in Microsoft Excel. Special characters and international text will display correctly.
Receipts and Invoices
Every transaction can carry its paperwork. In the record or edit window, use Receipts & Invoices to attach a PDF or image (JPG, PNG, HEIC) -- up to 5 files, 10 MB each. When you edit the transaction later, each attachment has View and a delete button ("Delete this attachment? This cannot be undone.").
- Every receipt is on the record. Adding or removing a receipt is written to the Audit Log on that transaction -- "Receipt attached" or "Receipt removed" -- with the file's name and who did it.
- Closed years keep their receipts. A receipt on a transaction dated in a fiscal year you have closed cannot be deleted: "This transaction is dated in fiscal year [year], which is closed, so its receipts cannot be removed. Receipts stay with the closed books."
- From an AI assistant. A connected AI assistant can attach a file that is already in your church's Drive as a receipt, or remove one, after your approval. See What Your AI Assistant Can Read and Change.
Importing Transactions from a Bank CSV
Instead of entering each transaction by hand, you can upload a CSV file from your bank and let TimelyChurch match each line to one of your accounts and categories. Click the New Transaction arrow on the Transactions page and choose Import from CSV. Imports go through a review queue (you confirm or reject each row) before they post, and a count badge appears on the Transactions tab while rows are waiting for review. See Bank CSV Import for the full workflow and supported bank formats.
Categories
Categories help you classify transactions for reporting and budgeting. TimelyChurch maintains two types:
- Income categories (e.g., Tithes & Offerings, Donations, Fundraising, Grants)
- Expense categories (e.g., Salaries & Wages, Utilities, Building & Maintenance, Missions)
Categories are managed separately from accounts. You can load default categories, create custom ones, or set up sub-categories for more detailed tracking.
To manage categories, open the Setup ▾ dropdown (or More ▾ in Simple mode) in the Accounting tab bar and choose Categories.