
Setting Up Roles and Permissions
Roles control what each team member can see and do in TimelyChurch. By setting up roles thoughtfully, you make sure everyone has access to the tools they need -- and only the tools they need.
Understanding Roles
A role is a set of permissions that you assign to a team member. When you invite someone to your team, you choose which role they get. That role determines which sections of the admin panel they can access and what actions they can take.
For example:
- An Administrator can access everything.
- A teacher role might only see lessons, schedules, and attendance.
- A media volunteer role might only access announcements and events.
Accessing Roles
- Log in to your TimelyChurch admin panel.
- In the sidebar, expand the Administration category.
- Click Roles & Permissions.
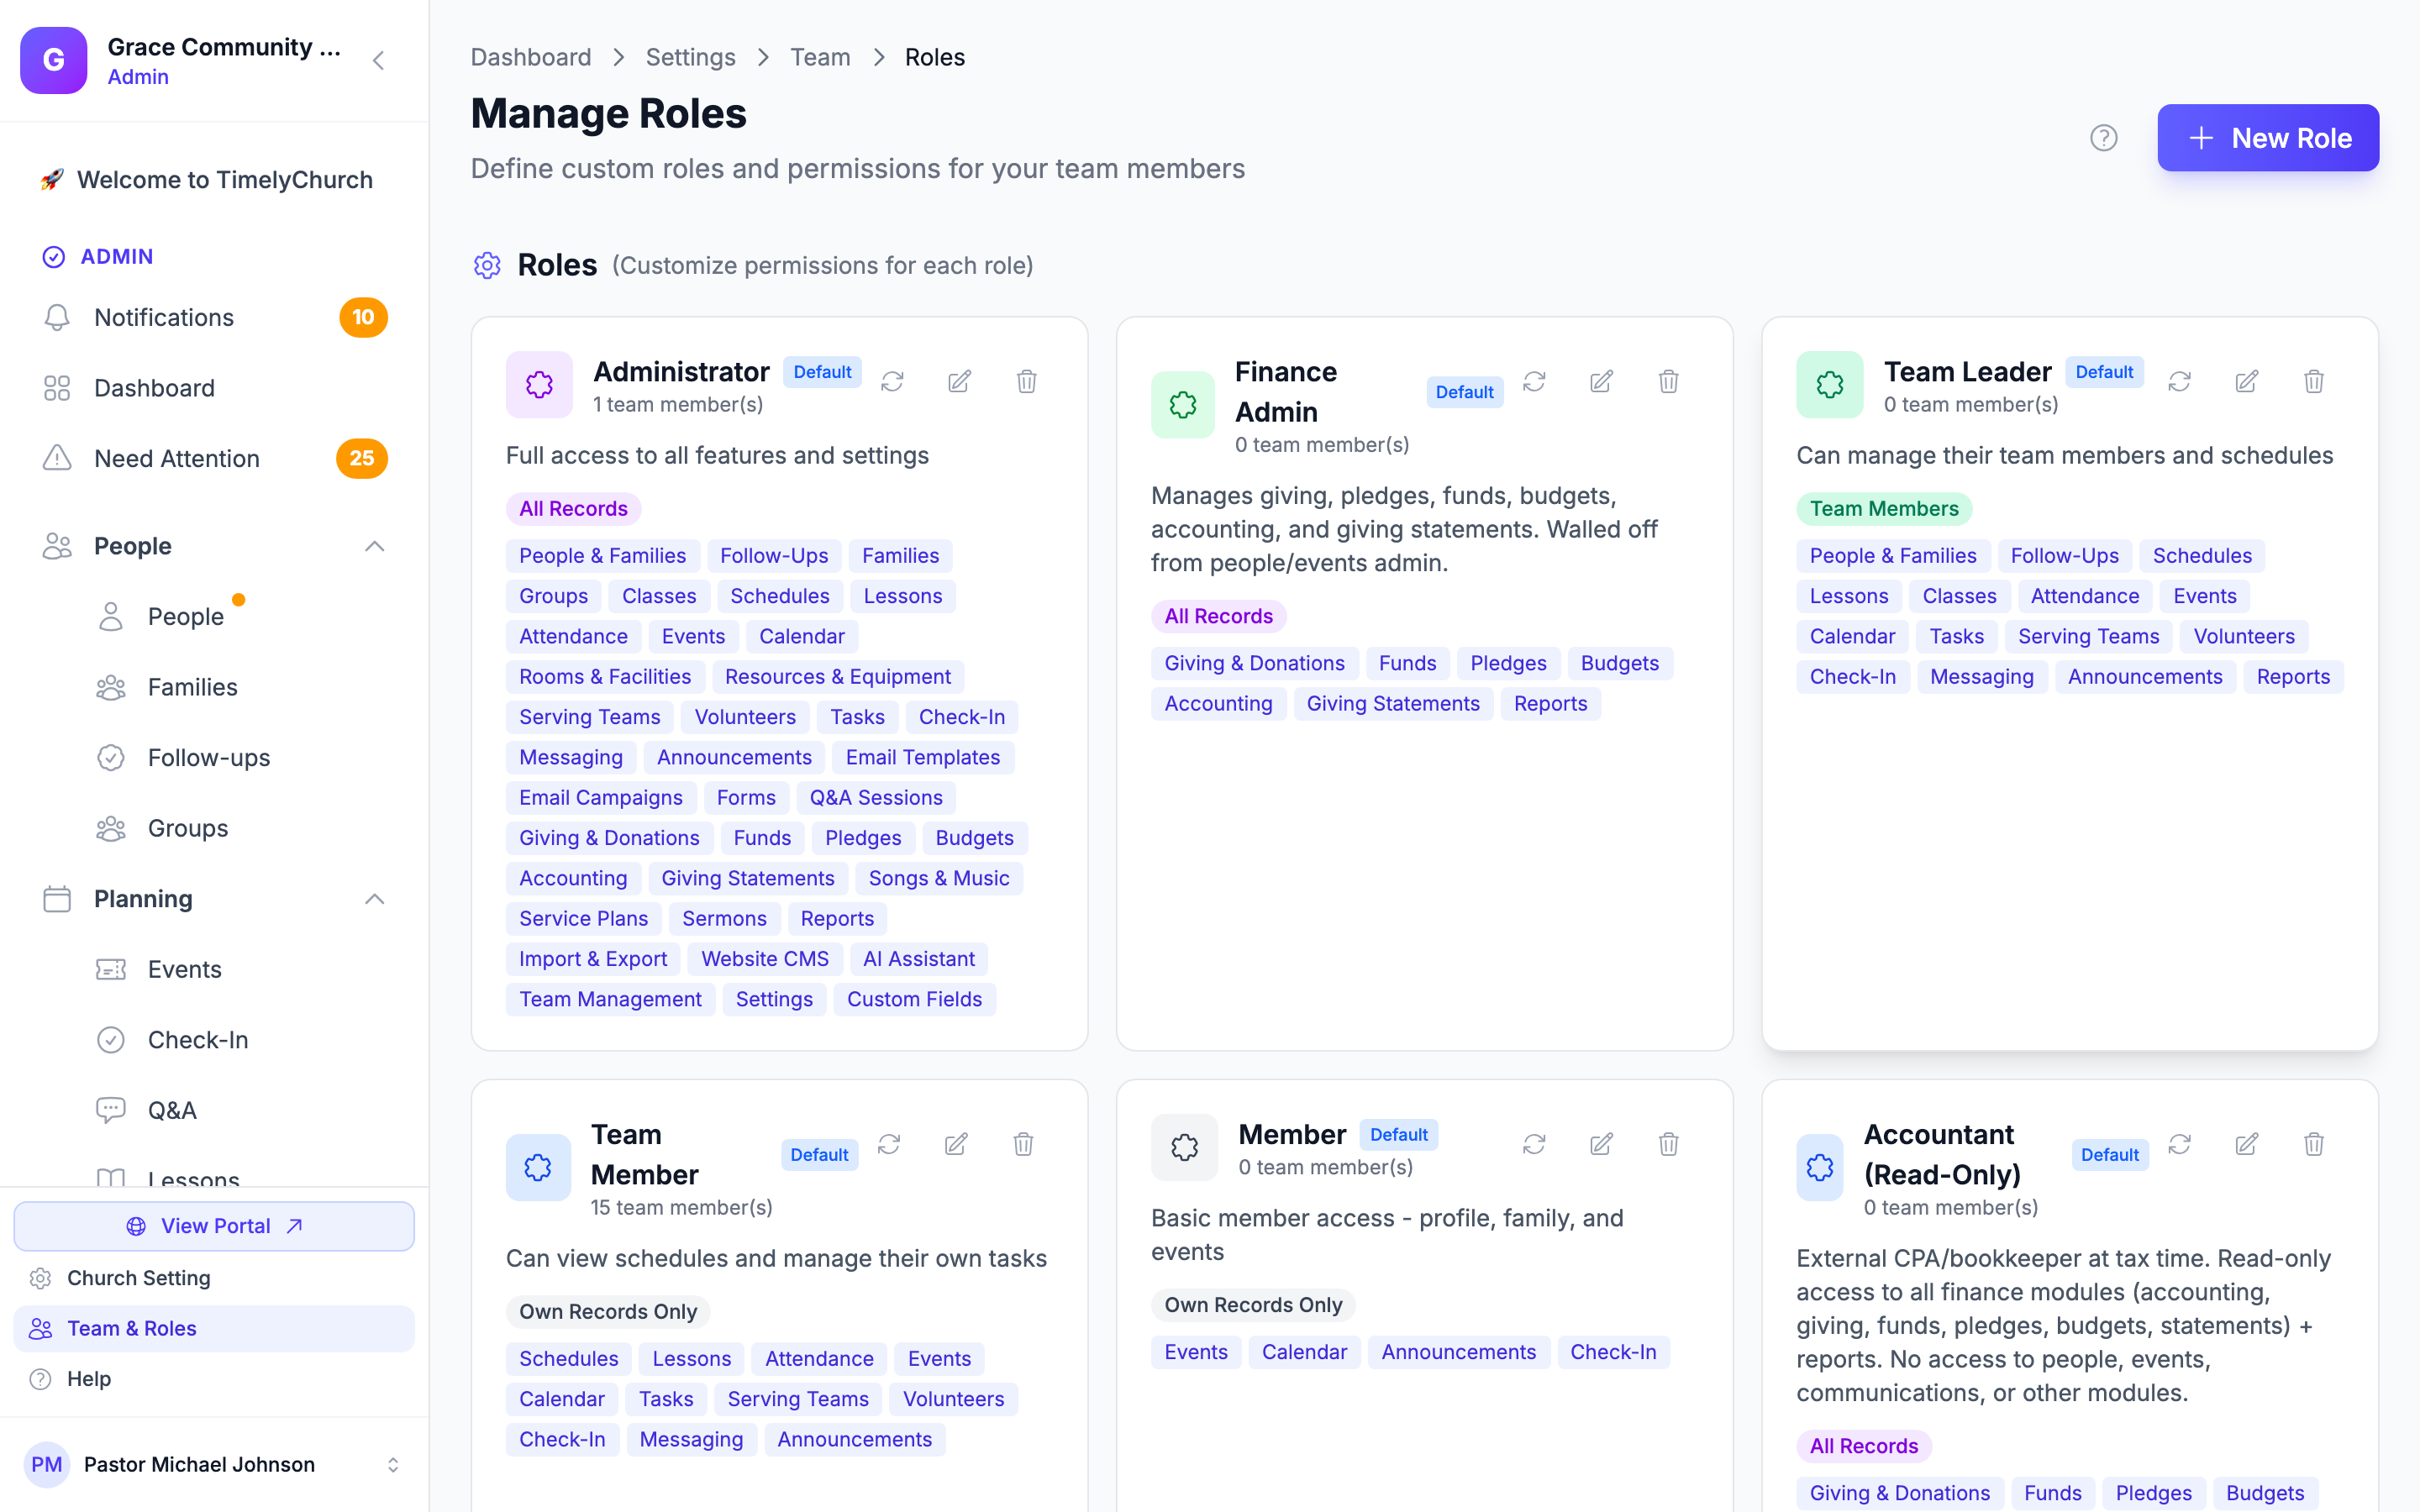
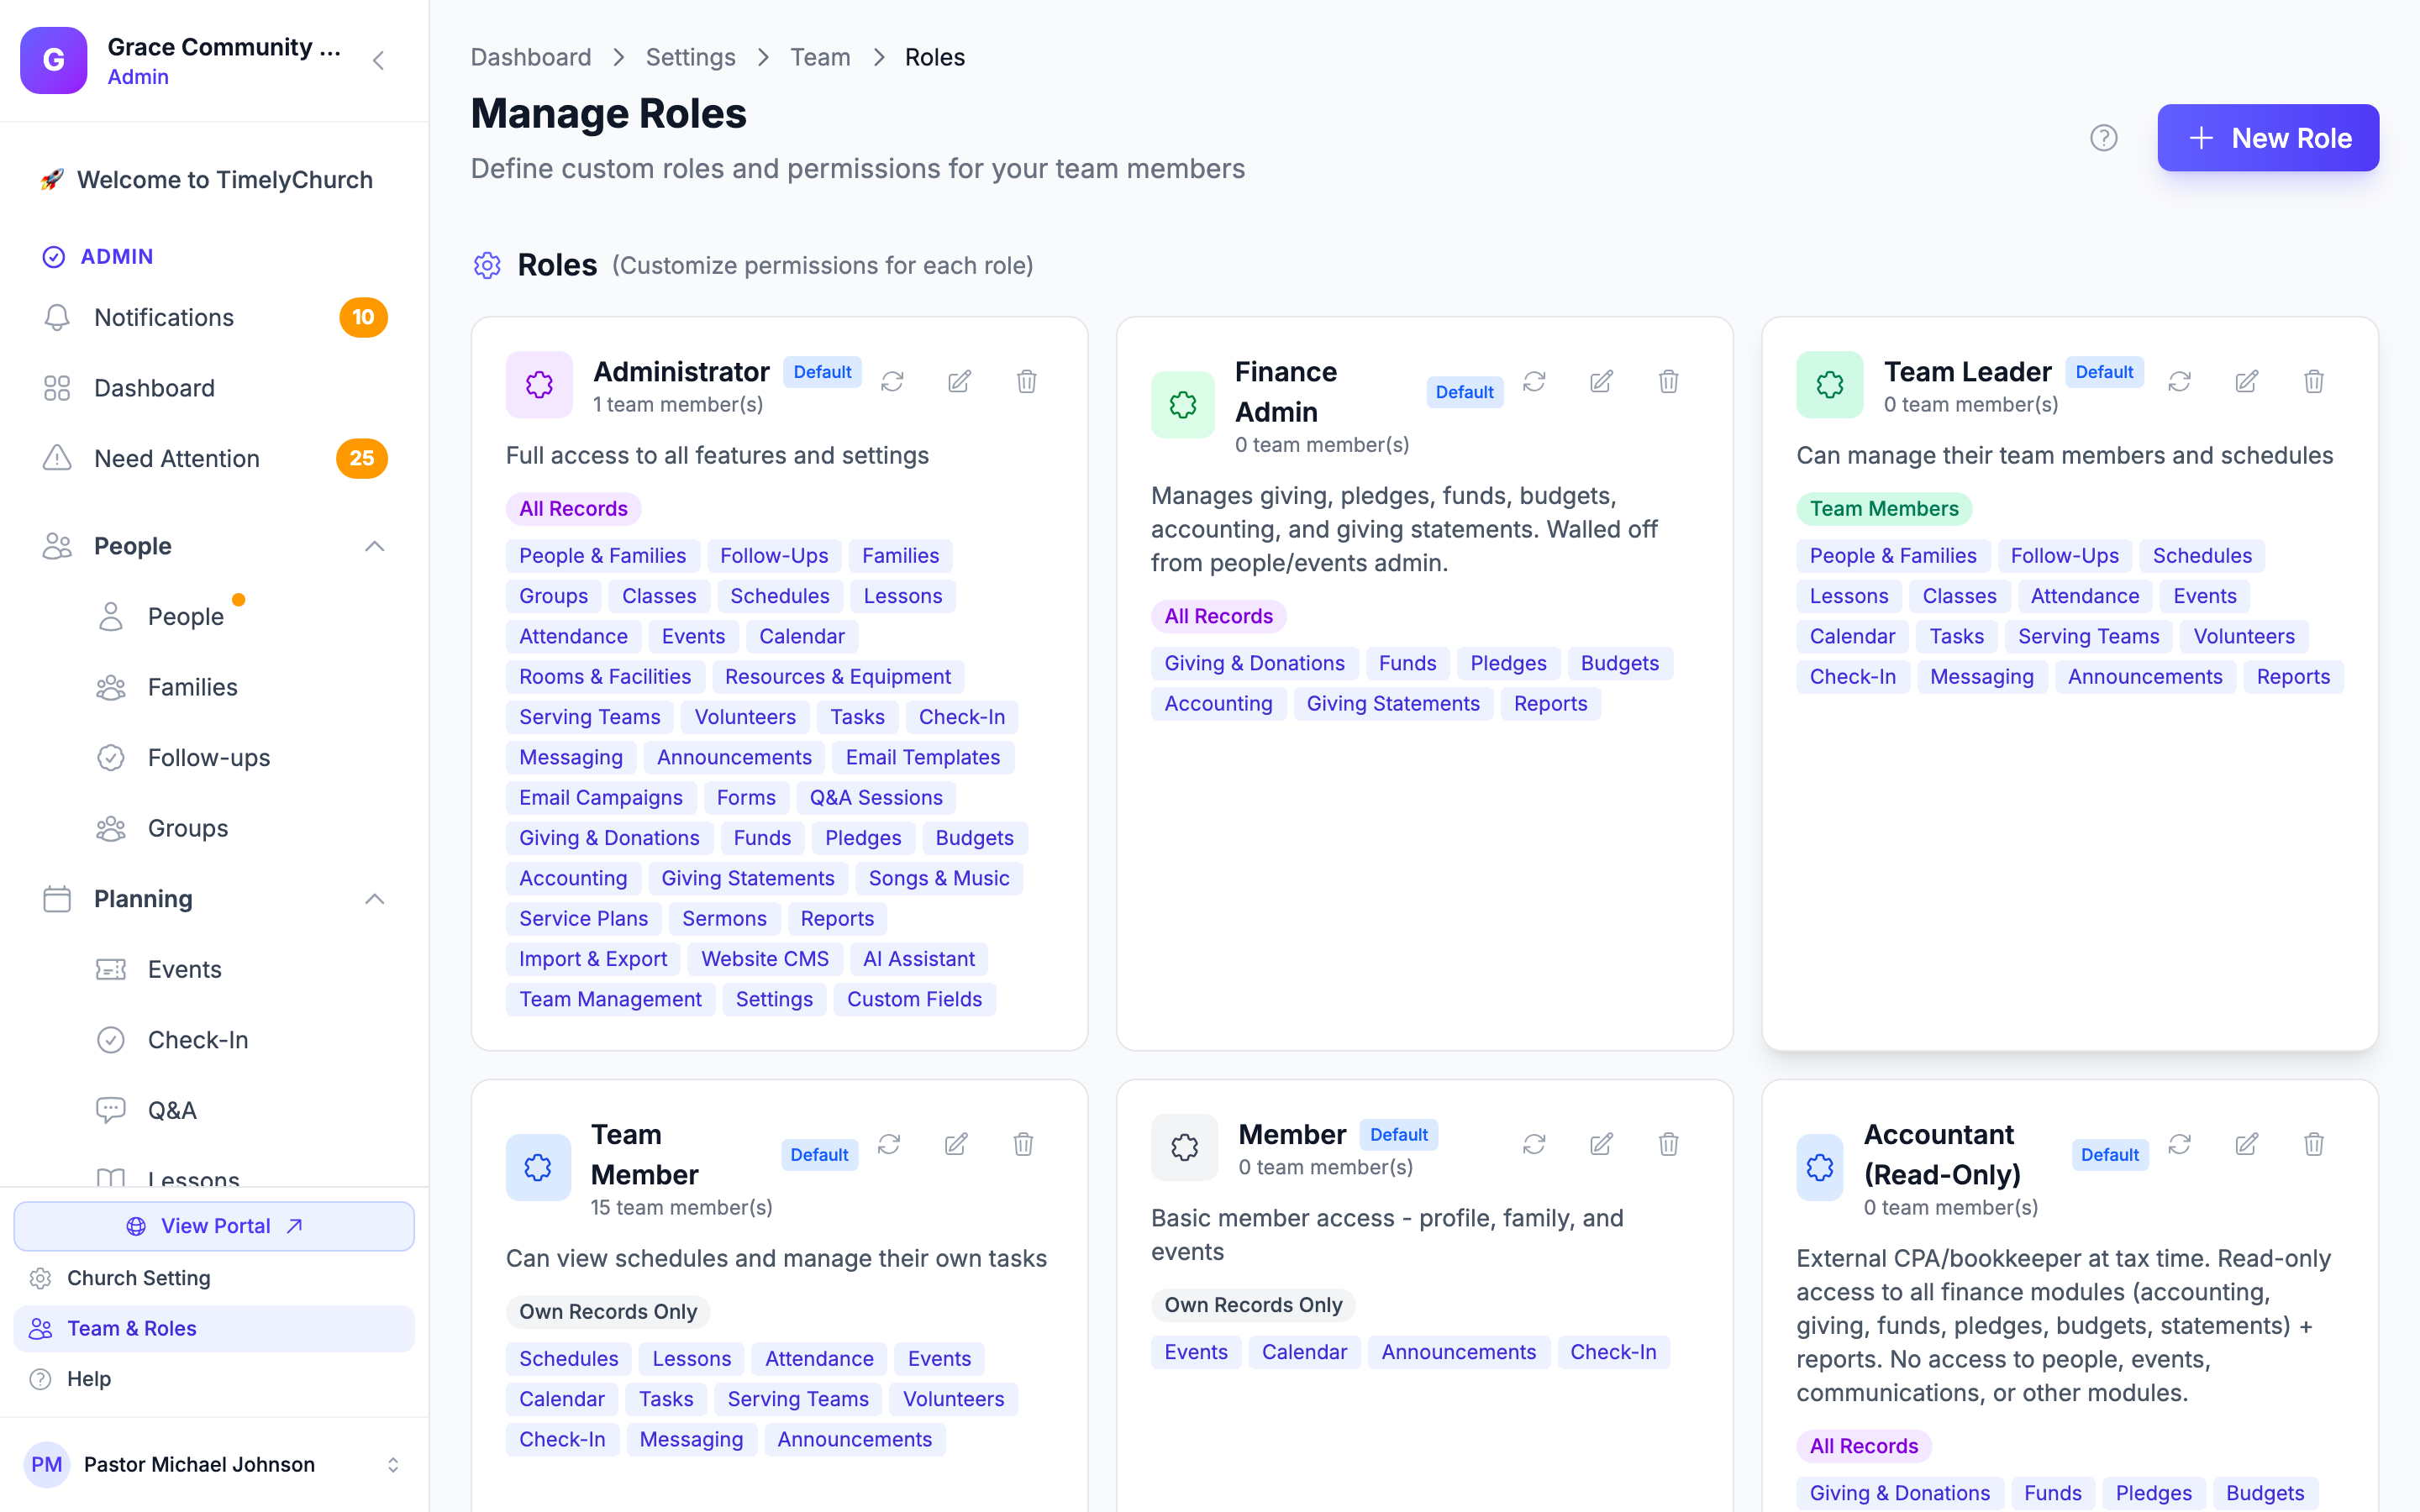
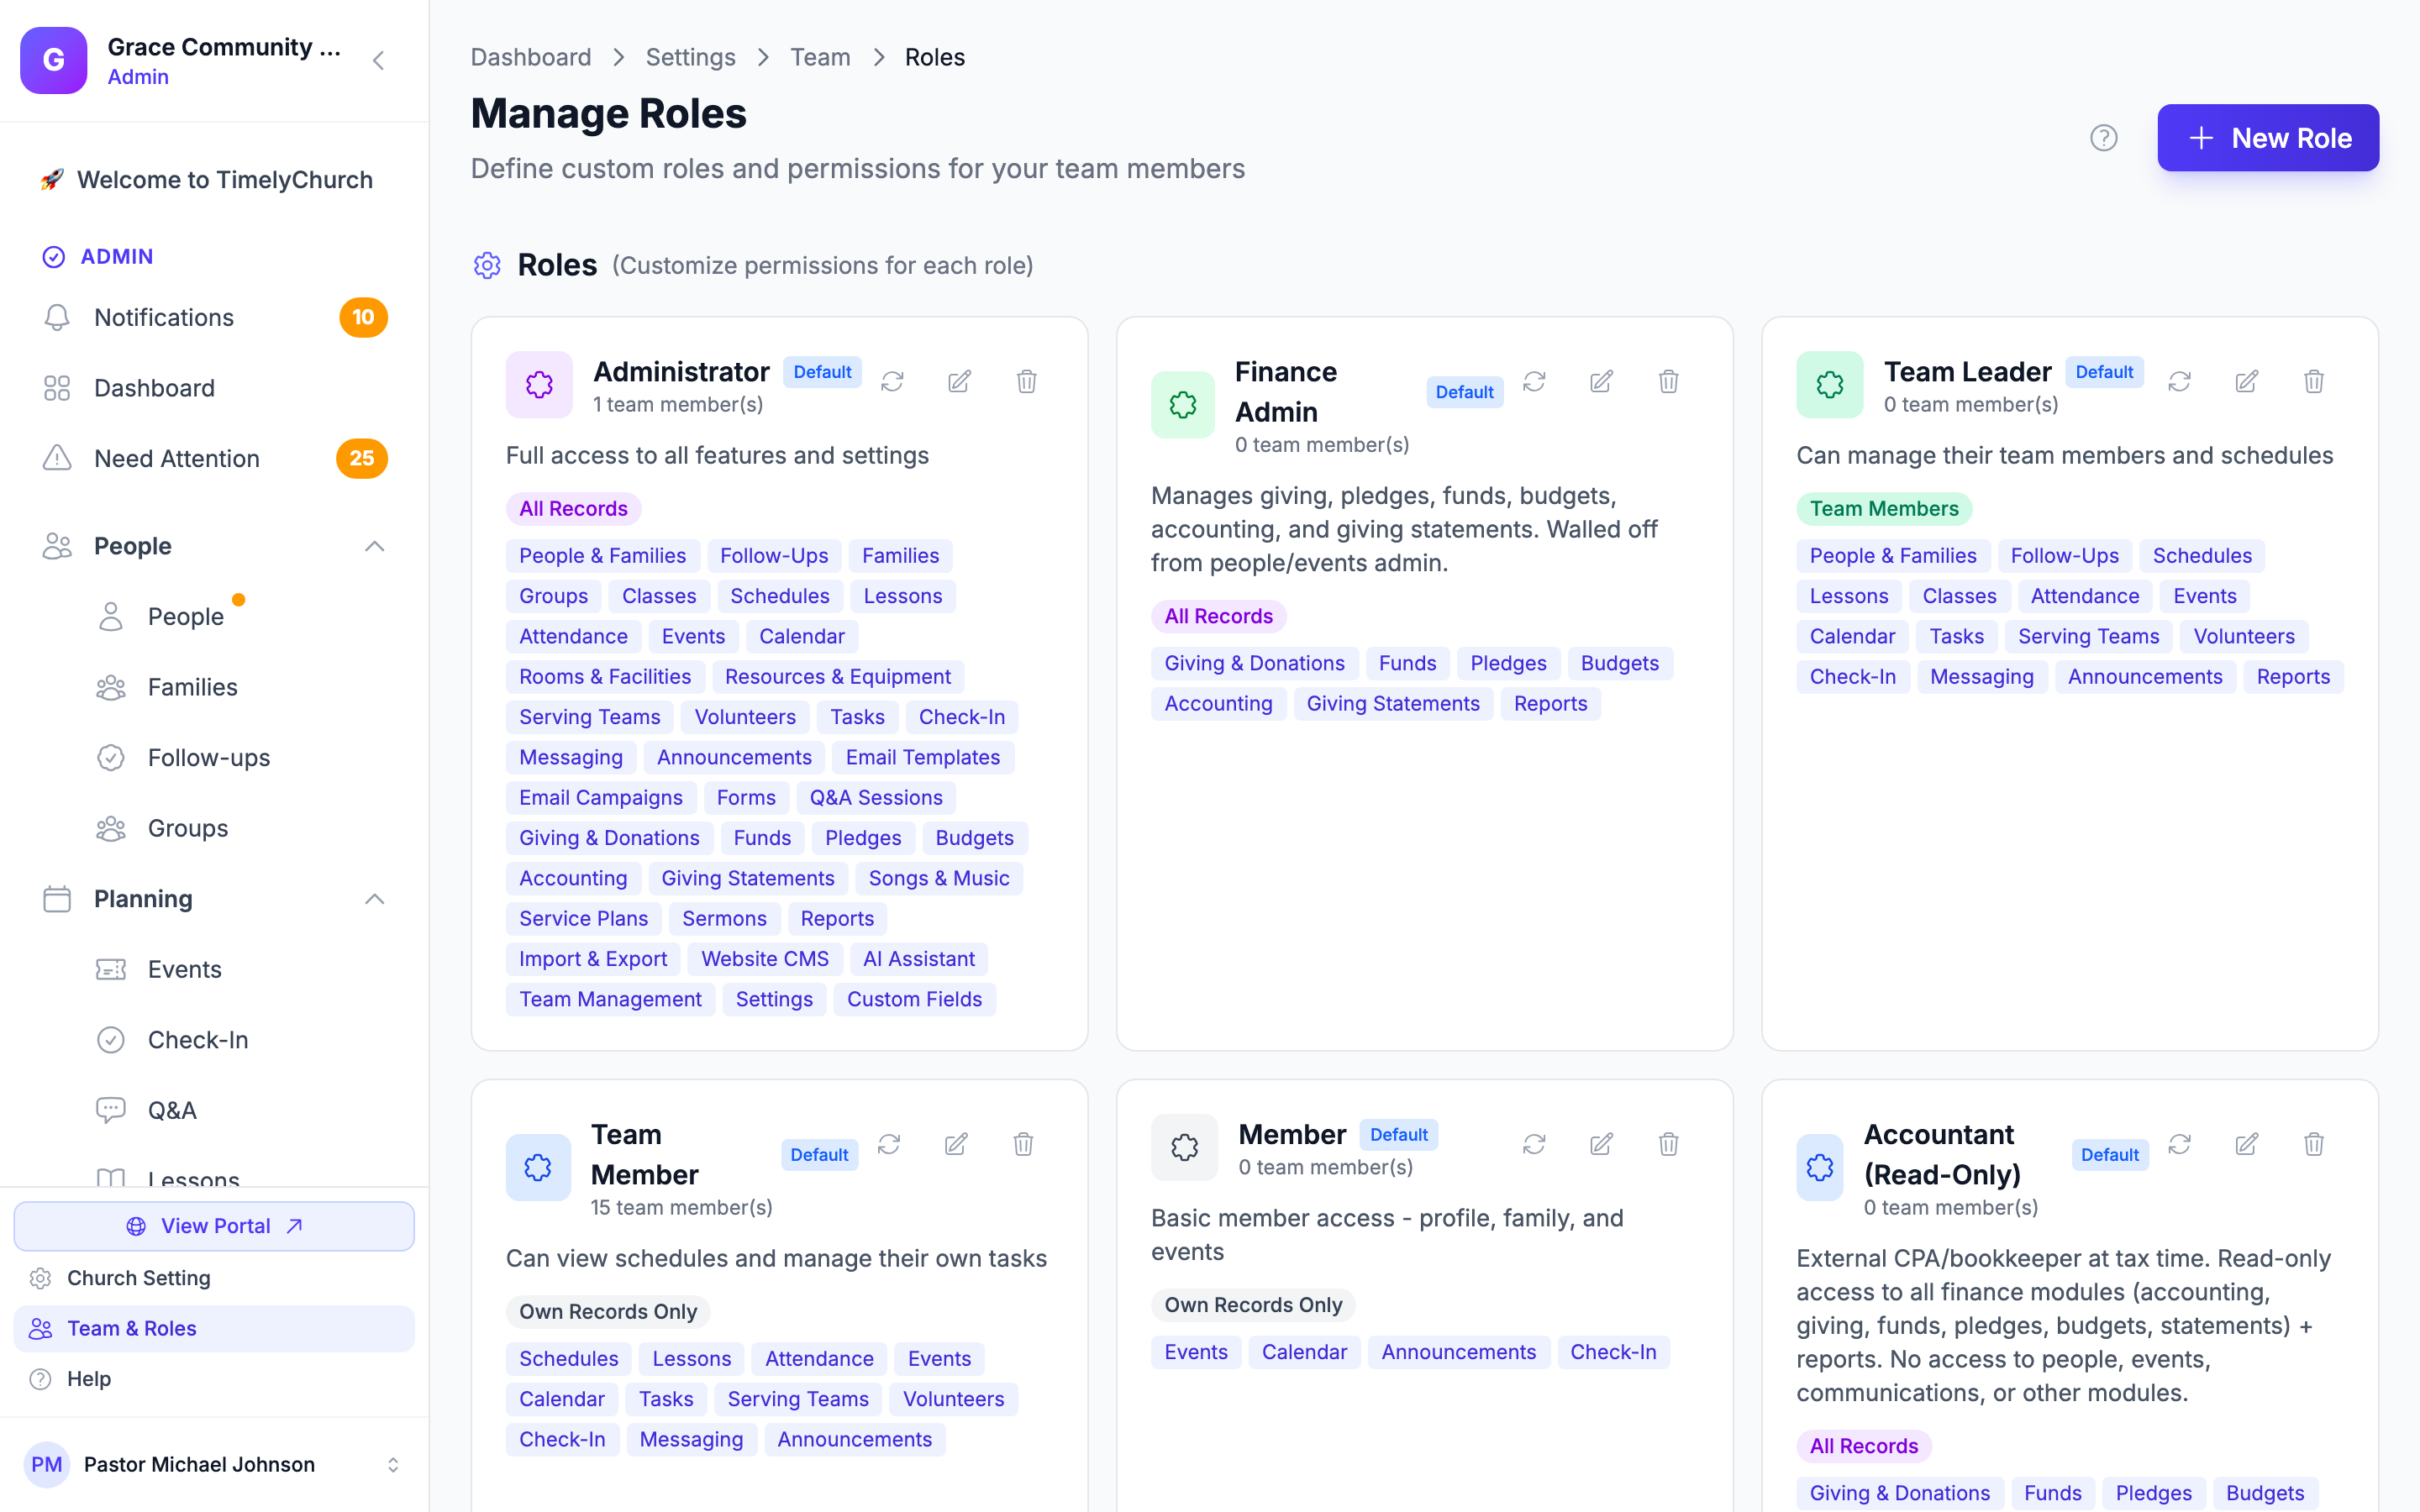
This opens the Manage Roles page, where each role is shown as a card with its name, color, and how many team members are assigned to it.
Default Roles
When your church is created, TimelyChurch automatically seeds a set of default roles based on common church team structures. These appear on your Manage Roles page (Administration → Roles & Permissions) and can be customized or extended at any time. Each seeded role carries a small Default badge so you can tell it apart from any custom roles you create.
| Role | Color | Scope | Default Permissions |
|---|---|---|---|
| Administrator | Purple | All | Full access to People, Events, Schedules, Communication, and Settings. By default, the Finance modules are delegated separately -- see Finance Admin below. This is your top-level admin role; its permissions are fixed and give it sparingly. |
| Finance Admin | Green | All | Manages Giving, Funds, Pledges, Budgets, Accounting, and Giving Statements, plus finance reports. Walled off from people/events administration. |
| Team Leader | Emerald | Team | View/edit on People; full control on Follow-Ups and Tasks; view/create/edit on Schedules; view on Lessons, Classes, and Events; record Attendance; lead Serving Teams; send Messaging. Designed for ministry leaders running a single team or class. |
| Team Member | Blue | Self | View Schedules, Lessons, Events, Serving Teams, and Announcements; create/edit their own Tasks; use Check-In. The role most volunteers and teachers should get. |
| Member | Gray | Self | View Events and Announcements and use Check-In. The default for general congregation members signing in to the portal. |
| Accountant (Read-Only) | Blue | All | Read-only access to all finance modules (Accounting, Giving, Funds, Pledges, Budgets, Statements) plus reports. Built for an external CPA or bookkeeper at tax time. |
| Safety Officer | Red | All | Manages check-in safety across the church: activate or clear an emergency lockdown and receive unclaimed-child / authorized-pickup safety alerts through Check-In, plus view Attendance. Church-wide check-in visibility without being a full administrator. |
Note: The two finance roles -- Finance Admin and Accountant (Read-Only) -- are only seeded when your plan includes the Finance modules. On plans without Finance, you'll see Administrator, Team Leader, Team Member, Member, and Safety Officer instead.
How the founding admin gets full access
When you created your church (see Sign Up and Create Your Church), you were automatically attached as a church administrator with full access -- separate from these seeded roles. The roles above are starting points you assign to other people you invite.
Tip: Default roles are a starting point. Every church is different, so feel free to adjust the permissions to match how your church actually operates. You can also reset any default role back to its seeded state at any time -- see Resetting a Role to Defaults below.
Creating a Custom Role
If the default roles do not fit your needs, you can create custom roles tailored to your church.
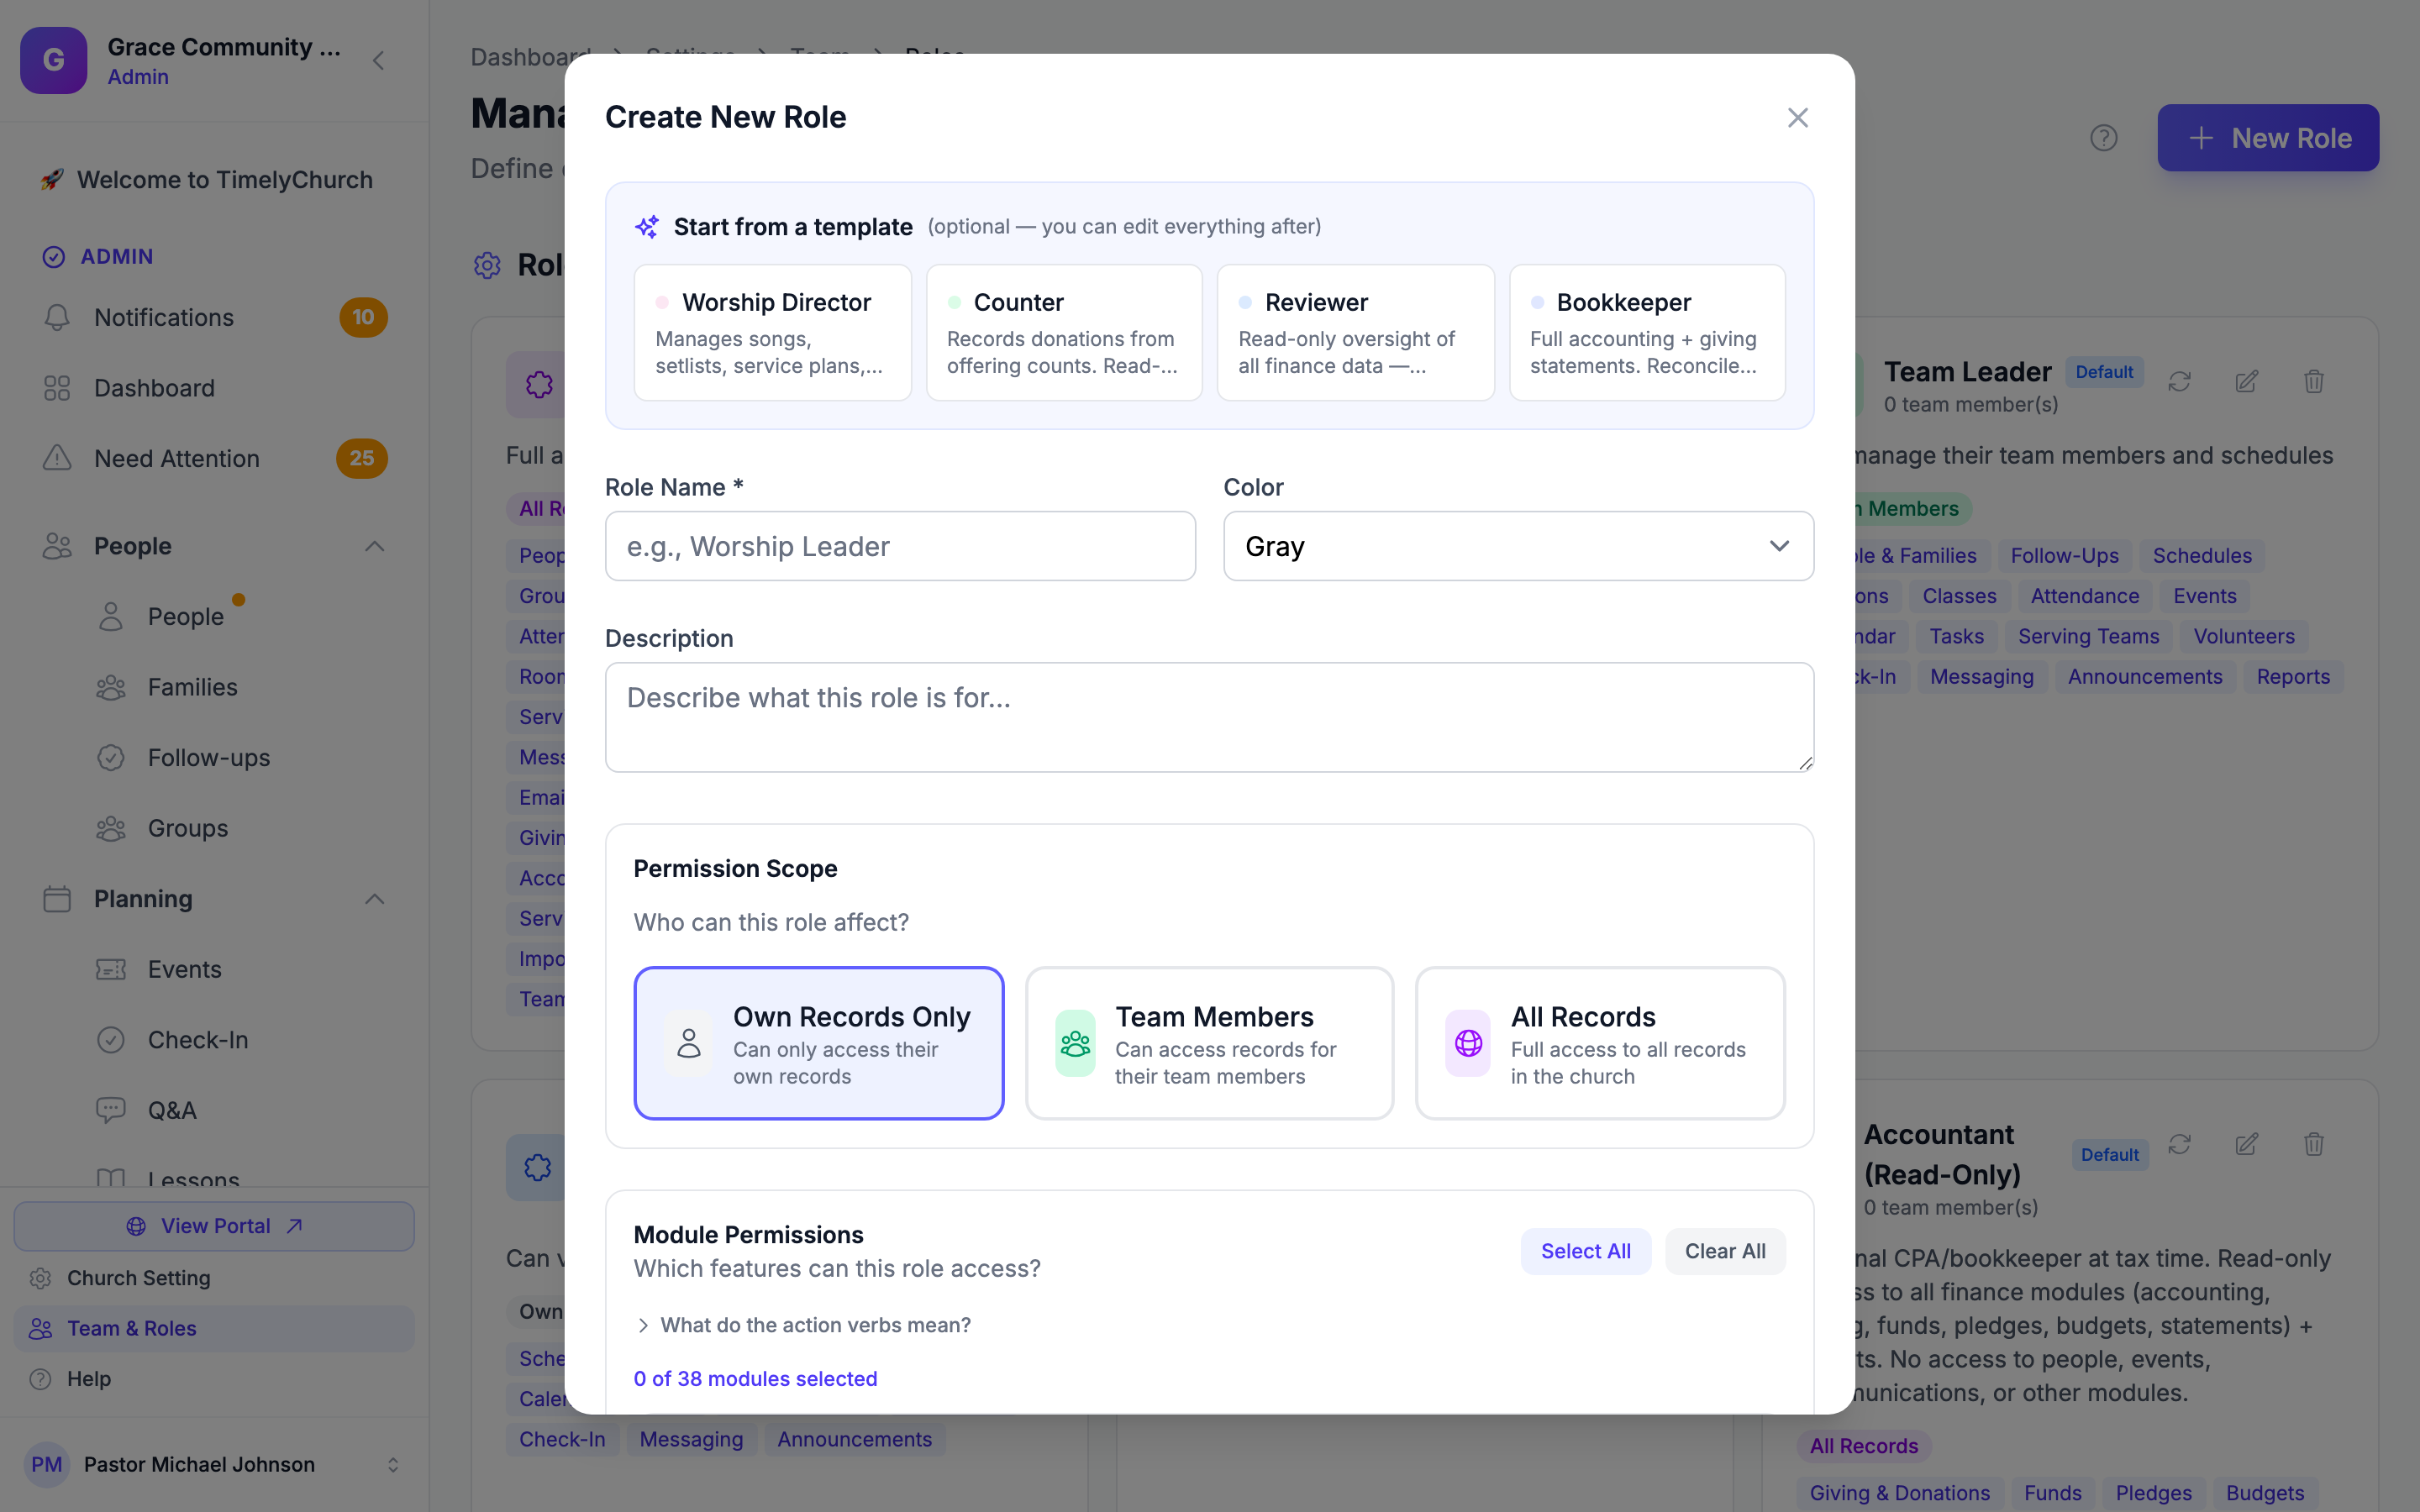
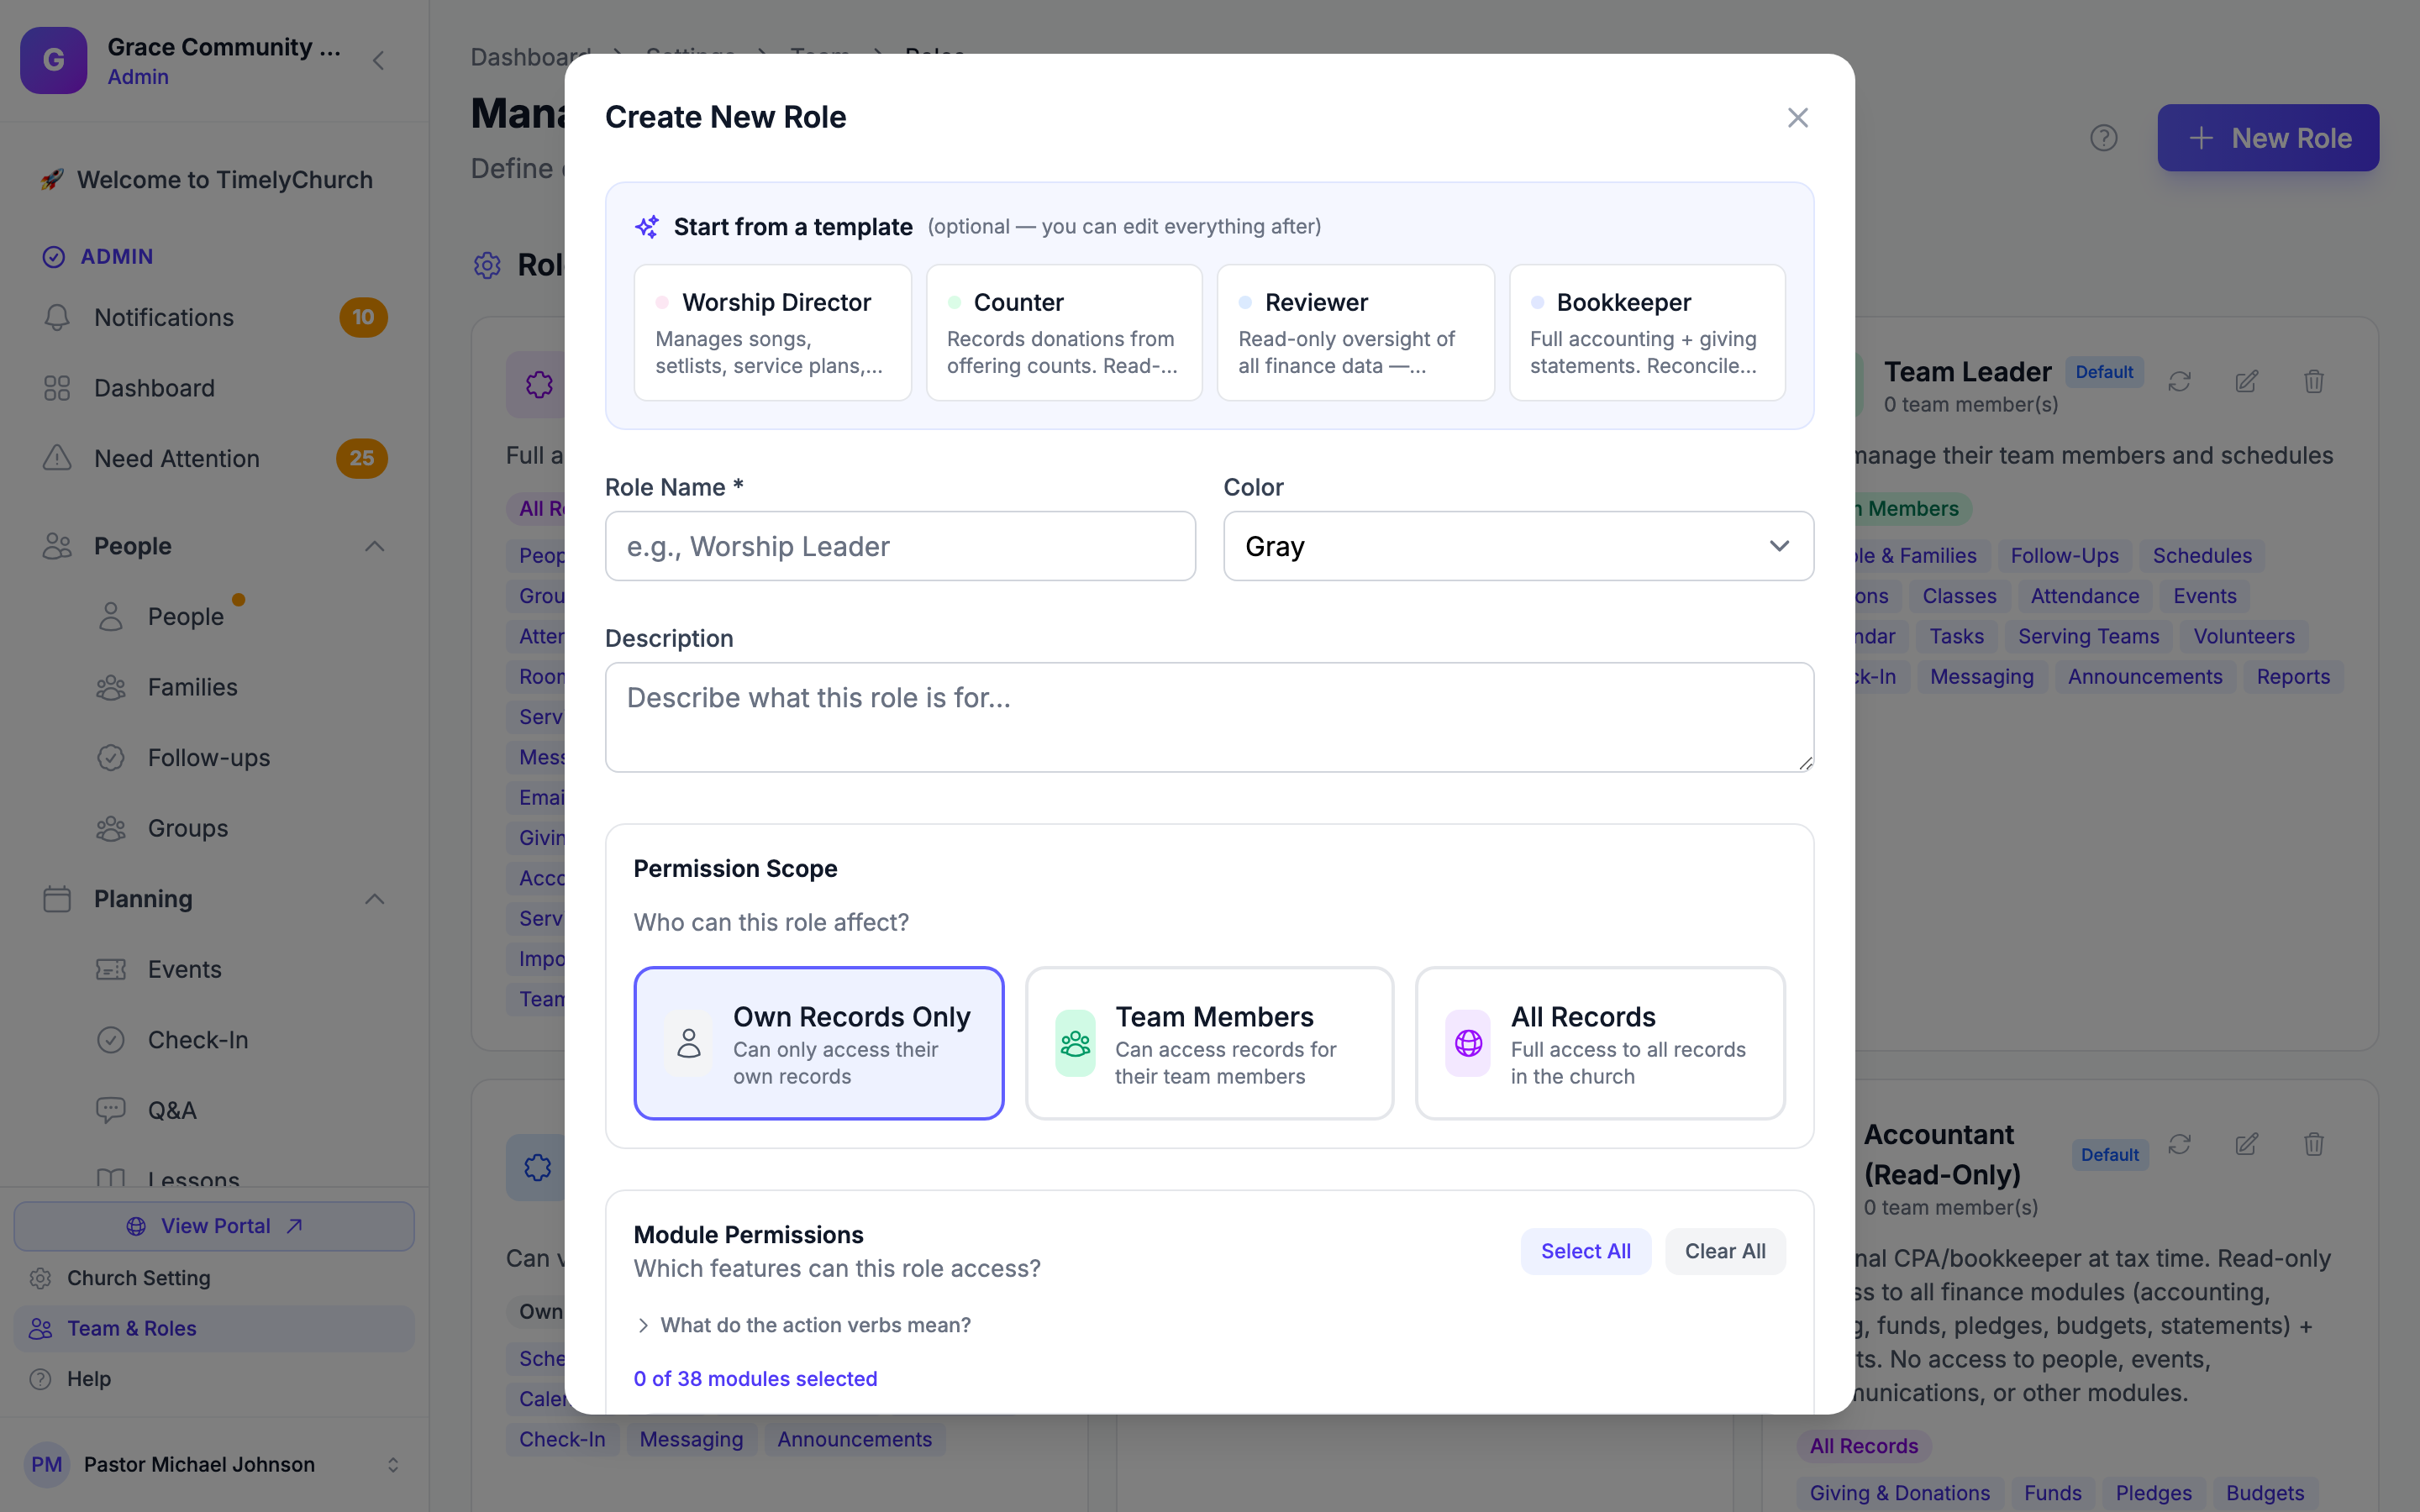
- On the Manage Roles page, click the New Role button (top right). If you don't have any roles yet, click Create Your First Role.
- (Optional) Pick a quick-start template at the top of the form -- such as Worship Director, Counter, Reviewer, or Bookkeeper -- to pre-fill the role with a sensible set of permissions. You can still edit everything before saving.
- Fill in the following details:
- Role Name -- A clear, descriptive name (for example, "Worship Leader" or "Finance Team").
- Description -- A brief explanation of what this role is for (up to 500 characters).
- Color -- Choose a color to visually distinguish this role in the team list.
- Permission Scope -- Choose the data visibility level (see below).
- Module Permissions -- Select which features this role can access and what actions they can perform within each feature (see below).
- Click Create Role.
Understanding Scope
The Permission Scope setting controls how much data a team member can see. In the role form, scope is chosen from three cards:
| Scope | What They See |
|---|---|
| Own Records Only | Only their own records and items assigned to them. |
| Team Members | Records for the members of their group/team. |
| All Records | All records across the entire church. |
For example, a teacher with "Own Records Only" scope can only see their own classes and attendance records. A teacher with "All Records" scope can see every class in the church.
Tip: When in doubt, start with "Own Records Only" scope and expand access only when needed. You can always change scope later without disrupting anything.
Understanding Module Permissions
Modules are the major feature areas in TimelyChurch. In the role form they are grouped into collapsible categories so you can find what you need quickly:
- People & Families -- People, Follow-Ups, Families, Groups
- Classes & Education -- Classes, Schedules, Lessons, Attendance
- Events & Calendar -- Events, Calendar, Rooms & Facilities, Resources & Equipment
- Volunteers & Teams -- Serving Teams, Volunteers, Tasks
- Check-In -- the check-in system and kiosk
- Communication -- Messaging, Announcements, Email Templates, Email Campaigns, Q&A Sessions
- Forms -- form building and submissions
- Finances -- Giving, Funds, Pledges, Budgets, Accounting, Giving Statements
- Worship -- Songs & Music, Service Plans, Sermons
- Website CMS -- public website pages and navigation
- AI Assistant -- the AI assistant and context library
- Reports & Data -- Reports, Import & Export
- Administration -- Team Management, Settings, Custom Fields
Setting a permission level
For each module you turn on, the quickest way to set access is the permission level control -- a row of pills:
| Level | What it grants |
|---|---|
| None | No access to the module. |
| View | Read-only access. |
| Edit | View plus create and edit. |
| Full | All available actions for that module, including delete. |
If you want finer control, expand the action checkboxes underneath (for example View, Create, Edit, Delete, and module-specific actions like Import, Export, Send, Publish, or Reconcile). Mixing actions that don't match a preset level switches the pill to a Custom state. For instance, you could give a volunteer the ability to view people records but not edit or delete them.
Editing a Role
- On the Manage Roles page, find the role you want to edit.
- Click the Edit (pencil) icon on the role card.
- Make your changes to the name, description, color, scope, or permissions.
- Click Save Changes.
Changes take effect immediately for all team members assigned to that role.
Note: The Administrator role always keeps full access -- its permissions cannot be changed (you'll see a note saying so, and the controls are locked). You can still rename it or change its color. Every other role, including the other default roles, is fully editable.
Tip: Before making major permission changes, let affected team members know so they are not surprised when a feature appears or disappears from their view.
Resetting a Role to Defaults
If you have customized a default role and want to restore it to its original settings:
- Find the role on the Manage Roles page (it will have a Default badge).
- Click the Reset to Default icon on the role card (this option only appears for roles that match a default system template).
- Confirm the reset.
The role's name, description, color, and all permissions will be restored to the original defaults. Team members assigned to this role will immediately see the updated permissions.
Deleting a Custom Role
If you no longer need a custom role:
- Find the role on the Manage Roles page.
- Click the Delete (trash) icon on the role card.
- Confirm the deletion.
Important: You cannot delete a role that still has team members assigned to it -- reassign those members to a different role first. You also cannot delete a role that is referenced by a pending invitation; revoke or wait for those invitations before deleting the role.
Tip: Instead of deleting a role, consider keeping it and simply not assigning anyone to it. This way, you have it ready if you need it again later.
How Roles Affect the Sidebar
Team members only see sidebar menu items for modules their role grants access to. For example:
- If a role does not include the Finances modules, the Finances section will not appear in that person's sidebar.
- If a role includes People but not Follow-Ups, they will see the People link but not the Follow-Ups link.
This keeps the interface clean and focused for each team member.
Note: Roles control what someone is allowed to access. Some modules also depend on your church's plan -- a module included in your plan but not yet available on the current tier may appear in the sidebar as a locked item with an upgrade prompt rather than being hidden.
Best Practices
- Start simple. Begin with the default roles and adjust as you learn what your team needs.
- Use descriptive names. Name your roles based on actual positions at your church (e.g., "Children's Ministry Director" rather than "Role 3").
- Limit admin access. Only give the full Administrator role to people who truly need it. This protects your data and settings.
- Review periodically. As your church grows or staff changes, review your roles to make sure they still make sense.
- Use scope wisely. The "All Records" scope is powerful -- only grant it to people who need to see everything.