
Stripe Fee Auto-Recording
Overview
When a donor gives online through Stripe, the gross amount they donated and the amount that lands in your bank account are not the same number. Stripe deducts a processing fee before depositing the rest. If you only record the net deposit, your books will understate both your gross giving and your processing-fee expense.
TimelyChurch automatically records the processing fee as a separate expense on every online Stripe donation, so your books always show:
- The gross donation as income (matching what the donor's receipt and statement say).
- The processing fee as an expense (so it shows on your P&L).
- The net deposit as the cash that actually arrived in the bank.
This is automatic for any church that has connected a Stripe account, and the same fee-posting logic also runs when you import a Cash App / PayPal / Stripe CSV in the Transactions screen.
How It Works
When a donation is taken through your connected Stripe account, TimelyChurch calculates the processing fee using standard US card pricing (2.9% + $0.30) and stores it on the donation record. At the moment the donation is recorded, TimelyChurch posts a matching expense transaction for that fee.
Specifically:
- A donor donates $100 online.
- TimelyChurch records the gross of $100, calculates the fee (2.9% + $0.30 = $3.20), and treats the net as $96.80.
- TimelyChurch records:
- An income transaction of $100 to your giving fund/account (the gross donation).
- An expense transaction of $3.20 to your processing fee account.
- Your Income Statement now shows $100 of giving and $3.20 of processing-fee expense, and the net of $96.80 is what reconciles against the bank deposit.
Note: The fee TimelyChurch records is the standard calculated estimate (2.9% + $0.30), not a per-charge figure pulled live from Stripe at record time. For typical US card donations this matches what Stripe charges; exotic cards (Amex / international) can run slightly higher.
The Processing Fee Settings
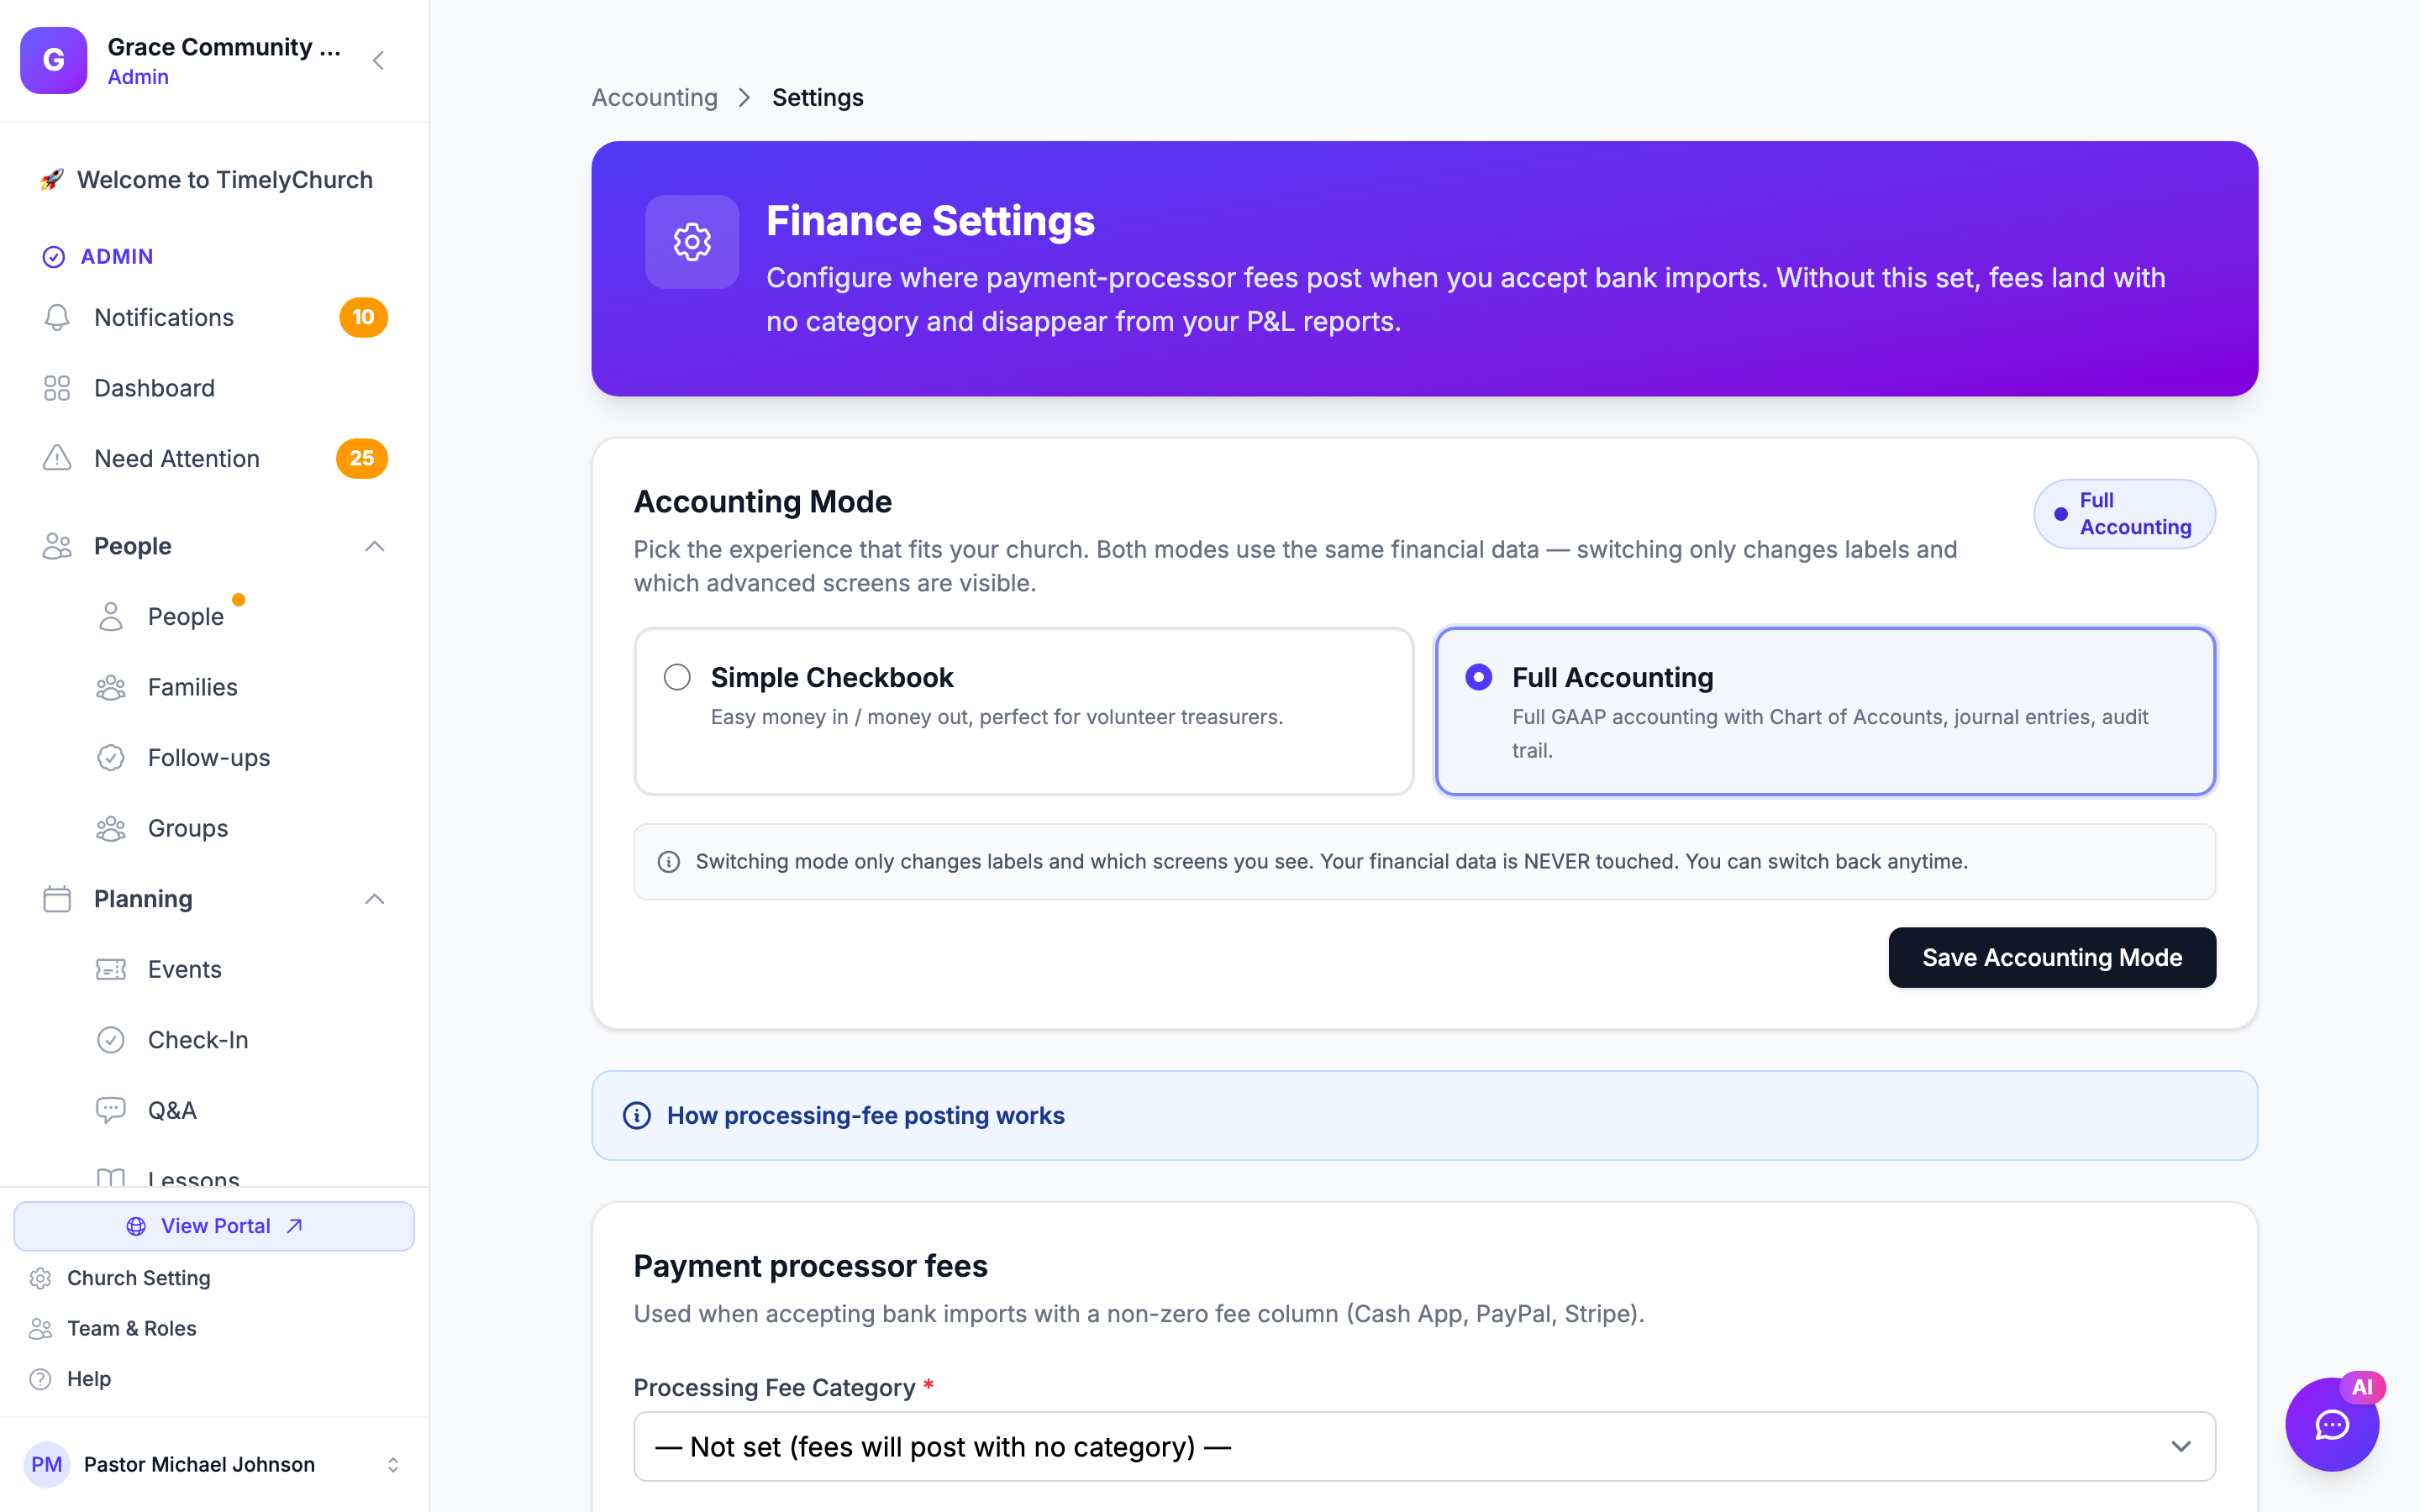
Processing-fee posting is configured on the Finance Settings page, under Payment processor fees. There are two settings that work together:
- Processing Fee Category — the expense category fee transactions are tagged with (so the fee shows up correctly in your category-based reports).
- Processing Fee Account — the expense account fee transactions are posted to.
What happens if you don't set the account
You do not have to set the Processing Fee Account before going live. If you leave it blank, TimelyChurch will auto-create an expense account called "Processing Fees" (#5950) the first time a fee needs to be posted, and use that going forward. So fees are never silently skipped.
The Processing Fee Category, however, is worth setting. If no category is selected, fees post with no category and won't show up in your category-based P&L reports. The settings page will suggest a category and flag it if it is not yet set.
Setting It Up
- Open the Finance Settings page (see "Where to find this" below).
- In the Payment processor fees section, pick a Processing Fee Category. If you don't have a suitable expense category yet, create one on the Categories page first (reachable from the Setup ▾ / More ▾ menu in the accounting nav).
- Optionally pick a Processing Fee Account. If you leave it blank, TimelyChurch auto-creates Processing Fees (#5950) on first use.
- Click Save settings.
Where to find this
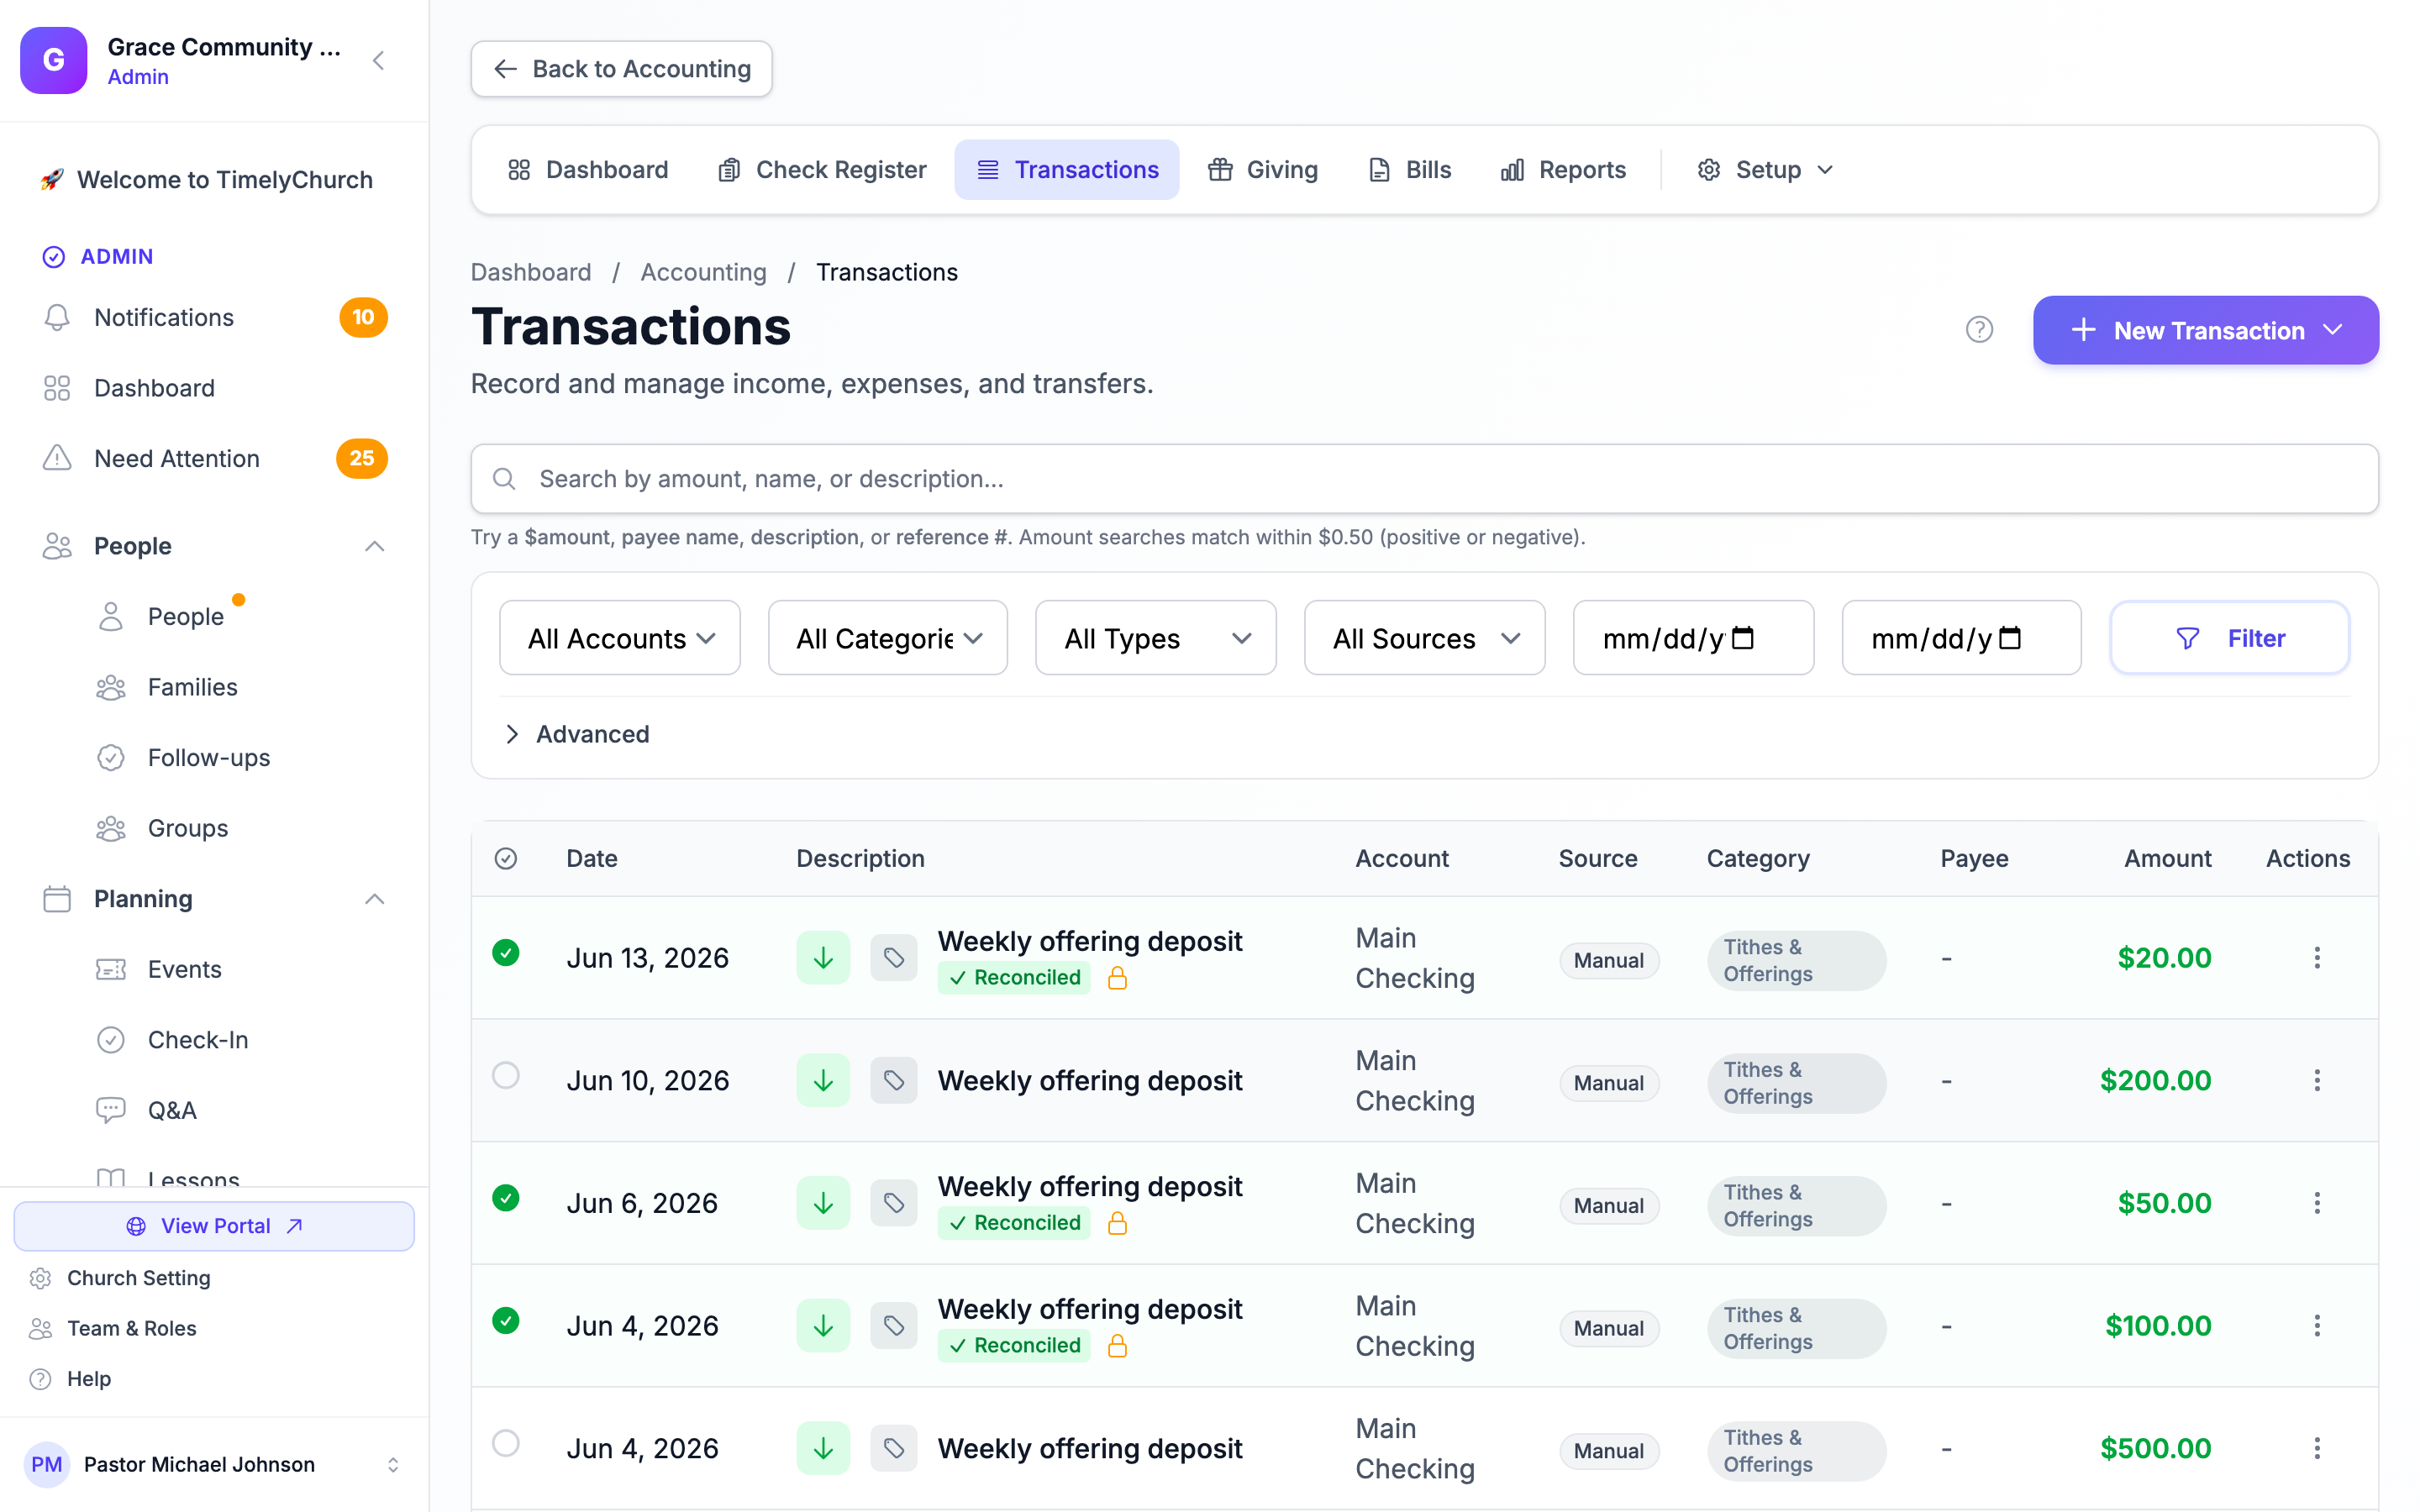
The Finance Settings page lives in the Accounting area. The quickest way to reach it is from the Bank Import Review queue on the Transactions screen — when you have imported rows that carry a fee and no category is configured, TimelyChurch shows an "Open Finance Settings →" link that takes you straight there.
Processing Fees on Bank CSV Imports
The same fee-posting logic runs when you import a bank/processor CSV. When you import a Cash App / PayPal / Stripe CSV in Transactions (via the New Transaction ▾ > Import from CSV menu), each row carries the net amount that hit your account plus the fee that was withheld. On Accept, TimelyChurch:
- Creates the income transaction for the gross amount (net + fee), so the donor's giving statement shows the full gift.
- Creates a separate expense transaction for the fee, posted to the Processing Fee Account and tagged with the Processing Fee Category from your settings.
This way your books match the QuickBooks/Xero convention: the donor sees the gross gift, your P&L shows the fee as an expense line, and the deposit reconciles to the net.
Gross vs. Net Reporting
This is the practical reason the auto-recording matters. With it in place:
- Gross giving reports — The Income Statement, Treasurer's Report, and donor giving statements all show the donor's actual gift (e.g., $100), not the net (e.g., $96.80).
- Donor receipts and statements — Acknowledgments are based on the gross amount, which is the correct IRS-recognized contribution amount.
- Expense reports — Online giving processing fees show as a real expense, so your board can see the cost of accepting online donations alongside other operating expenses.
- Bank reconciliation — The net amount that deposits matches the gross income minus the fee expense for that period, which is exactly what the bank statement will show. Reconciliations land cleanly.
Without auto-recording (which is how most other church platforms work), you would either:
- Record only the net, understating both gross giving and the fee expense, or
- Manually look up and enter every fee, which is tedious and error-prone.
TimelyChurch handles it for you.
Manual Processing Fee on Other Donations
For donations entered manually that came through a different processor (PayPal, Square, Cash App), the Record Donation form (Giving > Add giving) includes a collapsible Add processing fee option. Expand it, enter the fee, and TimelyChurch creates the same kind of paired expense entry, posted to the same processing fee account. A processing-fee field is also available on the manual New Income entry from the Transactions screen.
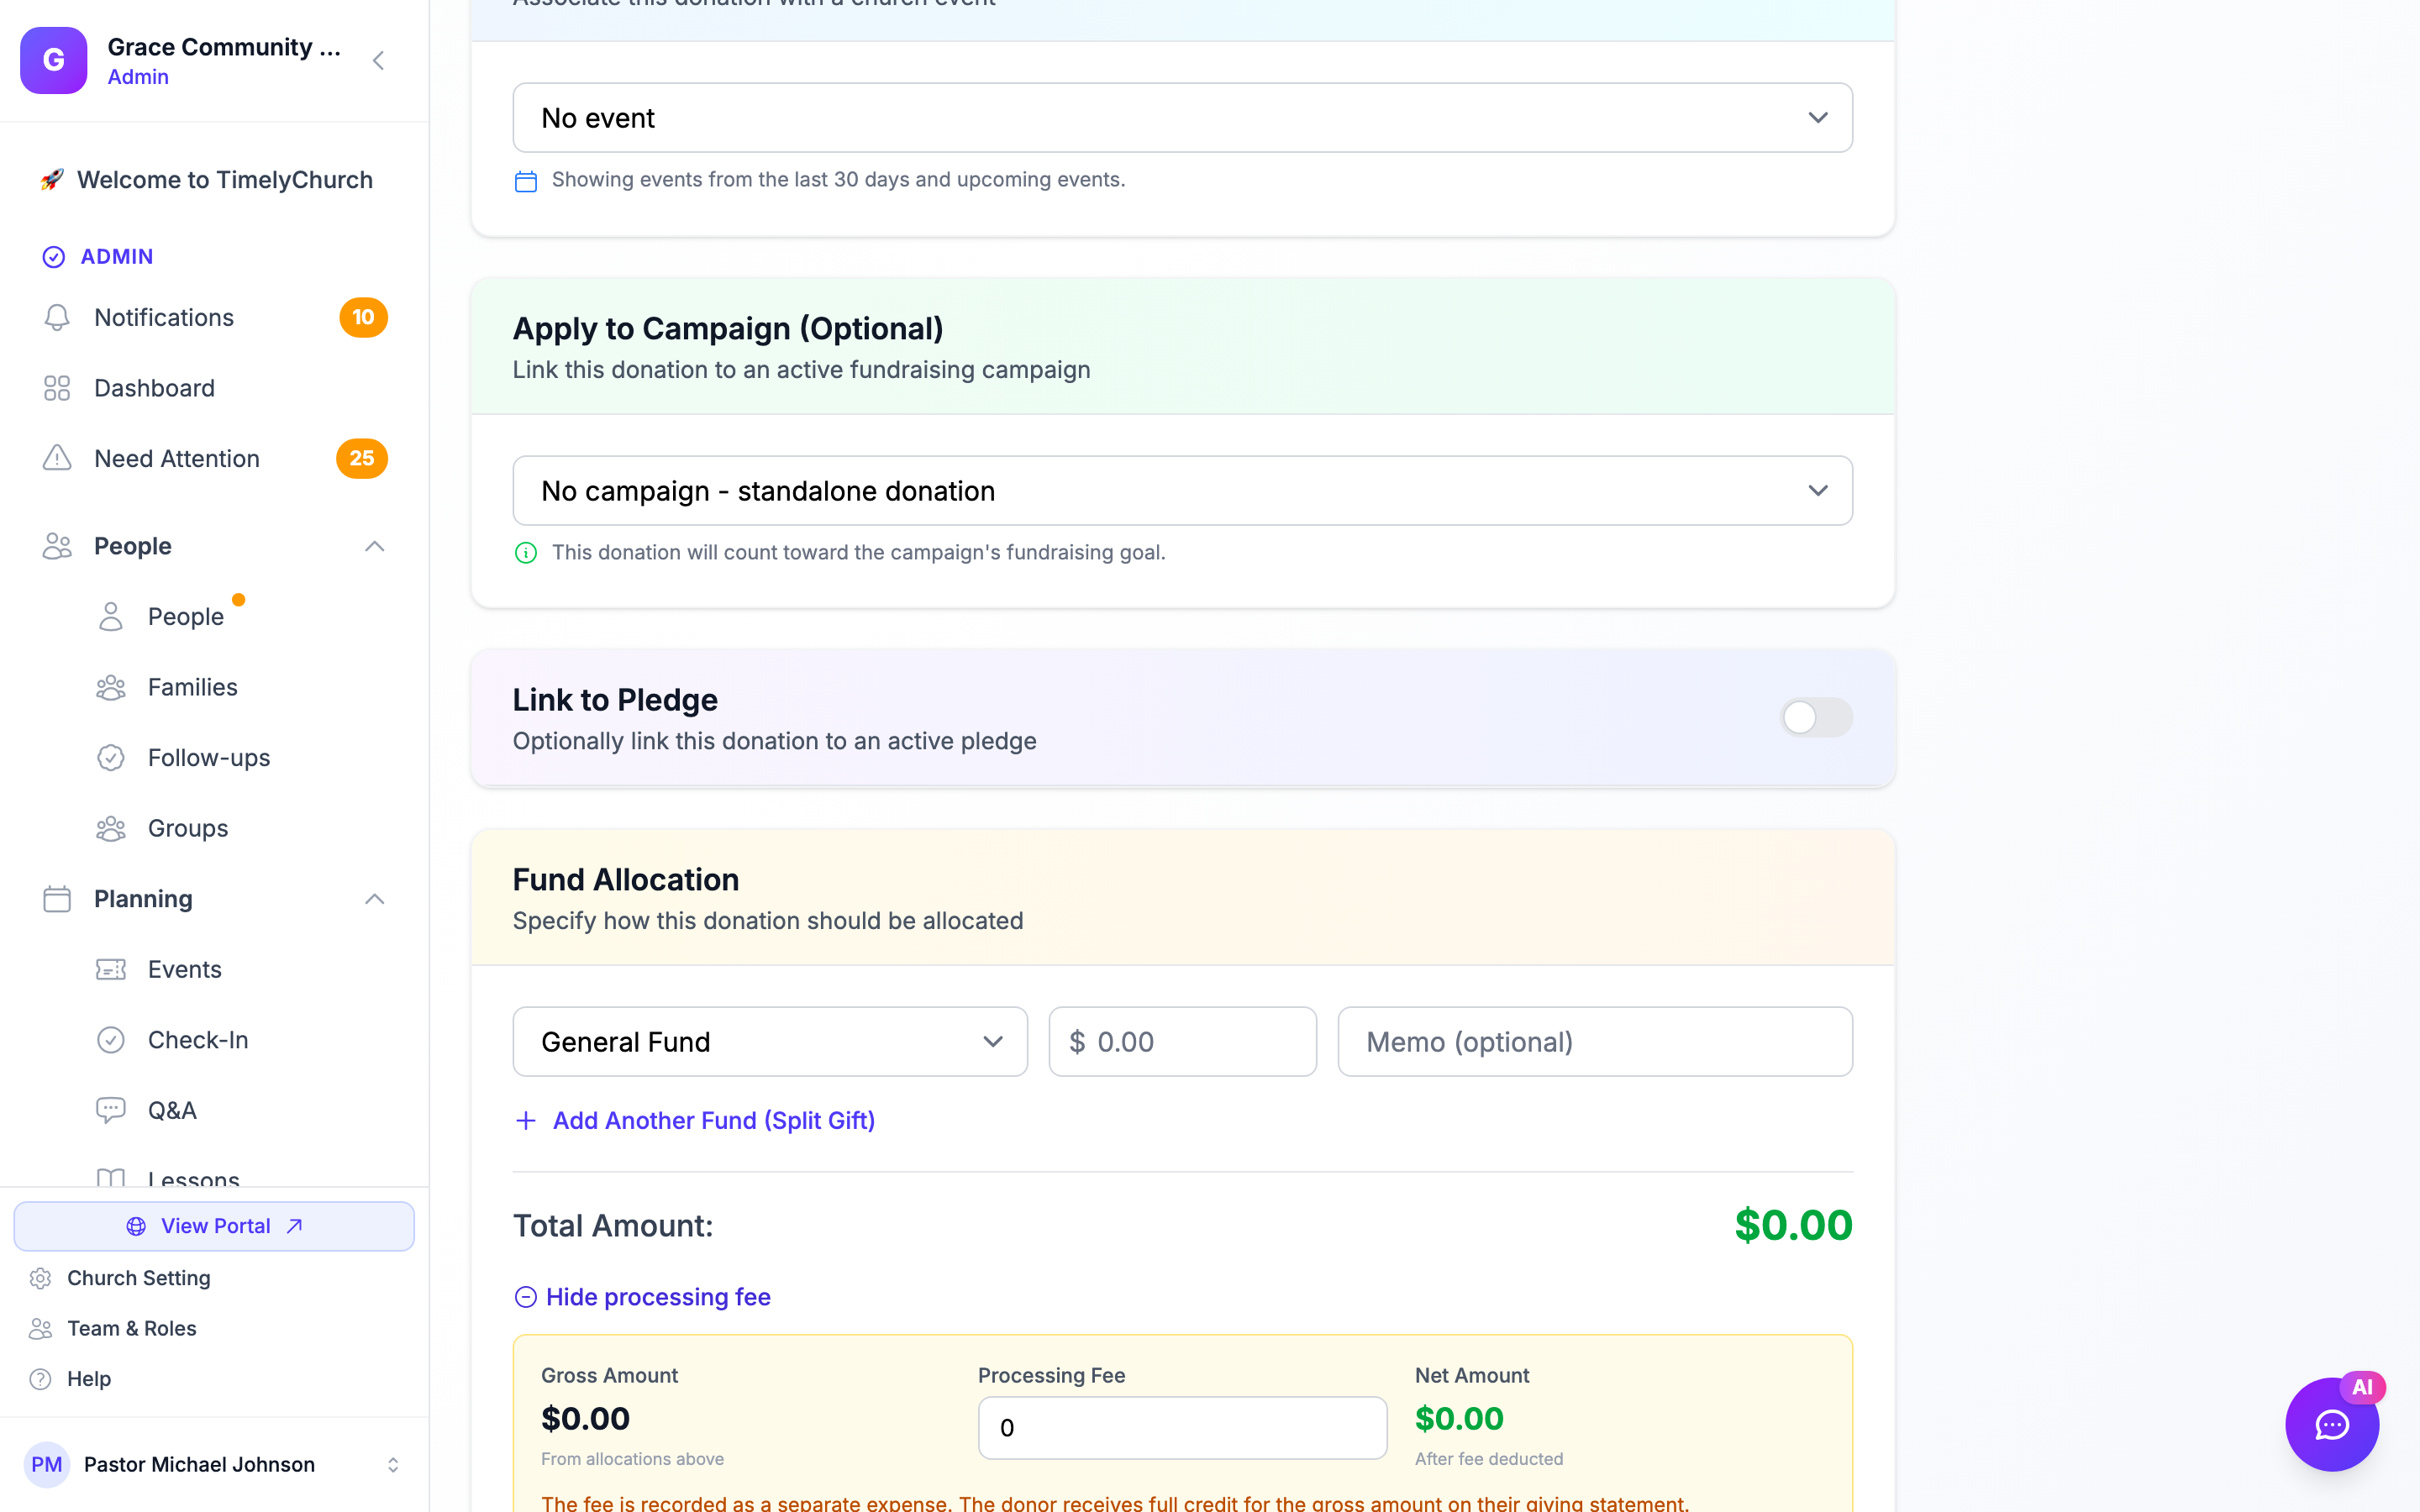
The Stripe and CSV-import paths handle the automated cases. The manual Processing Fee field handles every other path. Both post to the same processing fee account so your fee expense is consolidated. See Recording Transactions.
Best Practices
Set the Processing Fee Category early. The account auto-creates itself, but an unset category means fees post uncategorized and drop out of your category-based P&L. Set it before you go live with online giving or your first CSV import.
Use a single dedicated account. Don't split processing fees across multiple accounts (one for Stripe, one for PayPal, etc.) unless you have a specific reporting reason. Consolidating to one expense account makes year-over-year comparisons easier.
Watch the fee percentage over time. Run a quick Income Statement filtered to the processing fee account every quarter. If your fees are creeping up as a percentage of giving, it may be a sign to look at how you're collecting (e.g., encouraging fee cover-up at the point of giving).