
Check-In Rooms (Multiple Live Sessions per Event)
Check-In rooms let you run several live check-in sessions at the same time, including several rooms under one event. Nursery, Grade 1, and Grade 2 can each have their own kiosk, roster, head-count, and attendance total — without mixing children into the wrong room.
A Check-In room is a check-in session with a name you choose (Nursery, Grade 1, Camp Arrival, and so on). Starting a new room does not end the others. They stay live until you end each one.
For physical classroom capacity (fire-code limits and live head counts by class), see Room Capacity and Live Occupancy — that is a different thing from a Check-In session.
When to Use Multiple Rooms
Use a separate live session per check-in point when families should not share one line or one roster:
- Kids church and nursery during the same Sunday service.
- Grade-level rooms (Nursery, Grade 1, Grade 2, …) under one worship event.
- A welcome-desk session for the auditorium and a children's hallway session at the same hour.
- Camp or VBS checkpoints (Arrival, lunch, an activity door) — each checkpoint is its own session.
Use one session when everyone is checking into the same program at the same desk.
Camps, wristbands, and one shared event
If you use RFID wristbands, bands are linked at the event level, not the individual session. A multi-day camp still needs one event for the whole week, with every day's sessions (and every checkpoint) linked to that same event. Do not create a new event per day if you want Monday's band to work at Friday's lunch line.
A standalone session (no linked event) can still use tap-to-identify, but the bulk Release all bands action is event-scoped and will not appear. See Set Up Wristband Check-In and Using Wristbands at Camps & Events.
Turn This session uses wristbands on for each checkpoint session, not only Arrival.
Check-In Rooms vs Facilities → Rooms
These two "rooms" are easy to mix up. They are not the same record.
| Check-In session (this article) | Facilities → Rooms | |
|---|---|---|
| What it is | A live check-in point for today (Nursery, Grade 1, Arrival). | A physical classroom in your building (Room 204). |
| Where you manage it | Events → [event] → Check-In tab, or Check-In Station. | Facilities → Rooms, then choose the room on each class (Planning > Classes). |
| Capacity | Each session has its own live roster, checked-in count, and optional head-count. | Capacity is a number on the physical room (fire code / insurance). |
| Occupancy | The Station Rooms view groups the currently selected session's check-ins by class. | Occupancy is measured against the class's assigned Facilities room. See Room Capacity and Live Occupancy. |
A Check-In session is not created in Facilities, and renaming a session does not rename a Facilities room. Link classes to Facilities rooms so name tags can print the classroom and so occupancy has a capacity to compare against. Start Check-In sessions so each hallway table has its own live kiosk.
Starting Rooms (the event Check-In tab)
For several rooms under one event, start them from the event itself. This is the primary surface for multi-room check-in.
- Open the event (the Event Hub).
- Open the Check-In tab.
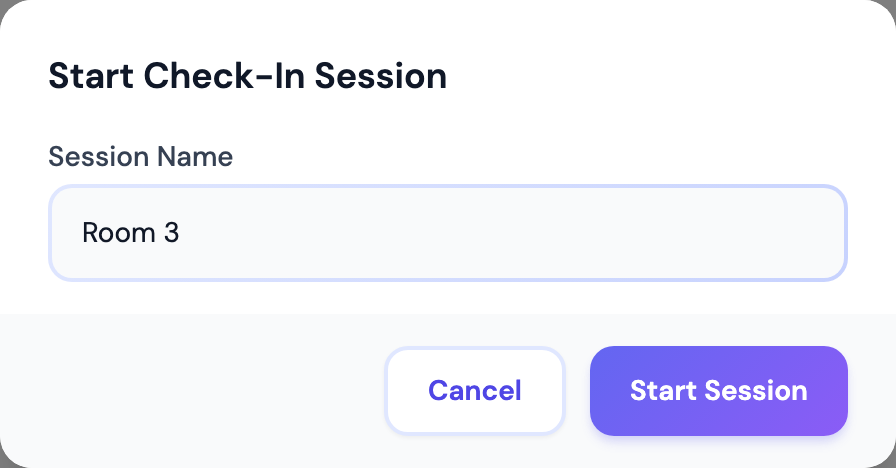
- Click Start a session. A Start Check-In Session panel opens (a bottom sheet on a phone, a centered modal on a desktop).
- The event is already locked in — there is no event picker on this tab.
- Session Name is required here. It is pre-filled with an incrementing default (Room 1, Room 2, Room 3, …) so two rooms are never identical if you submit blindly. Change it to the real name (Nursery, Grade 1, …) before you start.
- Click Start Session.
- Repeat once per room. They all run at the same time under the same event.
The empty state on this tab says it plainly: Start one session per room or class — they all run at the same time.
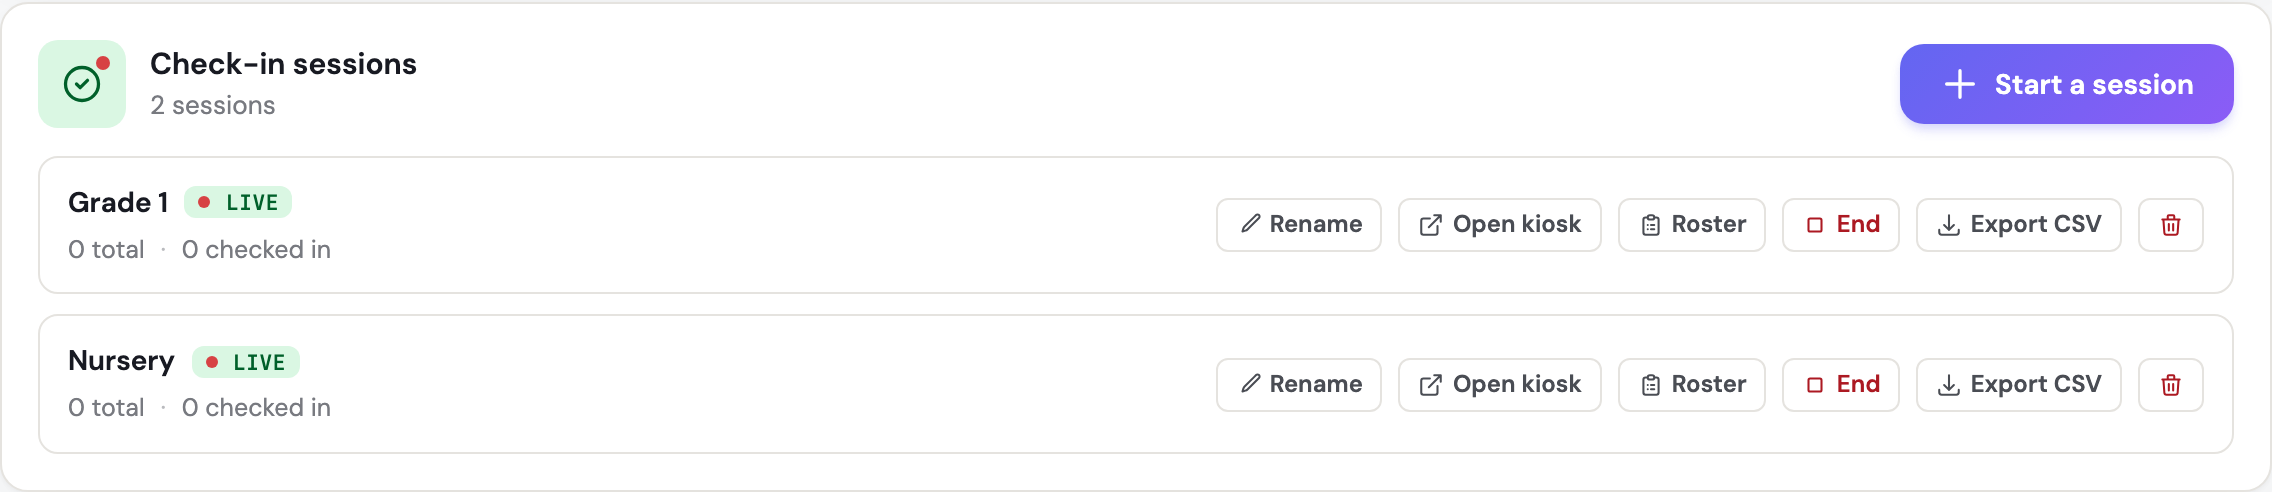
Each session appears on its own card with:
- The session name.
- A Live badge (pulsing) or an Ended badge.
- Running totals: total (individual check-ins plus any head-count), checked in, and head-count when you have used it.
Starting a Session from the Check-In Station
You can also start sessions from Check-In in the admin sidebar (the Check-In Station). Use this for a standalone session, or to add another concurrent session that you link to an event from a dropdown.
- Go to Planning > Check-In.
- Click Start Session in the header. The same Start Check-In Session panel opens.
- If any sessions are already live, a blue banner reports how many are active and that the new one will run concurrently.
- Link to Event (optional). Pick an upcoming event (the list is today's and the next seven days) to show assigned volunteers and sync attendance. Or choose No event - standalone session.
- Session Name (Optional). Leave it blank to use the event title, or a default of Sunday Service - [today's date] if there is no event.
- Optionally attach a Consent / Waiver form, and optionally check This session uses wristbands.
- Click Start Session.
Live sessions appear in the Active Sessions banner. When more than one is live, an amber chip reads Multiple sessions - select one. Use Select to put that session's roster and stats on the Station (this uses the exact session, not only its event — two rooms on the same event would otherwise be ambiguous). End closes that session only.
Tip: Give every concurrent session a distinct name. If every room keeps the event's default title, families and volunteers picking a session cannot tell them apart.
Renaming a Room
Names are how volunteers and families tell Nursery from Grade 1. You can rename a session at any time (live or ended).
From the event Check-In tab
- On the session card, click Rename.
- Edit the name (required, up to 255 characters).
- Click Save (or Cancel).
From the session page
- In Active Sessions, click the session name (or the view/eye control) to open the session.
- Next to the title, click the pencil (Rename session).
- Edit the name and click Save.
Per-Room Kiosk
Each live room can have its own kiosk tablet so a family at the nursery door never sees Grade 1 as an option.
Pin a kiosk to one room
Only a Live session can open a kiosk. An ended session will not present a live check-in surface.
- On the event Check-In tab: click Open kiosk on that room's card. A new tab opens already pinned to that session.
- On the session page: click Kiosk Mode. Same pinning.
- Bookmark that kiosk page, or use "Add to Home Screen", on the tablet that lives at that door -- the saved address keeps it pinned to that room.
The kiosk header shows the church name and a chip with that session's name, plus that session's live totals (check-ins and head-count).
Shared kiosk (family picks the room)
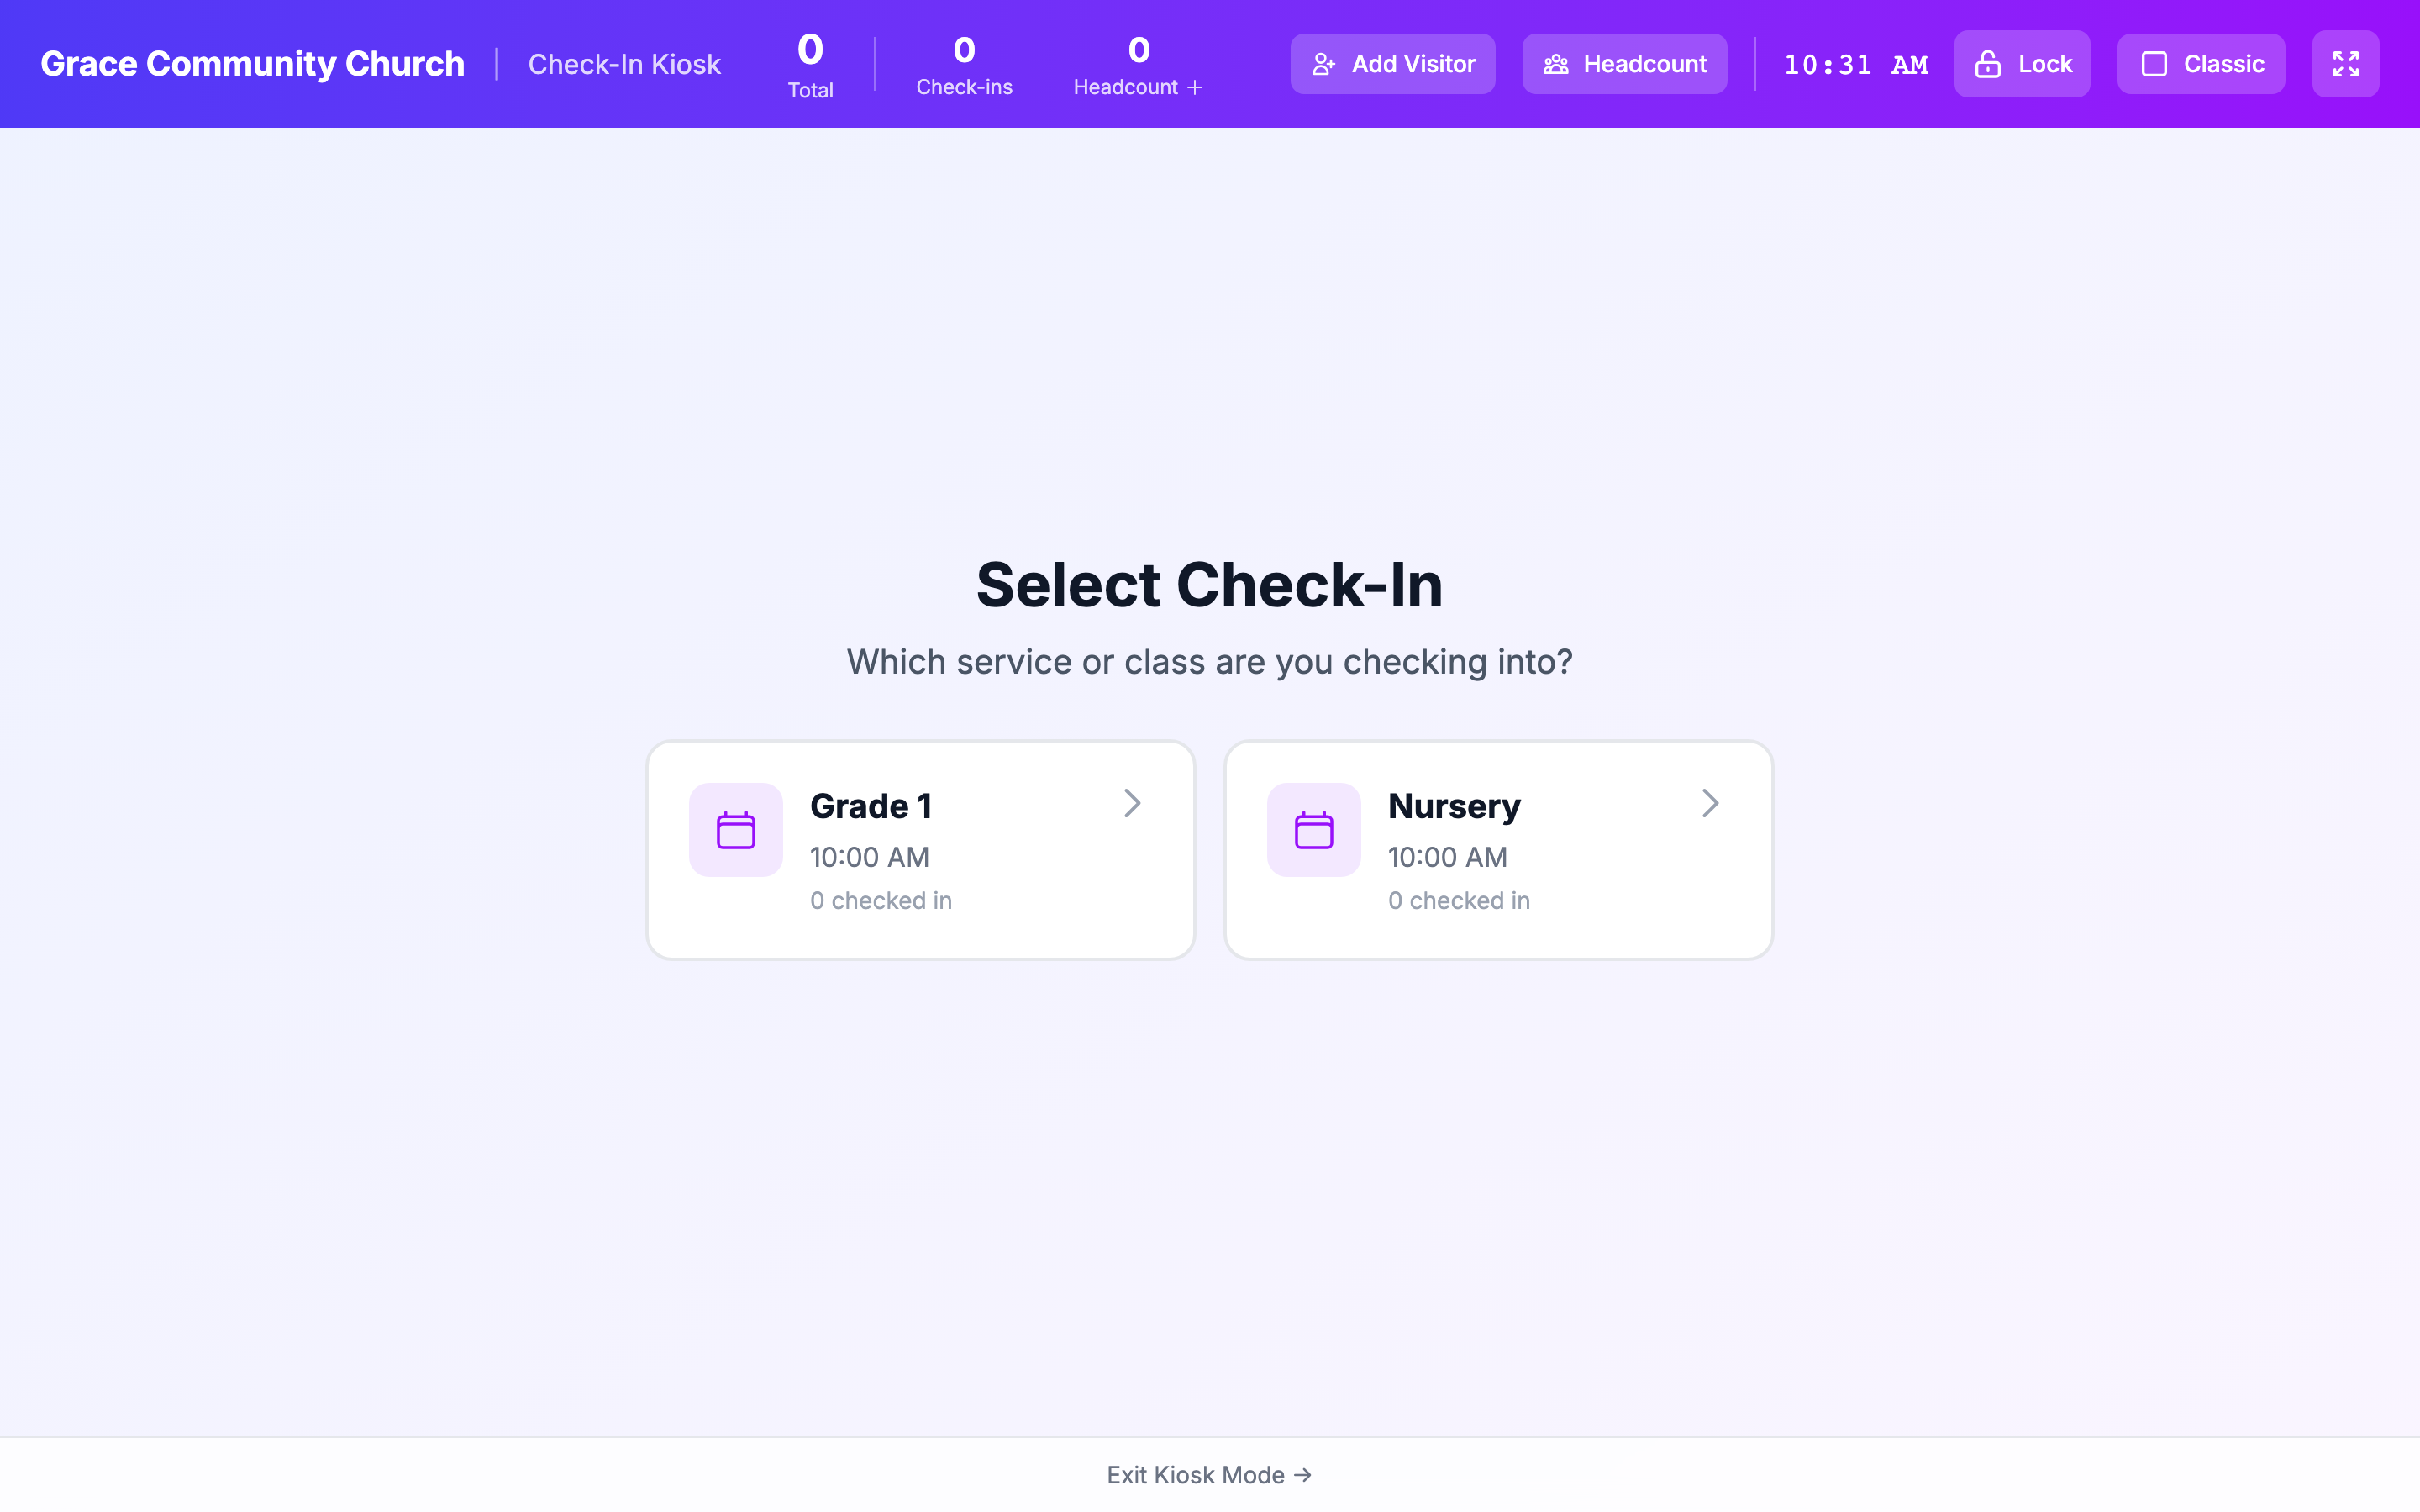
If you open Kiosk Mode from the Check-In Station header (no session pinned) and more than one session is live, the kiosk first shows Select Check-In — Which service or class are you checking into? Families tap a named session, then the phone pad.
If only one session is live, the kiosk skips that step.
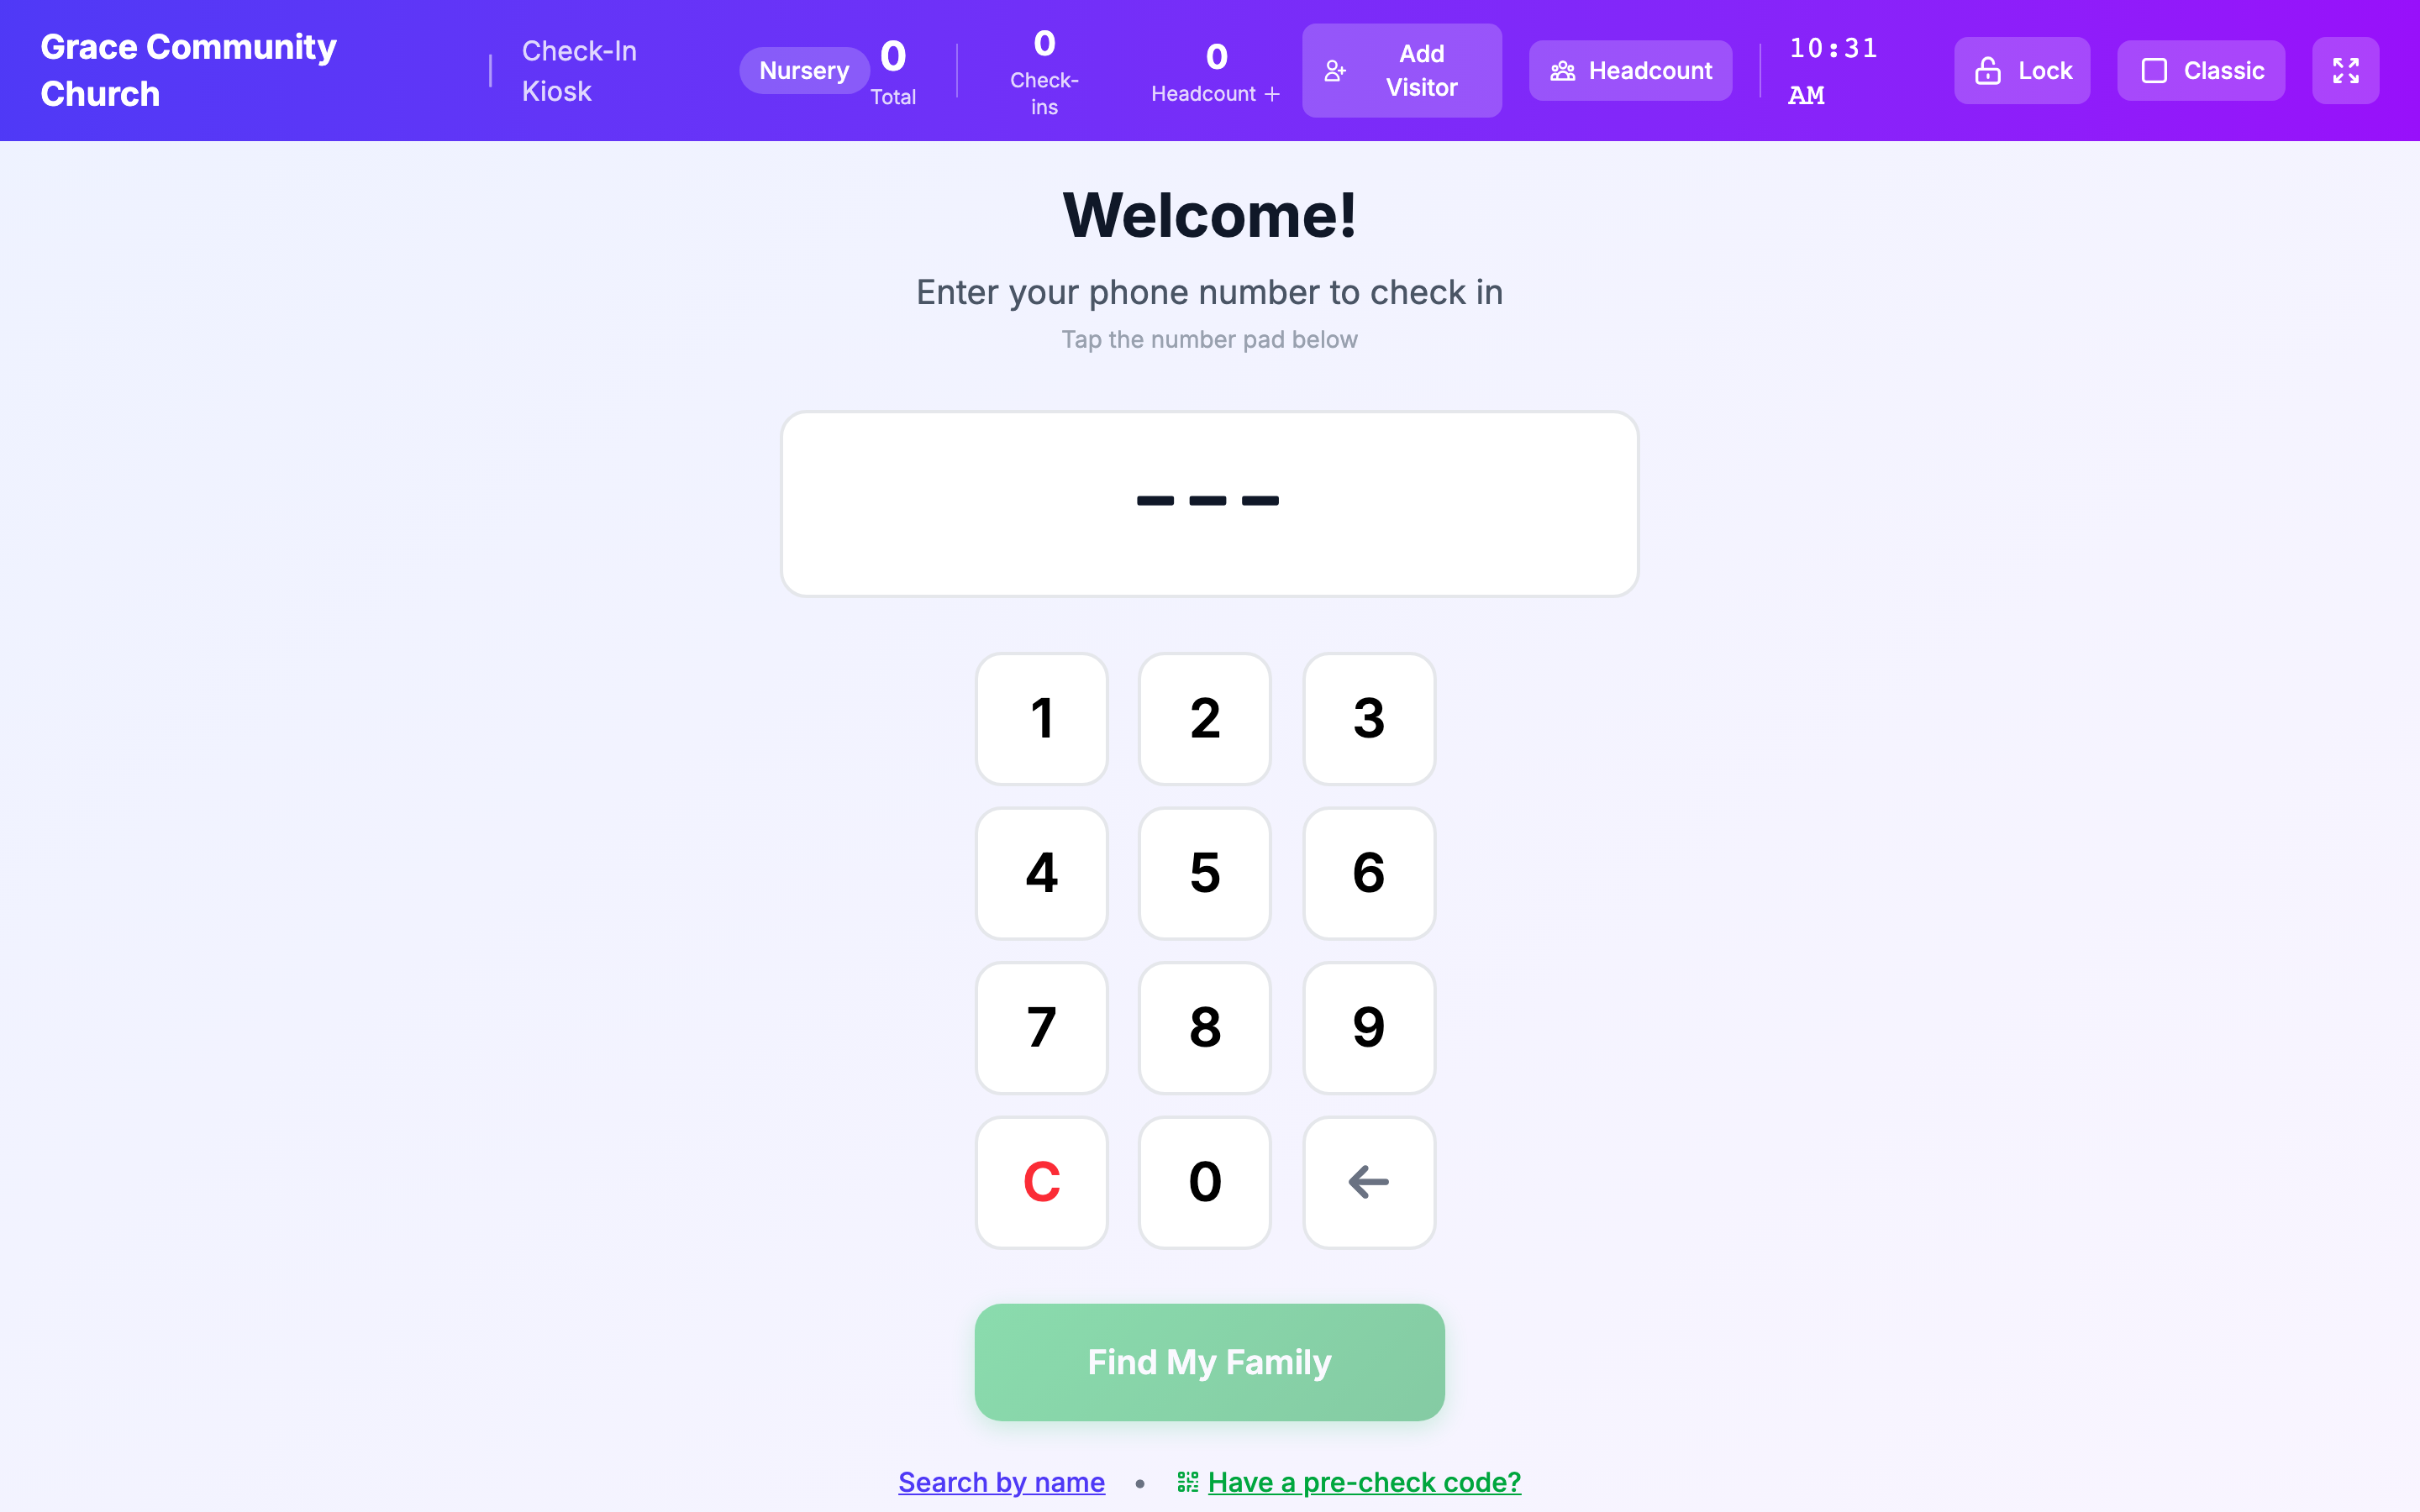
For kiosk layout, PIN lock, and printing, see Setting Up a Check-In Kiosk.
Checking in from the event page
The event Check-In tab also has Quick check-in search. When two or more rooms are Live, a Checking into picker appears next to the search — choose the room first. When only one session is live, that session is used automatically.
If a check-in is attempted while several sessions are live and no room is selected, TimelyChurch does not guess. You will see: Multiple check-in sessions are active — please select a session/room to check into.
Ending and Resuming a Session
End
Ending a room closes it to new check-ins. People who are already checked in stay checked in (and still need a normal checkout / security-code pickup). Other live rooms are not touched.
- Event Check-In tab: End on that card.
- Check-In Station Active Sessions: End on that card.
- Session page (while live): End Session.
The card then shows Ended (event tab) or drops out of Active Sessions (Station). On the Station, ended sessions can still appear under Today's Sessions with their start/end times and check-in count.
Resume
Re-activating a session does not recreate it and does not drop its check-ins. It becomes Live again so you can keep checking people into that same room. Resuming one session does not change any other.
On the event Check-In tab, an Ended card shows Resume. Use that after a pause (lunch, a false end, a room that needs to reopen).
Note: Resume is only on the event Check-In tab. The session page shows Session Closed, Export CSV, and Delete when a session is not live, and the Check-In Station has no Resume either. A standalone session (no linked event) therefore can't be reopened once it has ended -- start a new session instead. Ending a session never deletes its check-ins.
If no session is live on the event tab but ended rooms still appear above, the page tells you to Resume an ended session above to keep checking people in, or start a new one.
Occupancy While Several Rooms Are Live
The Check-In Station stats and the Checked In card (List / Rooms toggle) follow the session you Selected. Head counts on that card are this session's children, grouped by class — not a building-wide mix of every live room.
Physical capacity still lives on Facilities → Rooms, assigned to each class. Read those head counts against that capacity as described in Room Capacity and Live Occupancy.
Each Check-In session also has its own total on the event tab: individual check-ins plus any kiosk head-count entered for that room.
Parent Security Tags Across Rooms
Security codes and parent tags work the same way as a single-session Sunday:
- Each child's check-in still gets its own 6-character security code.
- Print the child name tag and the parent security tag as usual (Security Codes, Labels, and Child Safety).
- Verify & Check Out looks up the code across the church's active check-ins, not only the session currently selected on the Station — so a shared pickup desk can release a child from Nursery or Grade 1 with the matching tag.
If siblings belong in different rooms, check them in at each room's kiosk (or select each session). A family check-in on one pinned kiosk lands everyone you select in that room.
Authorized pickup still applies at checkout: for a child, choose who is picking up before Confirm Check Out.
Standalone Sessions vs Event-Linked
| Linked to an event | Standalone (no event) | |
|---|---|---|
| How you start | Event Check-In tab (Start a session), or Station Start Session with an event chosen. | Station Start Session → No event - standalone session. |
| Default name | Event tab: required Room N (edit it). Station: event title if you leave the name blank. | Sunday Service - [date] if you leave the name blank. |
| Volunteers | Assigned event volunteers can show for the session. | No event volunteer list. |
| Attendance | Check-ins feed that event's attendance. | Session report only; not attached to an event. |
| Wristbands | Bindings are stored on the event. Multi-day camps must share one event. Release all bands is available when the session uses wristbands. | Tap-to-identify can still work; Release all bands is not available. |
| Resume after End | Resume on the event Check-In tab. | Not available -- start a new session. |
| Icon on Station | Calendar-style (purple) on the Active Sessions card. | Check-style (indigo). |
Sessions are dated to today in your church time zone, even if the linked event is on another calendar day. Start rooms on the day you need them live. The event Check-In tab only lists that event's sessions for today, so rooms started on a different day will not show there.
Other Gotchas
- Name every room. Duplicate event titles make the kiosk picker and the Station Select list unsafe to run by guesswork.
- Do not let the system guess the room. With two or more live sessions, check-in refuses to auto-pick. Pin the kiosk or use Select / Checking into.
- Station Kiosk Mode vs Open kiosk. The Station header kiosk is shared (picker if multiple are live). Open kiosk on a card is pinned to that room. Put the pinned URL on the tablet at that door.
- Ending is not checkout and is not delete. Pickup still needs the security code (and authorized pickup for children).
- Delete is permanent. Delete on the session page or event tab removes the session and its check-in/attendance records. Confirm first. Prefer End unless you meant to wipe the roster. A session that still has children checked in can't be deleted until they are checked out.
- Opening Check-In from an event. If the Station is opened from an event and no live session exists for that event today, the page may auto-create a session named after the event title and date. Prefer starting named rooms from the event Check-In tab so you do not get an extra room alongside Nursery / Grade 1.
- Lockdown still applies across active sessions. See Lockdown Mode.
- Classroom Roster (session page or event tab Roster) is per session — use it on a TV in that room.
Frequently Asked Questions
Can two rooms share one event? Yes. That is the point of Check-In rooms. Start one session per room from the event Check-In tab.
Can a child be in two rooms at once? Each check-in belongs to one session. Check them into the room they are actually in. For camp checkpoints under one event, a later session (lunch, an activity) is a separate check-in; wristbands can identify the same child at each checkpoint.
Does ending Nursery check everyone out of Grade 1? No. End closes only that session to new check-ins.
Where did my room go after I ended it? On the event Check-In tab it stays as Ended (Resume is there). On the Station it leaves Active Sessions and can still appear under Today's Sessions.
Why did the kiosk ask which class to pick? More than one session is live and that kiosk is not pinned to a room. Either pin the tablet with Open kiosk, or keep the picker if one device serves every door.
Why do I see "select a session/room to check into"? Several sessions are live and the check-in did not include which one. Select the room on the Station, the event tab picker, or a pinned kiosk.
Related Articles
- Check-In Overview — Feature summary, including concurrent sessions.
- Setting Up a Check-In Kiosk — Layout, PIN lock, and the session picker.
- Check-In Settings — Printer options, notifications, and a shorter concurrent-session note.
- Room Capacity and Live Occupancy — Facilities rooms, class room assignment, and head counts.
- First-Time Setup: Day 1 Tutorial — Starting and ending a test session.
- Set Up Wristband Check-In — One event for a multi-day camp.
- Using Wristbands at Camps & Events — Checkpoints as separate sessions under that event.
- Event Check-In and Attendance — Check-In tab on the Event Hub.
- Lockdown Mode — Emergency hold on checkouts.