
Creating Groups
This article walks you through creating a new group in TimelyChurch, including all available settings for each group type.
Before You Begin
- Your role needs permission to create groups.
- Your church plan may limit the number of groups you can create. If you have reached your limit, you will be prompted to upgrade your plan.
Step-by-Step: Creating a Group
- Navigate to Groups from the admin sidebar.
- Click the Add Group button in the top-right corner.
- The Add Group panel opens. Fill in the fields described below.
- Click Create to save the group.
After creation, you will be redirected to the group's page where you can add members, upload a photo, and configure additional settings.
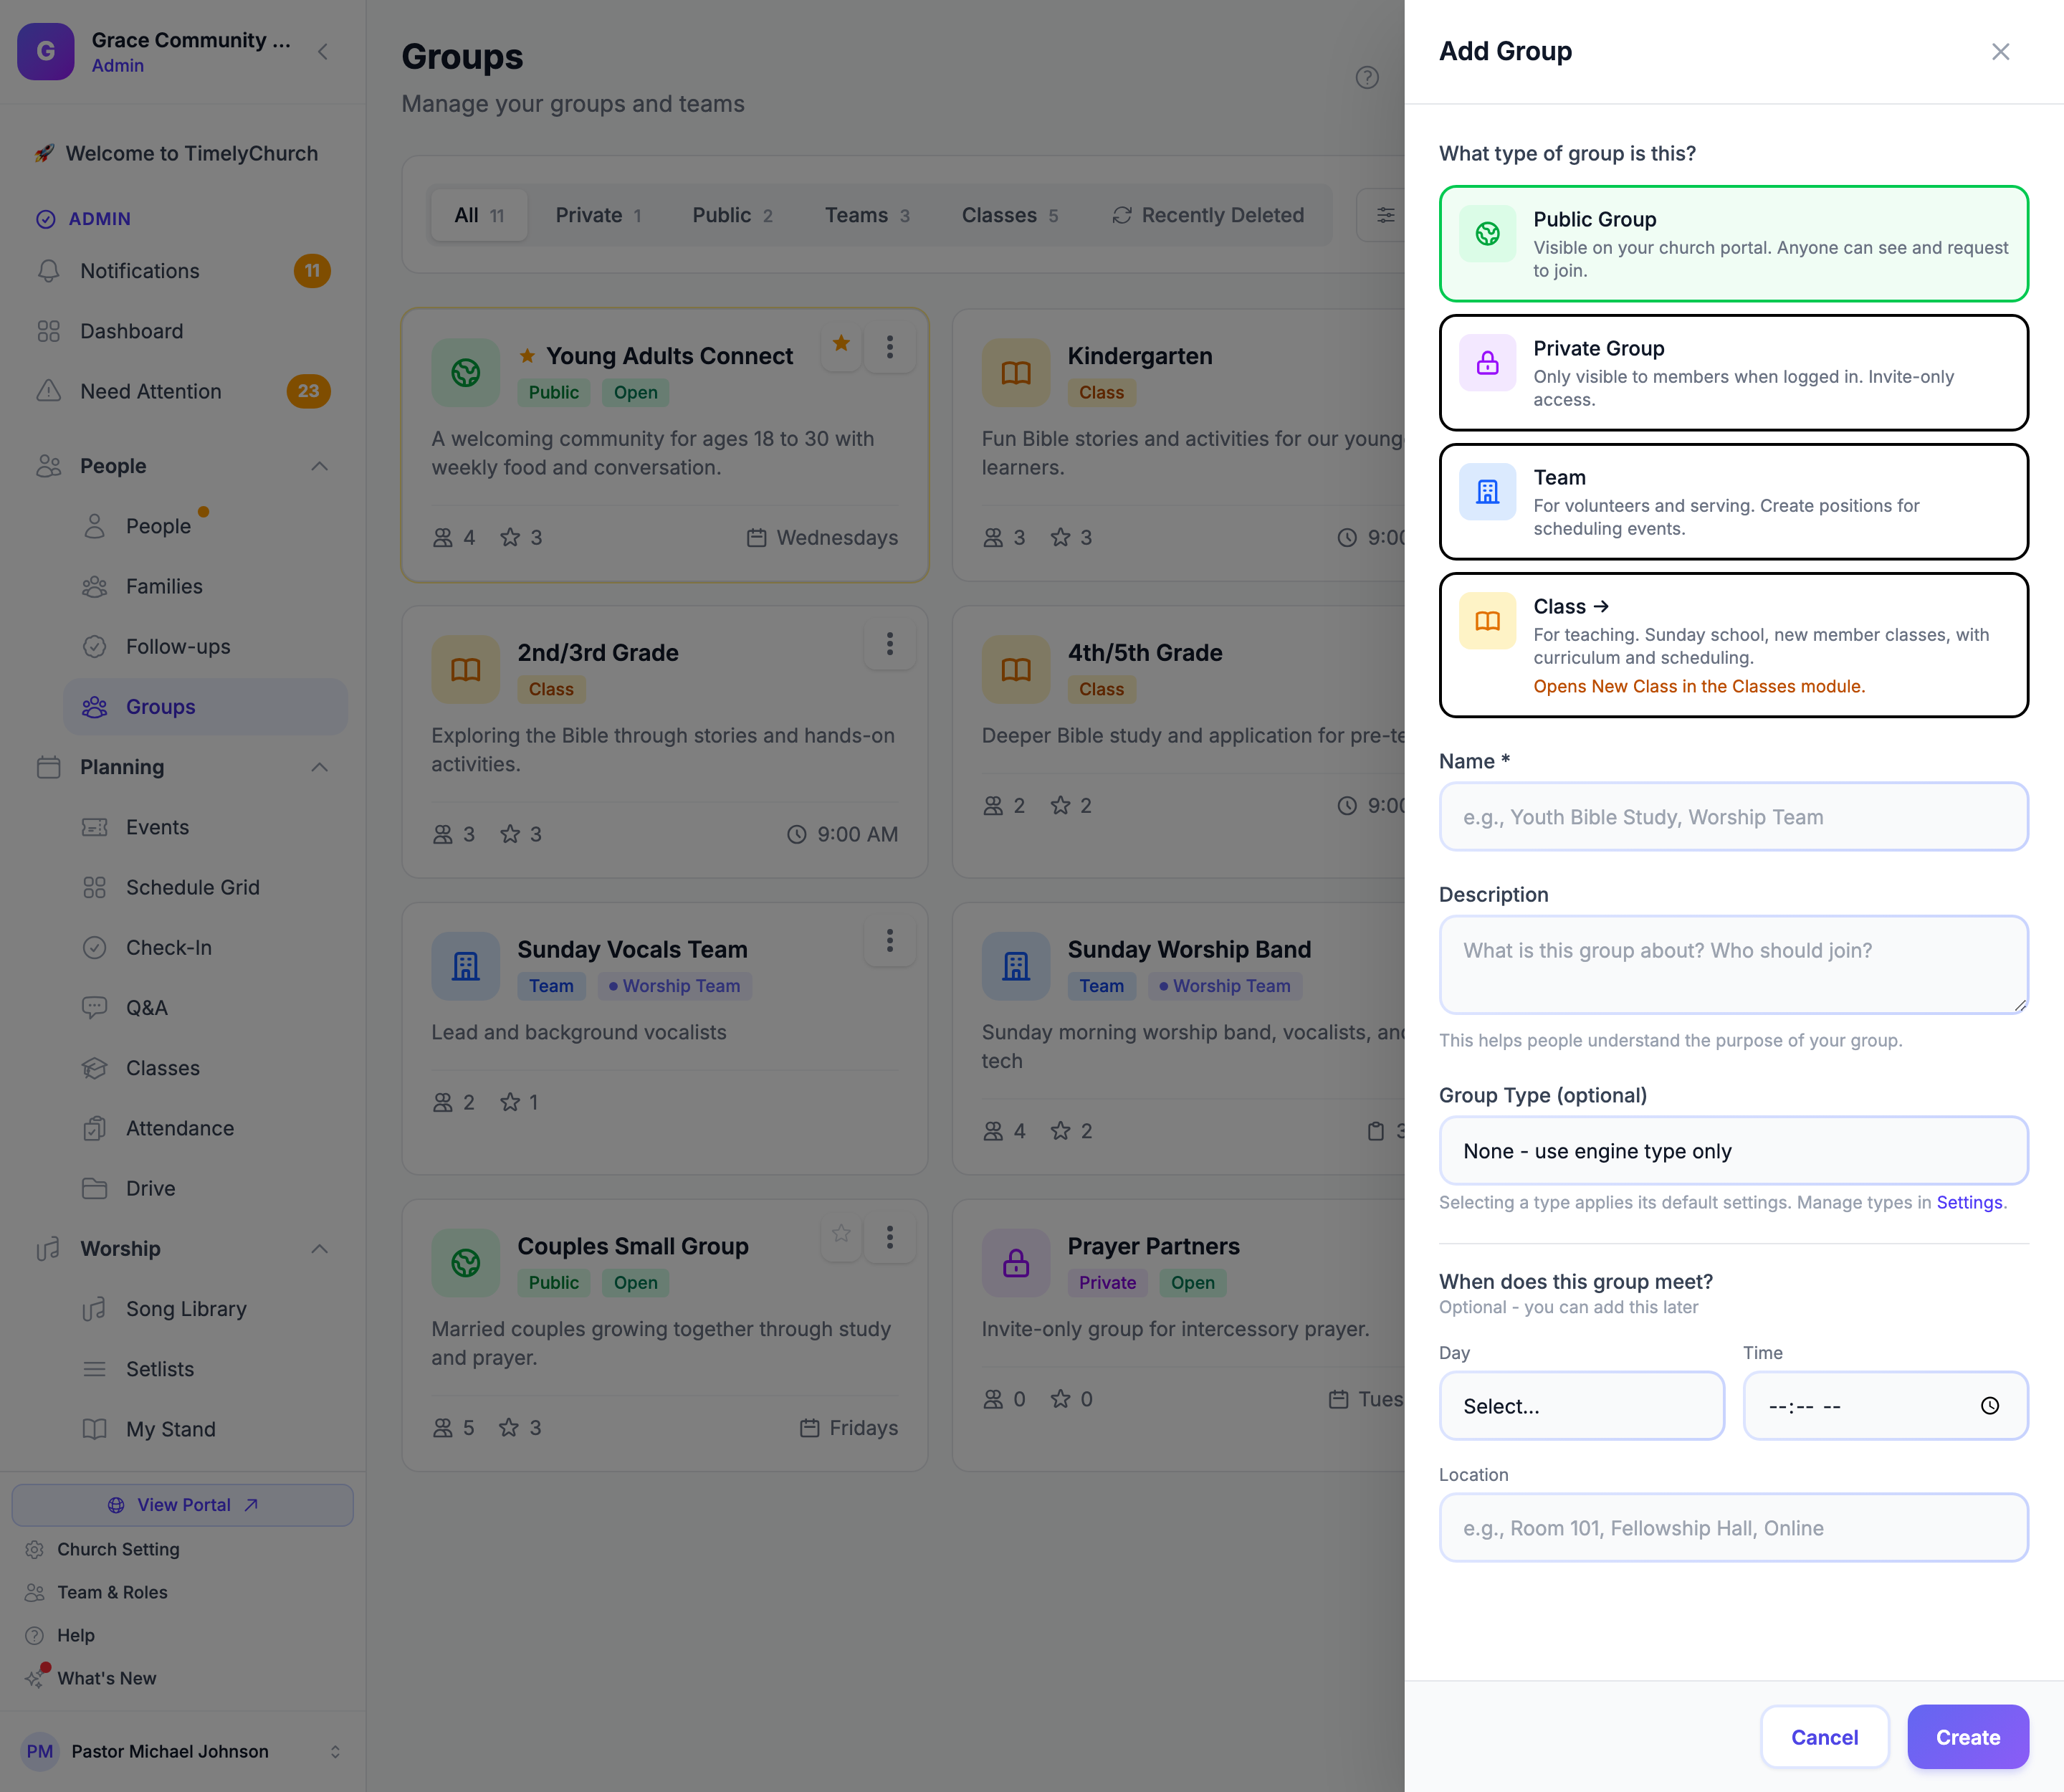
Required Fields
| Field | Description |
|---|---|
| What type of group is this? | Choose Public Group, Private Group, Team, or Class. This is the underlying kind of group and controls which features are available. |
| Name | The display name of the group (max 255 characters). |
Custom Group Type (Optional)
In addition to the four kinds above, you can layer a Custom Group Type on top of any group. Custom group types are church-defined labels (for example "Life Group", "Recovery Group", "Worship Team") that map to one of the four kinds and can carry their own default settings (meeting frequency, max members, approval requirement, check-in requirement).
| Field | Description |
|---|---|
| Group Type (optional) | Shown when your church has group types. Pick one and its default settings are applied when the group is created. The group also takes that type's kind (Public, Private, Team, or Class). Choose None - use engine type only to skip it. |
Custom group types are managed at Groups → Settings. See Custom Group Types for setup details.
Common Optional Fields
The Add Group panel keeps the create step short -- it asks for just the essentials. Everything else (address, online link, member cap, leaders, and more) is added afterward on the group's Group details tab. See "Settings Available After Creation" below.
| Field | Description |
|---|---|
| Description | A short description of the group's purpose and activities. This helps people understand who should join. |
| Day | Under "When does this group meet?" -- the day of the week the group meets. Optional; you can add it later. |
| Time | The time the meeting starts. |
| Location | A friendly name for the meeting location (e.g., "Room 101", "Fellowship Hall", "Online"). |
Teams
When you choose Team, the panel shows Next step: Add Positions -- after creating the team you add positions like "Vocalist", "Greeter", or "Sound Tech" and schedule people into them for events. A new team starts with enrollment Closed and Require approval turned on; change either on the Group details tab.
When you create a team, positions and schedule templates become available on the group page. See Team Positions, Templates and Scheduling.
Classes
Classes are set up on their own Classes page (Planning > Classes). The Class card in the Add Group panel says "Opens New Class in the Classes module." -- choosing it takes you straight to the Classes page's New Class form. See Managing Classes. The class form covers these fields:
| Field | Description |
|---|---|
| Room Assignment | Assign the class to a room from your facility's room list. |
| Time Slot | A label for the service time (e.g., "9:00 AM Service", "11:00 AM Service"). Displayed alongside the class name. |
| Min Age / Max Age | Numeric minimum and maximum ages for enrollment (0-120). |
| Min Grade / Max Grade | Minimum and maximum grade levels for enrollment (Pre-K through Adult). |
| Requires check-in | When enabled, attendance is tracked through the check-in system. |
| Auto-enroll by age/grade | When enabled, people matching the age or grade criteria can be automatically enrolled. |
When you create a class, TimelyChurch automatically generates two default positions: Teacher and Assistant Teacher. You can customize these later.
Settings Available After Creation
Open the group and go to the Group details tab (on a phone the tab is called Details). The top card shows the group's details; click Edit to change them, then Save.
Basics
- Name and Description
- Kind -- Public group, Private group, Team, or Class (see "Changing a Group's Kind Later" below)
- Group Type -- The custom group type, if your church has any
Schedule and enrollment (Public groups, Private groups, and Teams)
- Meeting Day, Time, and Frequency (Weekly, Bi-Weekly, Monthly, or Varies)
- Max Members -- An optional cap. Leave it empty for no limit. When the group is full, people who try to join are placed on a waitlist (see Group Waitlist).
- Schedule Note -- Shown publicly when no fixed meeting day is set (e.g., "Dates will vary - sign up to stay in the loop!"). The field appears when the frequency is Varies or no day is chosen.
- Enrollment -- Open or Closed. A closed group has no public page, so nobody can join it through a link or the Group Finder.
- Allow guest registration -- "Visitors can join without creating an account." On by default for Public groups.
- Require approval -- "New members need leader approval to join." On by default for Teams.
- Online signup form -- Creates a shareable signup form automatically; each submission adds the person to People and to this group.
- Hide member count publicly -- The member count won't show on public group pages.
- Ask for RSVPs -- Members are asked to respond to upcoming meetings (see Group Meetings, Attendance & RSVPs).
Location
- Location Type -- Physical, Virtual, or Hybrid.
- Location Name -- A friendly name, such as "Smith Home" or "Community Center".
- Full Address -- The street address.
- Address Visibility -- Controls who can see the full address: Members Only (default -- only active members see the address), Proximity Public (non-members see a general area description, members see the full address), Fully Public (everyone sees the full address), or Hidden (no address shown to anyone).
- Proximity Description -- A general area shown publicly when Address Visibility is Proximity Public (e.g., "Near Downtown").
- Meeting Link URL -- For Virtual and Hybrid groups. Only visible to group members.
Other cards on the tab
- Group leaders -- Add leaders and co-leaders with Add Leader (see Managing Group Members).
- Positions and Scheduling Settings -- Teams and classes only (see Team Positions, Templates and Scheduling).
- Registration forms -- Forms linked to this group. Add form creates one people can use to join.
- Tags -- Private and Public groups only. Click the tags that apply and Save Tags (see Group Tags).
Changing a Group's Kind Later
You're not locked into the kind you chose when you created a group. Public group, Private group, Team, and Class can all be changed afterward from the group's Details tab -- and converting a group to Class automatically adds the default Teacher and Assistant Teacher serving positions, the same as if you had created it as a Class from the start. This is a church-administrator-only change: a team leader editing their own group sees the Kind as read-only text, with a note underneath reading "Only a church administrator can change a group's kind."
- Open the group and click the Group details tab, then Edit.
- Open the Kind dropdown and choose Public group, Private group, Team, or Class.
- Click Save.
Uploading a Group Photo
- Open the group page.
- Hover over the group icon (the square image at the top of the group's profile card).
- Click the upload button to choose and upload a photo.
- Supported formats: JPEG, PNG, JPG, GIF, WEBP (max 5 MB).
To remove a photo, hover over the image and click Remove photo.
Deleting and Restoring a Group
To delete a group, open it and click Delete at the bottom of the left-hand panel, then confirm. Deleting is not immediate and permanent: the group moves to Recently Deleted.
Church administrators can bring it back:
- On the Groups page, click Recently Deleted (next to the type filter tabs).
- Find the group. The list shows how many members it had and when it was deleted.
- Click Restore. Members and positions come back intact.
The page tells you how many days a deleted group is kept before it is removed for good. To remove one right away, click Delete Permanently -- this cannot be undone.
A deleted class is archived instead and is restored from the Classes page (see Managing Classes).
Tip: When creating a Public Group that you want people to discover on their own, check that Enrollment is Open, then click Enable sharing on the group page. If you also want non-members to see where it meets, set the Address Visibility to "Proximity Public" or "Fully Public".