
Navigation and Menus
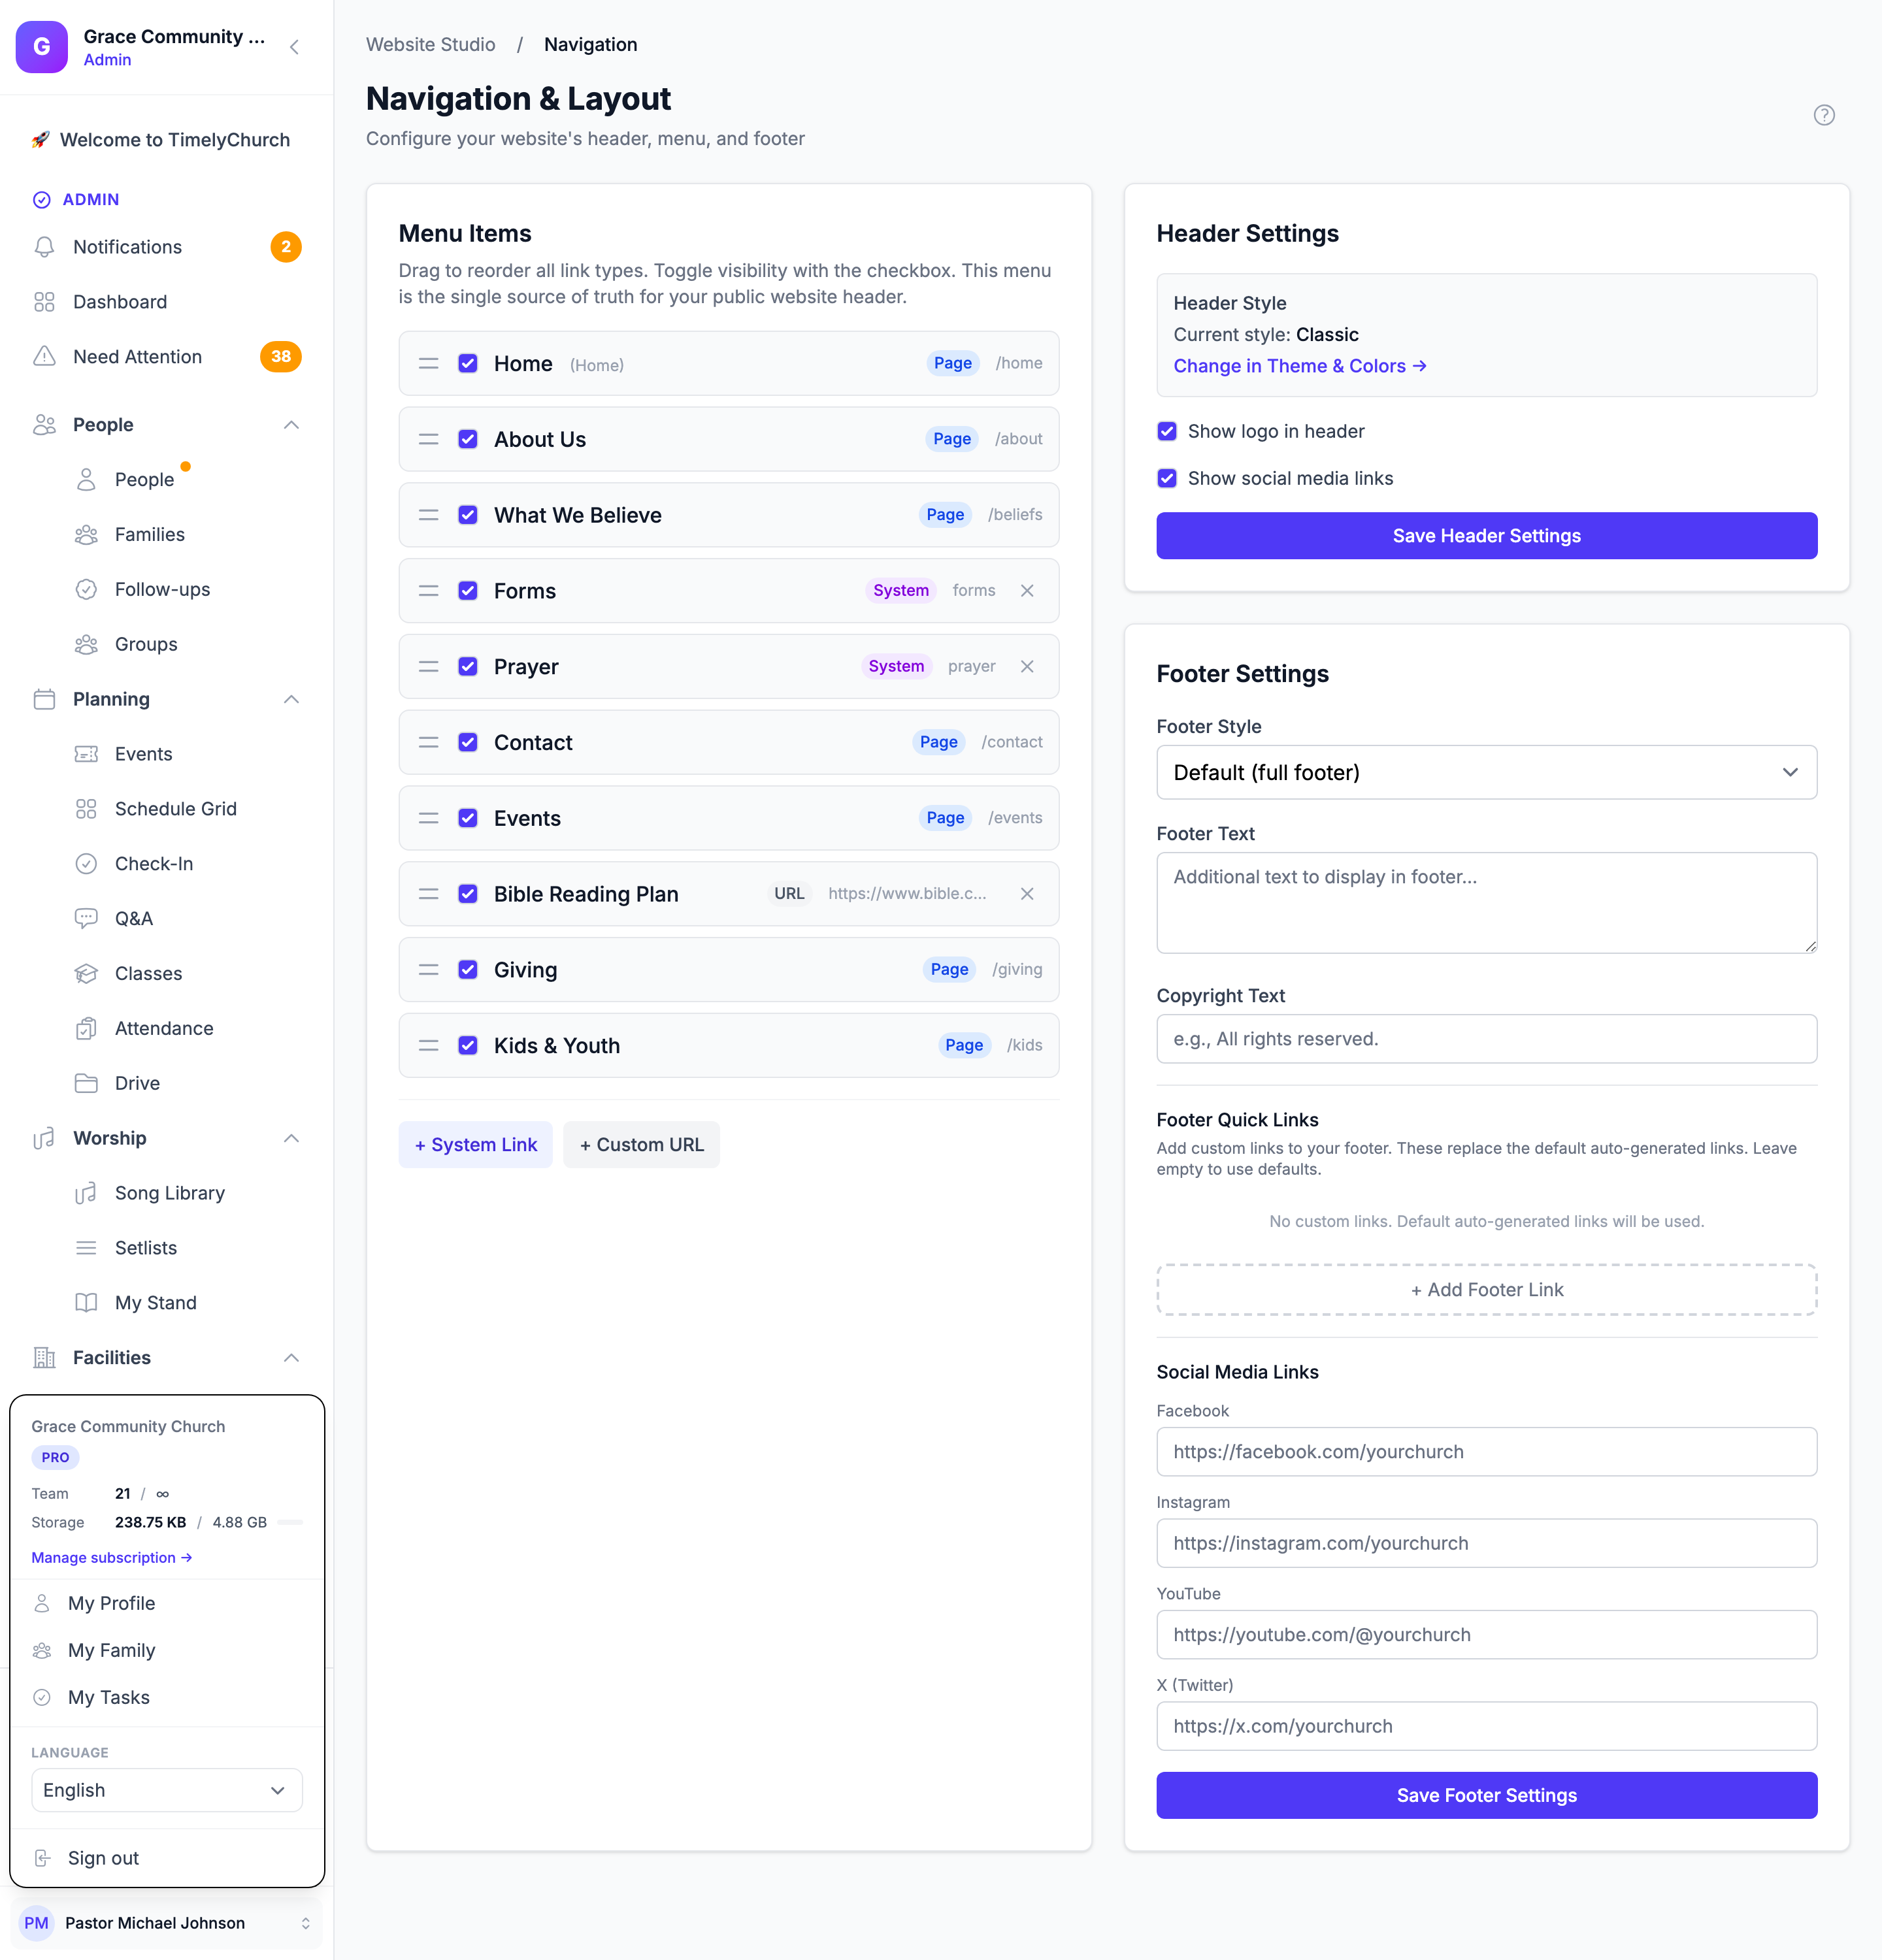
The Navigation & Layout page lets you control which links appear in your site menu, the order they appear in, and how your header and footer are configured. The menu can hold your published pages, built-in pages such as Events or Give, and links to any web address.
Accessing Navigation Settings
- Click Website in the left sidebar to open Website Studio.
- Click the Navigation card on the dashboard.
The page is divided into three areas: Menu Items, Header Settings, and Footer Settings.
Managing Menu Items
Menu Items is the single source of truth for your public website header: whatever is in this list, in this order, is your menu. Each entry is labeled with its type:
- Page -- one of your published website pages. The Home page is marked (Home).
- System -- a built-in page of your website, such as Events or Sermons.
- URL -- a link to any web address.
Showing or Hiding a Menu Item
- Find the item in the Menu Items list.
- Check or uncheck the checkbox next to it.
- The change is saved automatically ("Navigation saved.").
Note: Hiding a page from the menu does not unpublish or delete it. The page is still accessible via its direct URL -- it simply will not appear in the site menu.
New pages that you publish with Show in Navigation turned on join the list automatically.
Adding a Built-In Page (System Link)
- Click + System Link.
- Choose the Module: Home, Events, Sermons, Service Times, Our Staff, Forms, Give, Prayer, or Directory (only the ones not already in your menu are offered).
- Optionally type a Label override (optional) -- the default label is used if you leave it empty.
- Click Add to Menu.
Adding a Link to Any Web Address (Custom URL)
- Click + Custom URL.
- Enter the URL and the Label (the link text).
- Click Add to Menu.
Removing a Menu Item
Click the remove icon (Remove from menu) on the item and confirm Remove. For a page, this only takes it out of the menu -- the page itself stays.
Reordering Menu Items
- Grab the drag handle on the left side of an item.
- Drag it to its new position in the list. Every type of link can be reordered.
- Release it. The new order is saved automatically.
Items at the top of the list appear first (leftmost) in your navigation menu.
Tip: You can also set a page's position with Menu Order in the page editor sidebar.
Custom Menu Labels for Pages
If you want a page to display a different name in the navigation than its page title:
- Go to Website Studio > Pages.
- Open the page in the editor.
- In the Page Settings sidebar under Navigation, enter a Menu Label.
- Click Save Settings.
For example, a page titled "About Our Church" could have a menu label of simply "About."
Header Settings
The header settings control the appearance of your site navigation bar.
Header Style
Header Style shows the Current style (for example Classic). The style itself is chosen on the Theme & Colors page -- click Change in Theme & Colors to go there. See Customizing Your Website Design for the five header layouts.
Show Logo in Header
Check Show logo in header to display your church logo in the header. If unchecked, only the church name text will appear.
Show Social Media Links
Check Show social media links to display your social media icons in the header area.
Saving Header Settings
Click Save Header Settings to apply your changes. Header settings take effect immediately on your public website.
Footer Settings
The footer appears at the bottom of every page on your website.
Footer Style
Choose one of four footer layouts in the Footer Style menu:
| Footer Style | Description |
|---|---|
| Default (full footer) | Multi-column layout with church info, navigation, contact details, and social. The richest footer. |
| Minimal (single line) | A single line with copyright and social icons only. |
| Centered (logo + links) | Everything centered -- logo, links, and copyright stacked in the middle. |
| Grand (large with CTA) | A large footer with prominent branding and a call to action. Use when you want the footer to be a visual statement. |
Footer Text
Enter any additional text you want displayed in the footer. This could be a brief description of your church, a welcome message, or any other information.
Copyright Text
Enter your copyright notice. For example: "All rights reserved." Your church name and the current year are typically included automatically.
Footer Quick Links
By default, the footer shows automatically generated links. To choose them yourself, use Footer Quick Links -- your links replace the automatic ones. Leave the list empty to keep the defaults ("No custom links. Default auto-generated links will be used.").
- Click + Add Footer Link.
- Pick the Link Type: Website Page, Form, or Custom URL.
- Choose the page (Select Page) or form (Select Form), or enter the URL.
- Enter the Display Label -- the link text shown in the footer.
- Click Add Link.
Drag a link by its handle to reorder it. Remember to click Save Footer Settings.
Social Media Links
Enter the URLs for your social media profiles:
- Facebook -- Your Facebook page URL (e.g.,
https://facebook.com/yourchurch) - Instagram -- Your Instagram profile URL (e.g.,
https://instagram.com/yourchurch) - YouTube -- Your YouTube channel URL (e.g.,
https://youtube.com/@yourchurch) - X (Twitter) -- Your X profile URL (e.g.,
https://x.com/yourchurch)
Social media icons will only appear for platforms where you have entered a URL. Leave a field blank to hide that platform.
Saving Footer Settings
Click Save Footer Settings to apply your changes. Footer settings take effect immediately on your public website.
How Navigation Relates to Pages
The navigation system is tightly connected to your pages:
- Only published pages appear in the menu.
- Each page has a Show in navigation menu setting and a Menu Order number in the page editor.
- You can manage these settings from either the Navigation page or from individual page editors.
- The Home page is labeled as "(Home)" in the navigation list for easy identification.
Best Practices
- Keep your menu concise. Aim for 5-7 main navigation items. Too many links can overwhelm visitors.
- Use clear, short labels. "About" is better than "About Our Church and Its History."
- Put your most important pages first. Visitors tend to look at the first and last items in a navigation menu.
- Always include a way to get back home. Make sure your Home page is in the navigation or that your logo links to it.
Next Steps
- Staff Directory -- Set up your leadership page
- Customizing Design -- Adjust your header and footer styles