
First-Time Setup: Day 1 Tutorial
This article walks a brand-new church admin through everything you need to do to run check-in successfully on your first Sunday. Follow the steps in order. Plan for about 60-90 minutes the first time, plus a quick rehearsal the day before your first live use.
If you have already done some of these steps, skip ahead. If you get stuck, the Troubleshooting article covers the most common first-time issues.
Before You Begin: What You'll Need
- An admin account on TimelyChurch with permission to use the Check-In module.
- A subscription plan that includes the Check-In feature (see article 6 -- if your plan doesn't include it, the module won't appear).
- A tablet, laptop, or touchscreen monitor for the kiosk (an iPad 10" or larger is recommended).
- A label printer. Brother QL-820NWB or QL-1100 is recommended; Dymo LabelWriter also works.
- Label stock that matches your printer (e.g., Brother DK-11202 62mm x 100mm).
- About 30 minutes of quiet time, ideally before a Sunday so you aren't rushed.
Step 1: Confirm the Module Is Enabled
- Log in to your TimelyChurch admin panel.
- Look for Check-In in the left sidebar.
- If it's there, you're good. Skip to Step 2.
Note: There is no separate "Attendance" entry in the sidebar. Attendance is now part of the Check-In module -- you record past or retroactive attendance using the Manual Attendance button in the Check-In Station header.
If Check-In is not visible:
- Your subscription plan may not include the Check-In feature. Open Church Settings and check your subscription/plan to confirm the plan name. If you need to add Check-In, contact your TimelyChurch account manager or upgrade through the billing portal.
- You may not have been granted module permission. Ask an administrator to give your role Check-In access under Roles & Permissions in the left sidebar (your team member must be assigned a role that includes Check-In).
Step 2: Set Up People and Families
Check-in works best when families and class enrollments are already in the system. If you haven't yet imported your church directory, do this first.
- Go to People in the admin sidebar.
- Add or import each family. The minimum useful fields are:
- First name, last name
- Phone (mobile is most common)
- Birthdate (so the system knows who is a child)
- Allergies and medical notes (for safety on labels)
- Use the Family feature to link parents and children together. This is what enables the "look up family by phone" experience at the kiosk.
- For each family, mark which adults are authorized to pick up children ("can_pickup").
Tip: You don't need to enter every family before going live -- new families can register at the kiosk via "Add Visitor." But pre-loading your regulars dramatically speeds up the first Sunday.
For details, see the People articles in the main knowledge base.
Step 3: Set Up Classes and Rooms
If you want children automatically assigned to the right classroom at check-in (which you do), set up your class structure now.
3a. Create Rooms
- In the left sidebar, open Facilities and choose Rooms.
- Add each physical classroom you use for children's ministry.
- For each room, set a Capacity number. This unlocks the Room Occupancy dashboard (see article 12). Use your fire-code maximum, or slightly less for safety margin.
- Mark each room Active.
3b. Create Class Groups
- Go to Groups in the admin sidebar.
- Add a class-type group for each age range (e.g., "Nursery," "Toddlers," "Preschool," "Kindergarten," "Elementary").
- Assign each class to a Room from the dropdown.
- Save.
3c. Enroll Children in Classes
For each child in your directory, add them to the class they belong to. The kiosk will then auto-select that class when the child checks in -- the parent doesn't have to choose.
If your church has hundreds of children, do this in batches. The most active children first.
Step 4: Configure Check-In Settings
Now configure how the system prints labels and handles check-in behavior.
- Go to Check-In in the admin sidebar.
- Click the Settings gear icon (top-right).
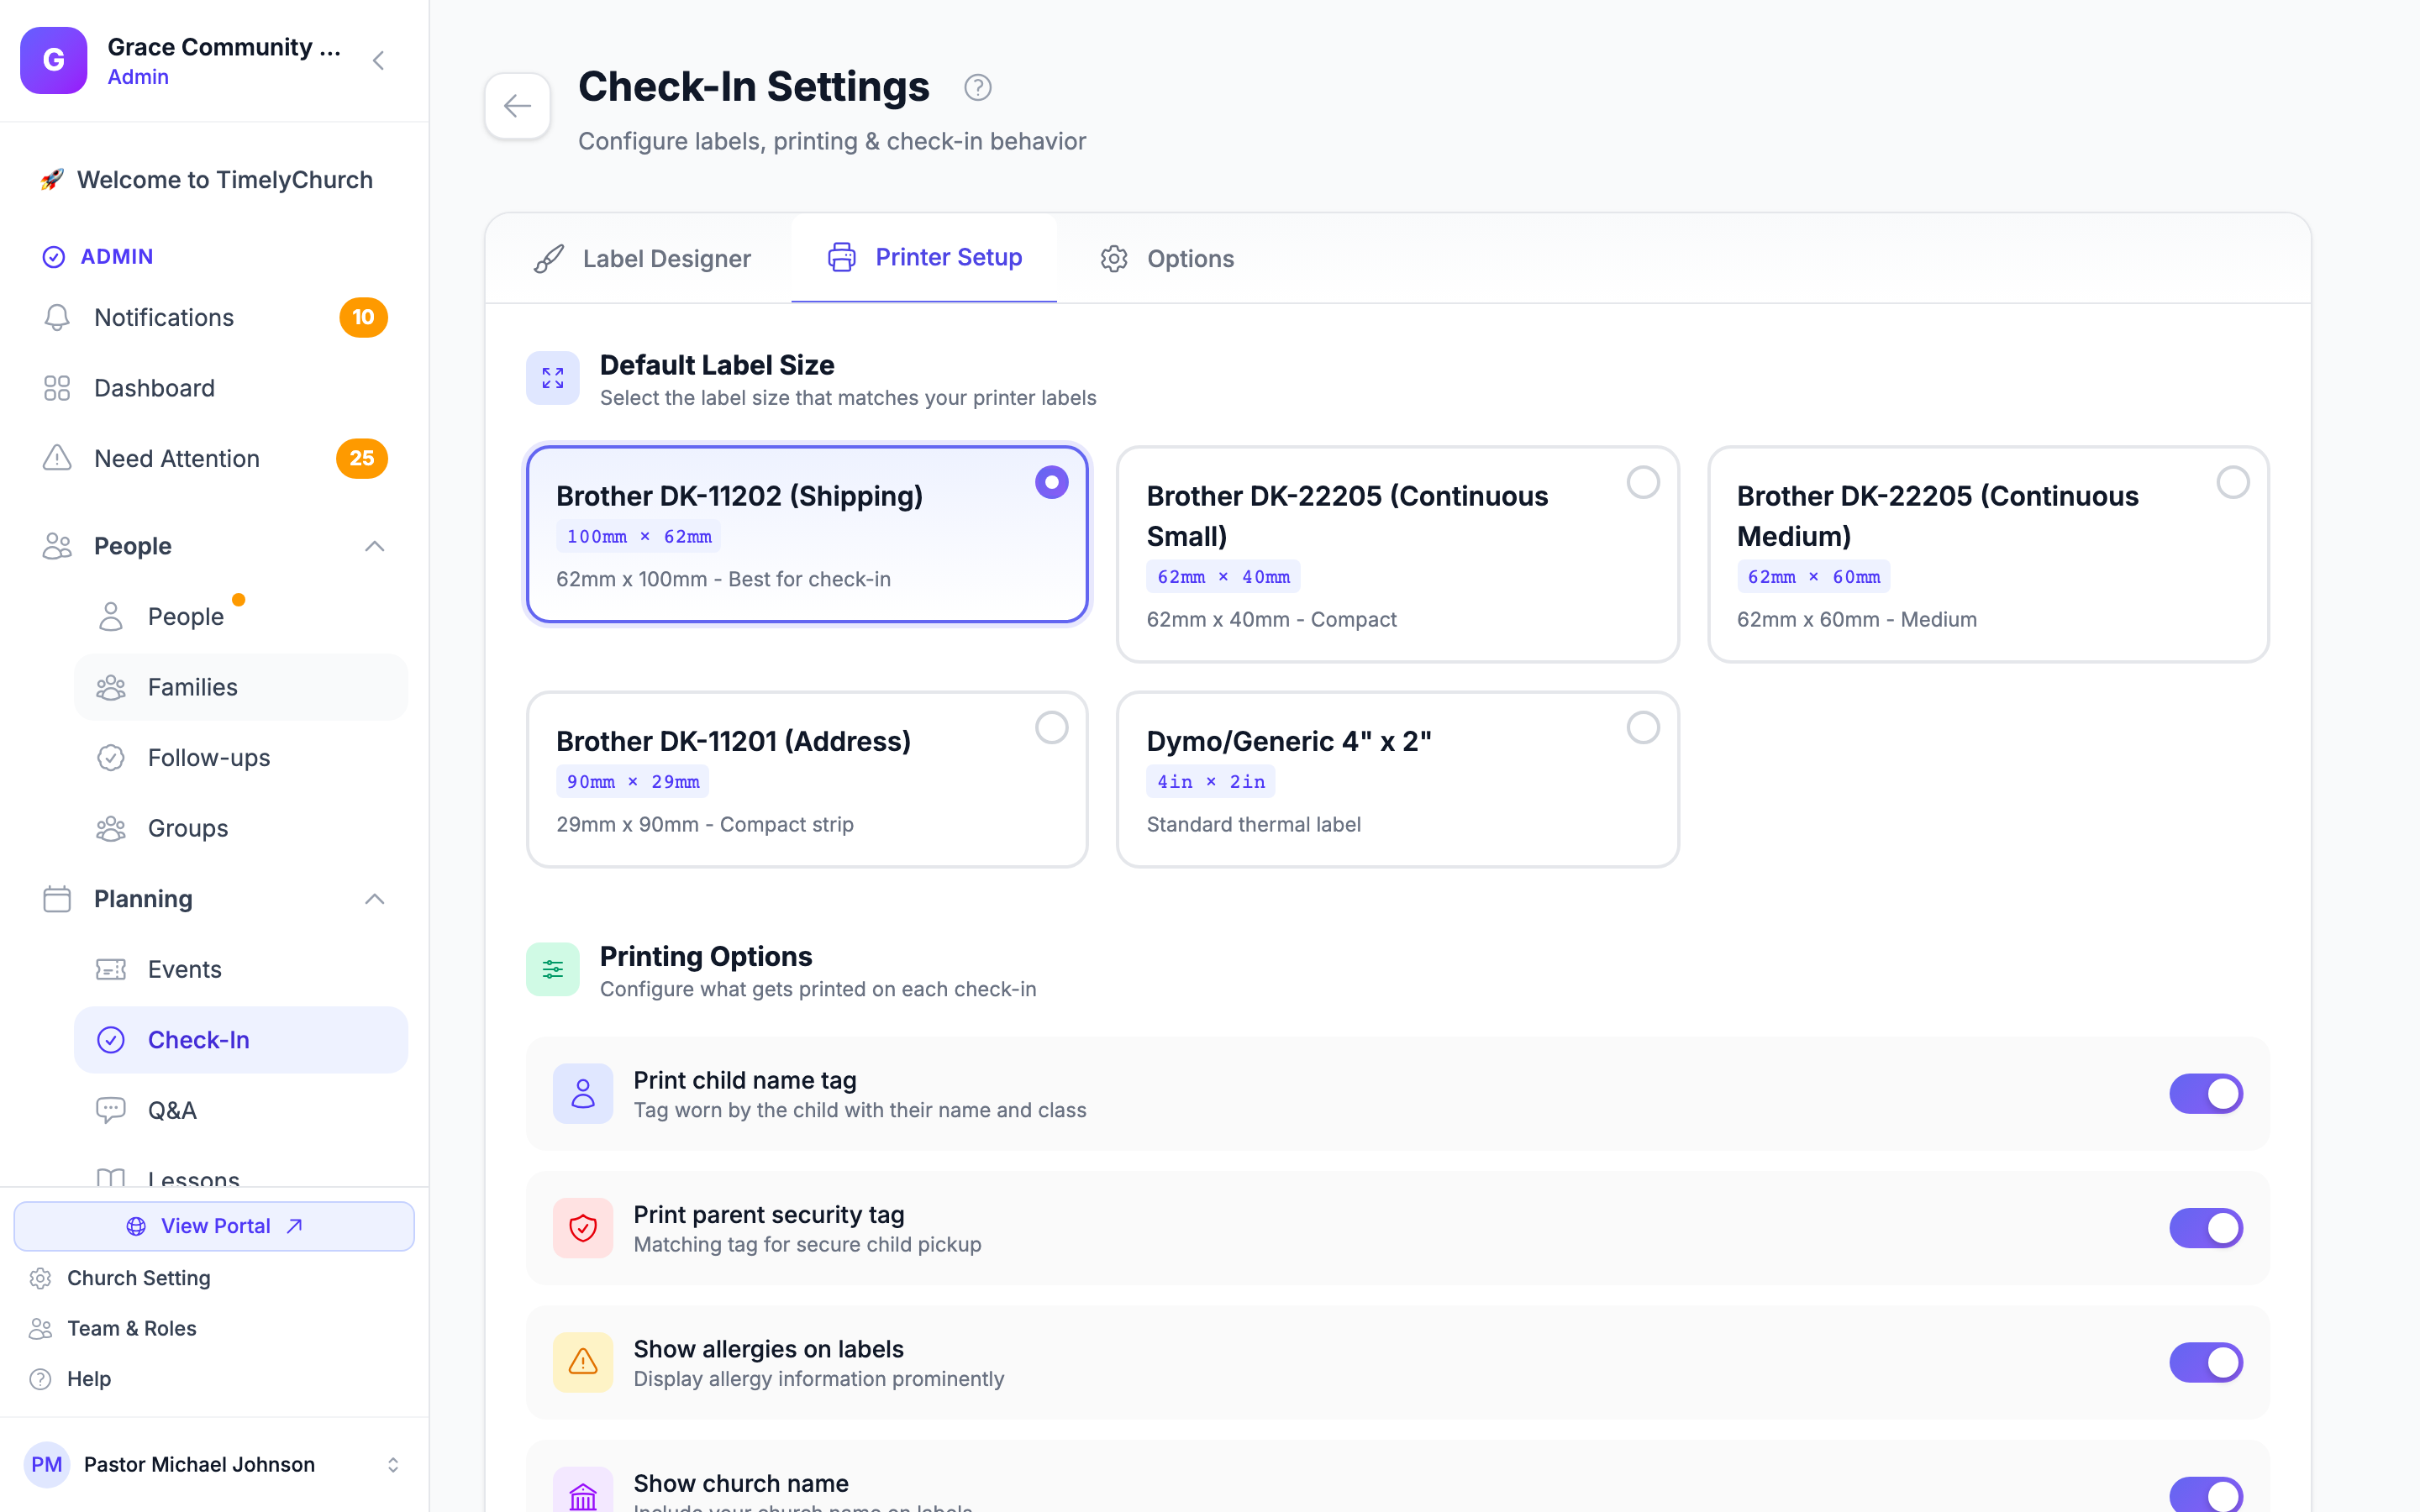
4a. Printer Setup
- Open the Printer Setup tab.
- Under Default Label Size, click the size that matches your label stock (e.g., the Brother DK-11202 62mm x 100mm preset).
- Decide what prints by default. The Printing Options section has four toggles:
- Print child name tag: On -- the child wears this.
- Print parent security tag: On -- the parent uses this for pickup verification.
- Show allergies on labels: On -- prints allergy info on the child tag for the volunteer to see.
- Show church name: On -- nice branding on every label.
- Click Save Printer Settings.
4b. Create Default Label Templates
- Open the Label Designer tab.
- Click Create Default Templates.
- Two templates are created automatically: a Classic Child Tag and a Classic Security Tag (parent tag). Both are set as defaults and ready to use.
You can customize these later (see article 5). For your first Sunday, the defaults are fine.
Step 5: Test the Printer
Don't wait until Sunday morning to find out the printer doesn't work.
- Plug your printer into the kiosk device (USB) or confirm it's on the same network (Wi-Fi).
- Power it on.
- From your computer, run a test print from the OS:
- macOS: System Settings > Printers & Scanners > [your printer] > Print Test Page.
- Windows: Settings > Devices > Printers & Scanners > [your printer] > Manage > Print a test page.
- iPad: From any app that prints (Notes, Mail), try AirPrint to your label printer.
- A label or test sheet should come out cleanly.
If the printer test fails, fix it now -- not Sunday morning. See the Troubleshooting article.
Test a Real TimelyChurch Label
- From the Label Designer tab, find one of your default templates.
- Click Preview in the three-dot menu.
- The preview opens with sample data (e.g., "Sarah Johnson," class "Kindergarten," and a 6-character security code such as "AB12CD").
- Click Print in the preview window.
- A real label should come out. Inspect it: are the name, code, and class all readable? Adjust the template if anything is cut off.
Step 6: Set Up the Kiosk
Now let's get a kiosk running on your tablet or laptop.
6a. Open the Kiosk
- On the kiosk device, log in to TimelyChurch as an admin (just for setup).
- Go to Check-In.
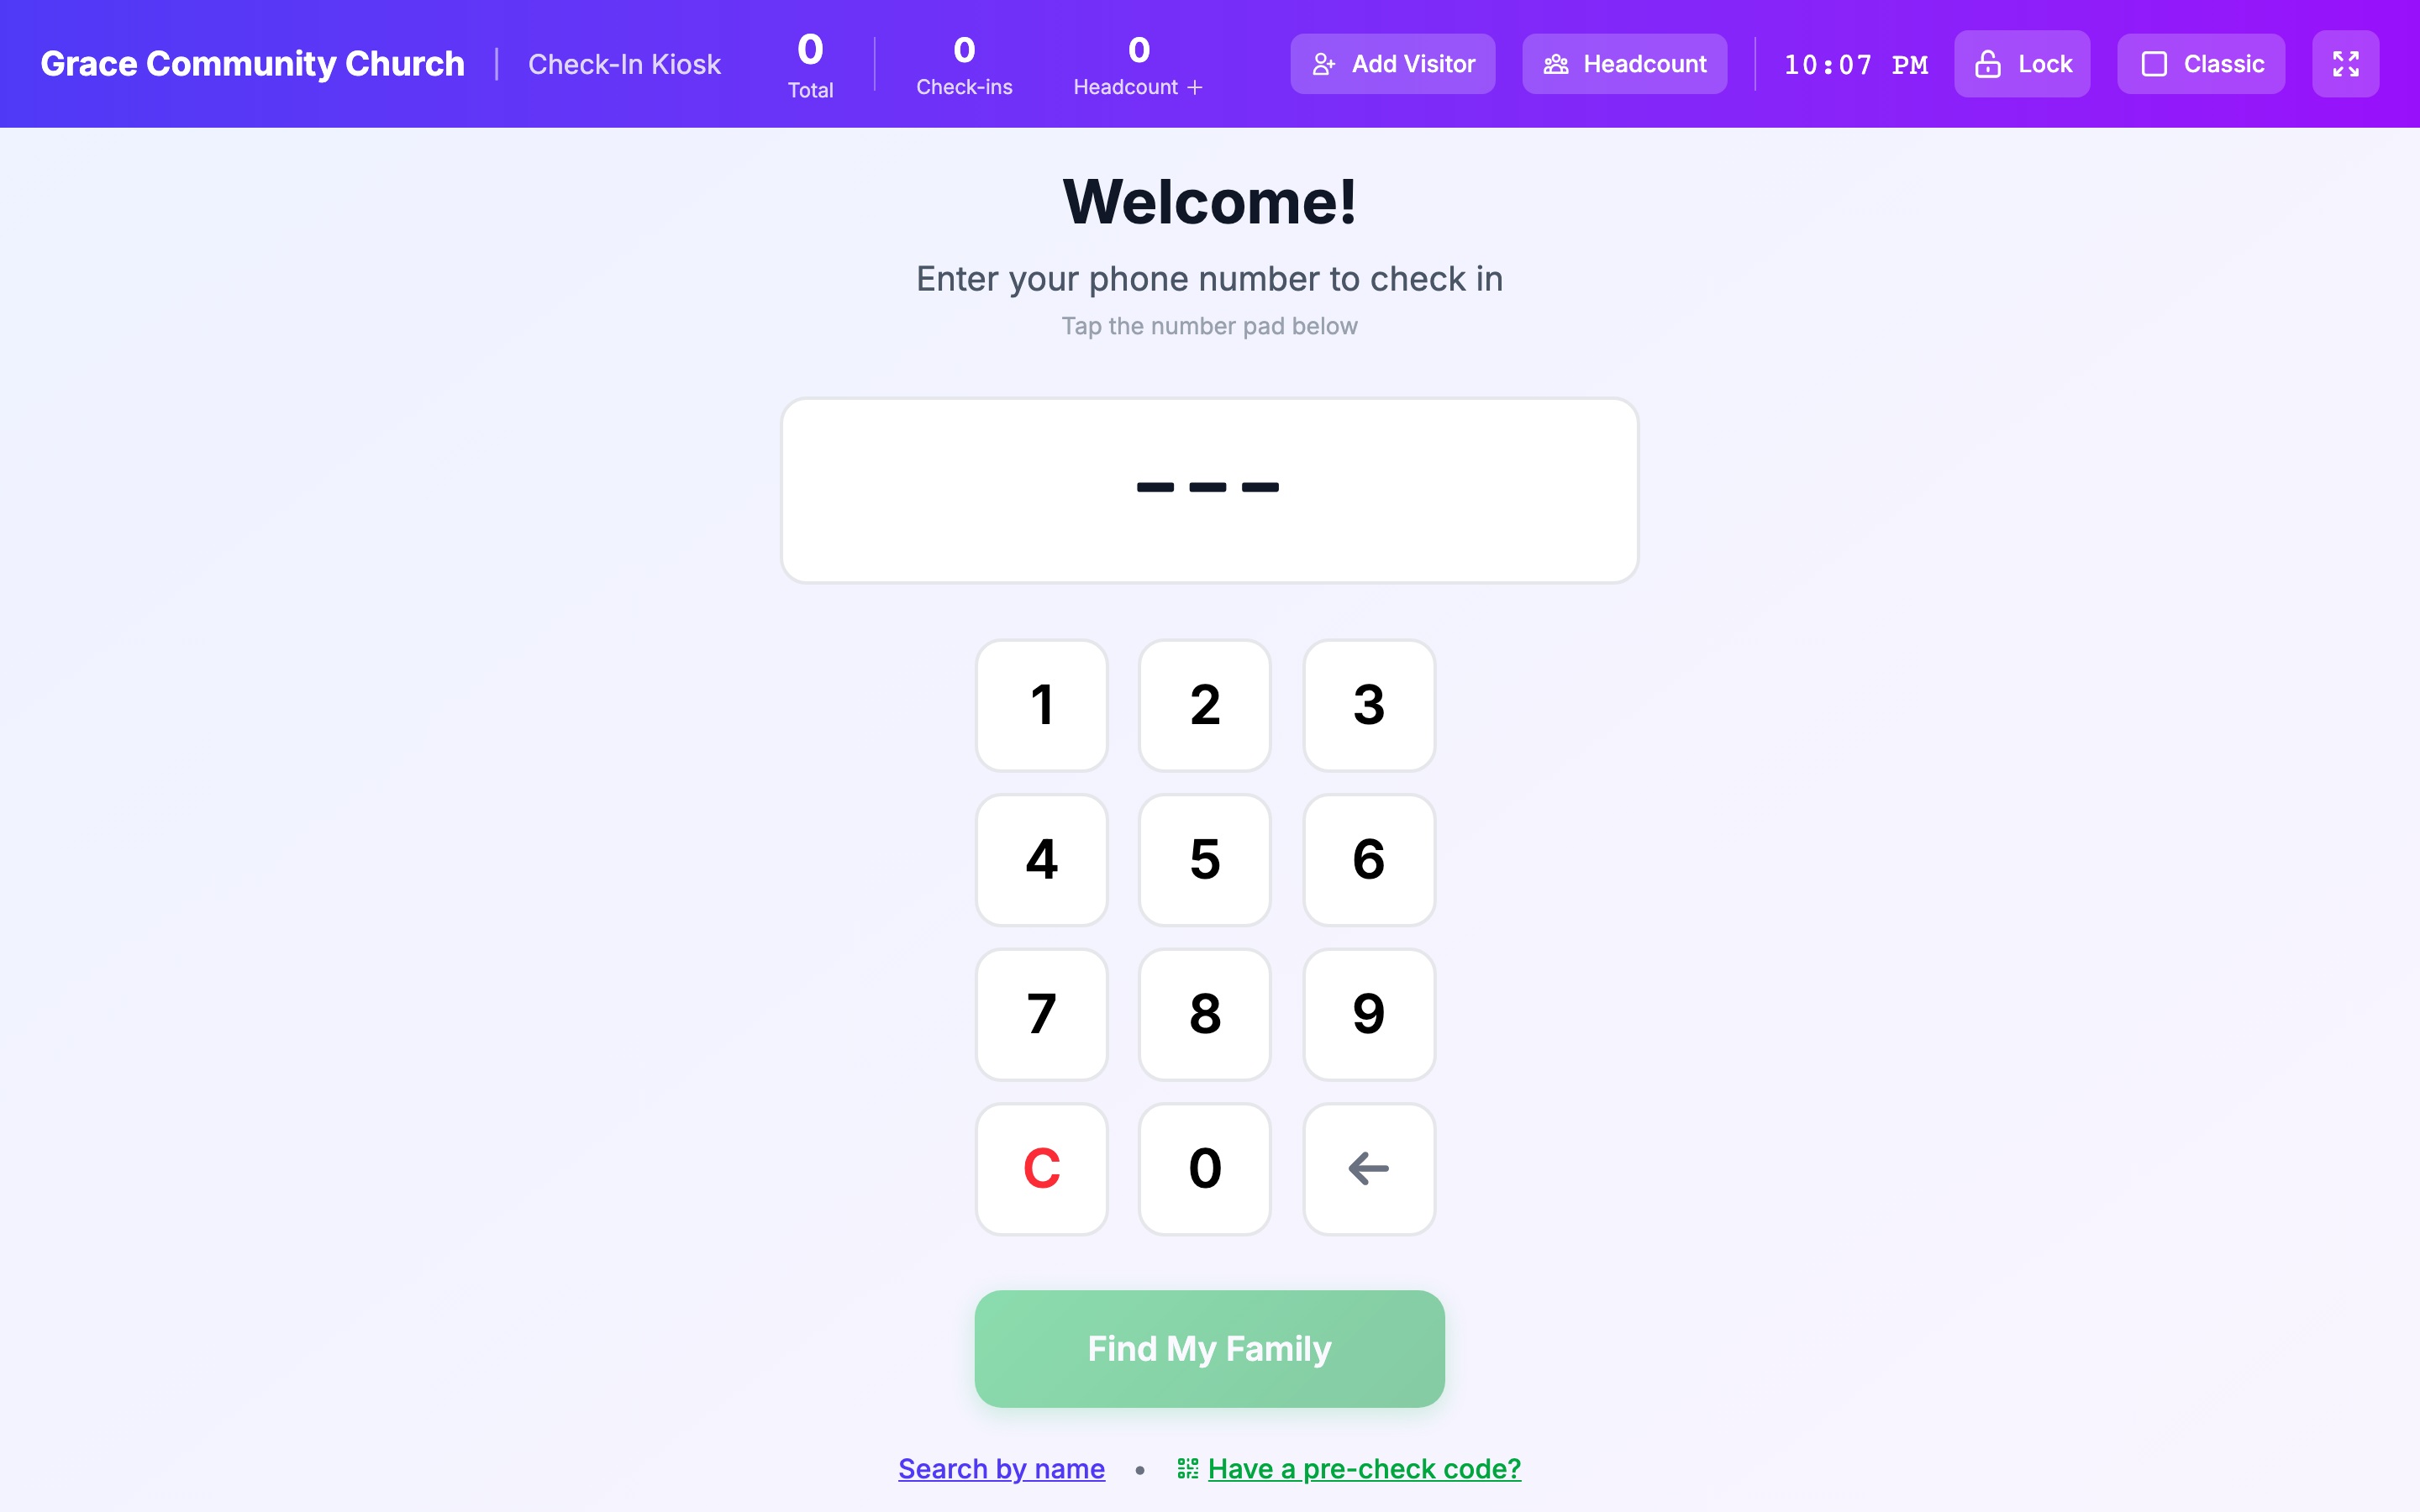
- Click the Kiosk Mode button (top-right).
- The kiosk opens in a new browser tab and goes fullscreen.
6b. Test Each Layout
- Tap the layout toggle button. Try Classic (default phone-pad) and Split (camera + phone-pad).
- Pick the layout you'll use for your first Sunday. Most churches start with Classic and switch to Split later if pre-check-in is widely adopted.
6c. Bookmark / Pin the Kiosk URL
- Bookmark the kiosk URL in your browser.
- On an iPad, tap the share icon and choose "Add to Home Screen" -- this gives you a one-tap launcher.
6d. Set the Lock PIN
- From the kiosk, tap the Lock button in the header.
- The Set Kiosk PIN modal appears. Enter a 4-6 digit PIN you'll remember.
- Confirm the PIN.
- Now write the PIN somewhere safe -- a sticky note under the kiosk stand, or in your church operations binder.
Locking is optional during your first test, but you'll want it locked when deployed publicly.
Step 7: Run a Test Session
Before your first live Sunday, do a dry run.
7a. Start a Session
- From the admin Check-In page, click Start Session. A "Start Check-In Session" panel opens (a bottom sheet on mobile).
- The Link to Event/Class field is marked with an asterisk, but it is functionally optional -- pick an upcoming event/class to show its assigned volunteers and sync attendance, or choose No event - standalone session to run a standalone session.
- Optionally type a Session Name (leave blank to use the event title or a default name).
- Click Start Session.
Tip: You can have more than one session running at once -- for example, one per service or class. Each active session shows up in the Active Sessions list with Select, view, and End controls.
7b. Test a Phone Lookup
- On the kiosk, enter the last 4-7 digits of a phone number you know is in the system (your own family, or a test record).
- Tap Find My Family.
- The family appears.
- Tap each person who is "checking in," then tap Check In.
- Security codes appear and labels print (or queue for printing).
7c. Test Visitor Check-In
- Tap Add Visitor in the kiosk header.
- Add a fake visitor family (you can delete the records later from People).
- Enter first and last names for an "adult" and a "child."
- For the child, optionally enter a grade and an allergy.
- Submit. A single shared security code is generated for the family.
7d. Test Checkout
- From the admin Check-In Station, find the Verify & Check Out panel.
- Enter the security code from the test check-in.
- The system shows the person's info.
- For a child: a Who is picking up? list of the family's authorized pickup people appears. Select one. Confirm Check Out stays disabled until a pickup person is chosen. (An admin can instead tick Override pickup authorization (admin only) to bypass this.)
- Click Confirm Check Out.
7e. End the Test Session
- From the admin Check-In page, find the active session.
- Click End next to it.
- The session is now closed.
If everything worked, you're ready for Sunday. If something didn't work, check the Troubleshooting article.
Step 8: Train Your Volunteers
The check-in system is only as good as the people running it. Spend time before your first Sunday walking your check-in volunteers through:
- How to look up a family by phone.
- What to do if a family isn't found (search by name, or "Add Visitor").
- How the security code works at pickup (always verify with the code; for children, also select the authorized pickup person before Confirm Check Out; quick checkout / admin override is for special cases only).
- Where allergy alerts appear (in the search results, on labels, in the room view).
- How to checkout a person with the Verify & Check Out panel.
- Who to escalate to if something goes wrong.
A 20-minute walk-through with a couple of dry-run check-ins is usually enough.
Tip: Have your most tech-savvy volunteer designated as the "Check-In Lead" each Sunday. They handle the unusual cases so other volunteers can focus on welcoming families.
Step 9: First Sunday Live
Day-of plan:
- 30 minutes before service: Power on the kiosk. Power on the printer. Verify both are working with a test print.
- 20 minutes before: Start the check-in session. Optionally link it to the event for the service.
- 15 minutes before: Lock the kiosk so guests can't wander into admin pages.
- Service start: Watch the live roster on the admin Check-In Station from a separate device. Track for problems in real time.
- 5 minutes before service end: Open the Need Attention page (left sidebar) and watch the Unclaimed Children section. As children get picked up, they drop off the list.
- After service: End the session. Print or screenshot the session report for your records.
Your first Sunday will probably surface a couple of small issues (a misprinted label, an unfamiliar volunteer, a family asking what to do). That's normal. Note what didn't work and adjust before next week.
Step 10: Optional Power-Ups
Once your first Sunday is done and you have momentum, layer in these features one at a time:
Pre-Check-In
Encourage families to pre-check from the member portal before they arrive. They get a QR code and skip the line. See article 7.
Volunteer Check-In
Track which teachers and helpers are on duty and enforce volunteer-to-child ratios. See article 10.
Lockdown Mode
Set up your church's child-safety lockdown procedure. Run a drill. See article 9 -- this is a critical safety feature, do not skip the article.
Custom Label Templates
Customize the look of name tags and security receipts to match your branding. See article 5.
Multi-Session Days
If you run multiple services or programs simultaneously, start a separate session for each from the Start Session panel -- they run concurrently and show up in the Active Sessions list, where you can switch between them with Select. See article 6.
Reports
Once you have a few weeks of data, dig into the Peak Times and Check-In Durations reports to refine your operations. See article 8.
Setup Checklist
Use this as a final pre-Sunday review:
- [ ] Check-In module is visible in your admin sidebar.
- [ ] People directory has at least your regular families with phone numbers.
- [ ] Families are linked (parent/child relationships).
- [ ] At least one Room exists with a capacity.
- [ ] At least one class-type Group exists with a room assigned.
- [ ] Children are enrolled in their respective classes.
- [ ] Printer Setup is configured with the correct label size and printing options.
- [ ] Default label templates exist (or custom ones are designed).
- [ ] A test print from the template preview page came out cleanly.
- [ ] Kiosk URL opens, fullscreens, and shows the phone number pad.
- [ ] Lock PIN has been set and written down somewhere safe.
- [ ] A test session was started, a check-in completed, and a checkout completed.
- [ ] Volunteers have been trained on the basic flow.
If every box is checked, you are ready.
Related Articles
- Check-In Overview -- High-level feature summary.
- Setting Up a Kiosk -- Detailed kiosk article.
- Check-In Settings -- All settings options.
- Troubleshooting -- When things go wrong.
- Lockdown Mode -- Critical safety feature, read before deployment.