
Journal Entries and Adjustments
What Are Journal Entries?
In accounting, a journal entry is a record of a financial transaction. In TimelyChurch, most everyday entries you create -- through the Transactions page, the Check Register, a bill payment, a donation, or a recurring posting -- are recorded for you automatically. Behind the scenes, every one of them keeps your books in balance.
For the occasional adjustment that does not fit a normal income, expense, or transfer, TimelyChurch gives you a dedicated Journal Entry tool. This article covers when to reach for it and how it works.
Note: Manual Journal Entries are a Full Accounting feature. If your church runs Accounting in Simple mode, the Journal Entries tool is hidden, and you record adjustments as regular Money In / Money Out transactions instead (see "Adjustments in Simple mode" below). You can switch modes in Settings.
When to Use a Journal Entry
Manual journal entries are useful in situations like:
- Correcting errors -- Reclassifying or fixing an amount that was recorded against the wrong account.
- Recording depreciation -- Writing down the value of equipment or property over time.
- Year-end adjustments -- Accruals, prepaid expense allocations, or closing entries.
- Reclassifications -- Moving an amount from one account to another after the fact.
- Recording non-cash transactions -- Donated goods, in-kind contributions, or write-offs.
- Opening-balance corrections -- Adjusting balances that were entered at setup (though for most starting-balance work, use the dedicated Opening Balances wizard instead -- see below).
Tip: Before reaching for a manual journal entry, check whether a split transaction solves the problem. If you are trying to allocate a single deposit or check across multiple categories or funds, splits are usually cleaner than a manual journal entry.
Where to Find Journal Entries
In Full Accounting mode there are two ways in:
- From Transactions: open Finances > Accounting > Transactions, click the New Transaction button (it opens a menu), and choose New Journal Entry.
- From the Setup menu: in the accounting tab bar, open the Setup ▾ dropdown and choose Journal Entries. This opens the Journal Entries list, where you can review past entries and click New Journal Entry to add another.
Note on Simple mode: In Simple mode the Setup ▾ dropdown is labeled More ▾ and does not include Journal Entries, and the Transactions tab is labeled Money In / Out. If you open a Journal Entry link while in Simple mode, TimelyChurch sends you back to the transactions page with a reminder that Journal Entries are a Full Accounting feature.
Creating a Journal Entry
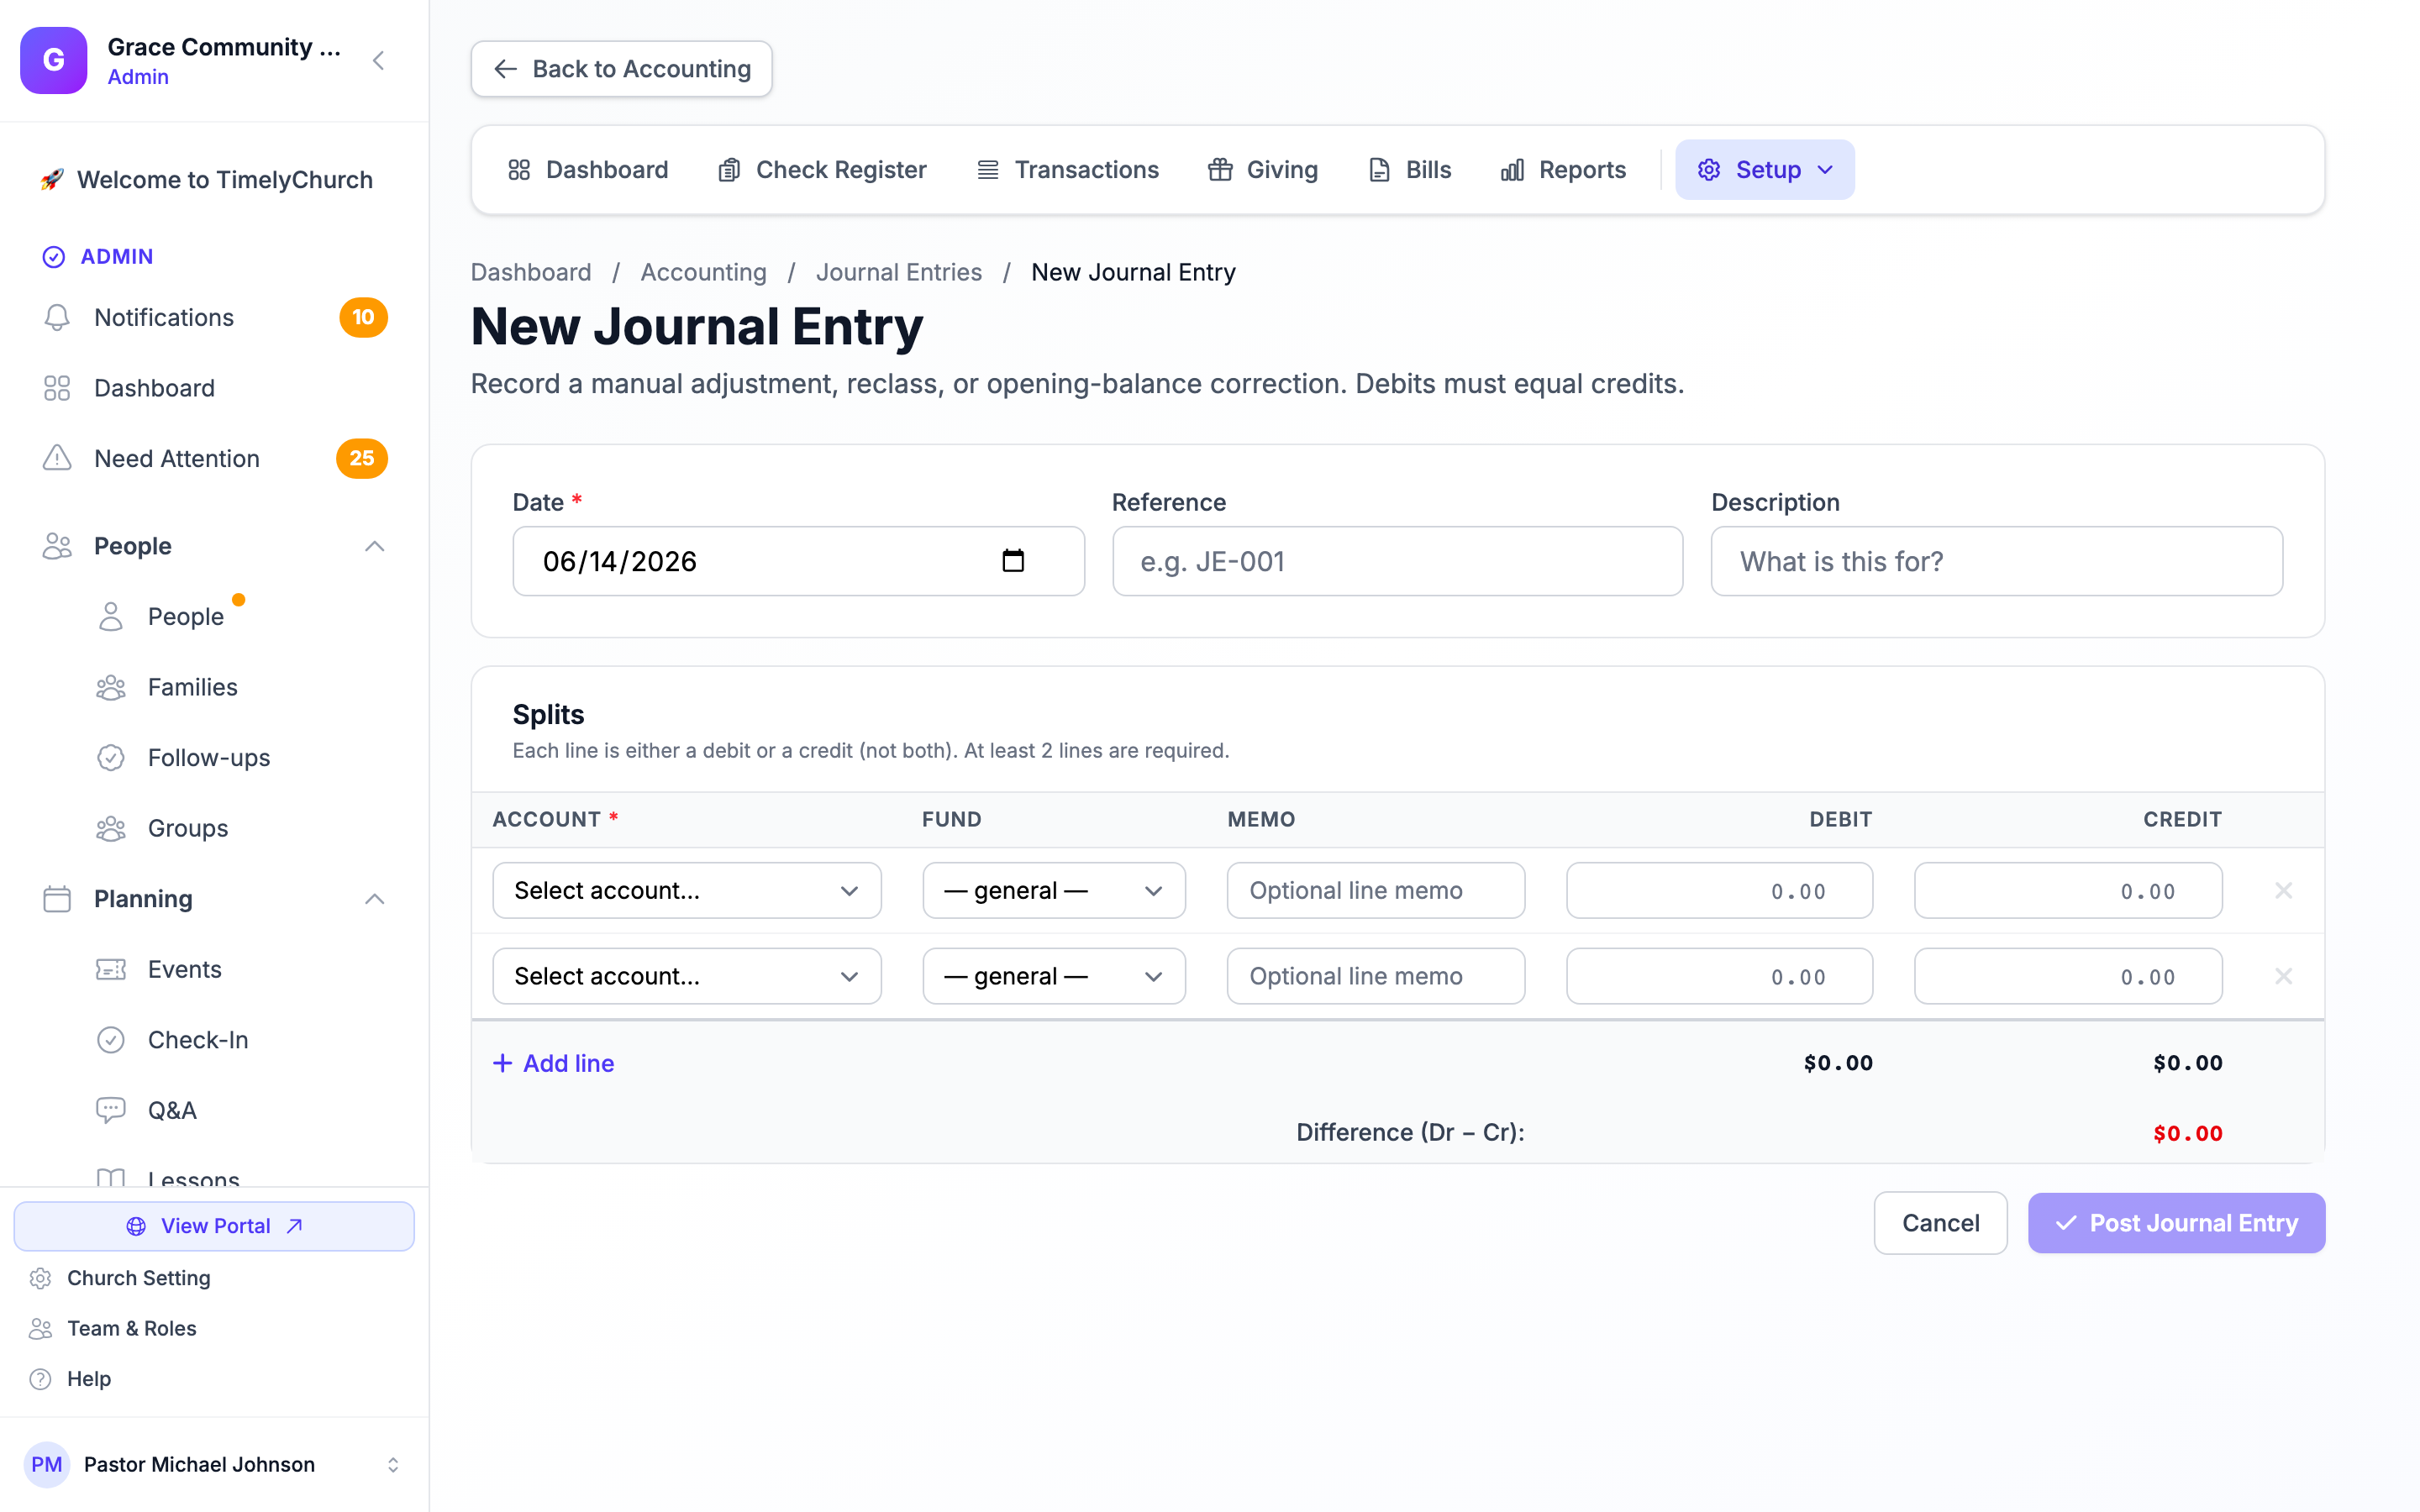
A journal entry is a double-entry record: it is made up of two or more lines, and the total debits must equal the total credits before you can post it.
To Record a Journal Entry
- Navigate to Finances > Accounting > Transactions and choose New Transaction > New Journal Entry (or open Setup ▾ > Journal Entries > New Journal Entry).
- Fill in the header:
- Date -- The date the entry should be effective.
- Reference -- An optional reference number (for example,
JE-001). - Description -- A short note describing what the entry is for.
- Fill in the Splits table. Each line records one side of the entry:
- Account -- The account this line affects (required).
- Fund -- Optionally tag the line to a fund, or leave it on "— general —".
- Memo -- An optional per-line note.
- Debit or Credit -- Enter the amount in exactly one of these columns. Each line is either a debit or a credit, not both.
- Use Add line to add more rows as needed (a minimum of two lines is required), and the row's remove button to delete one.
- Watch the running totals at the bottom. The Difference (Dr − Cr) must reach zero -- it shows Balanced in green when debits equal credits, and Unbalanced in red until then. The Post Journal Entry button stays disabled until the entry balances.
- Click Post Journal Entry.
Tip: Posted journal entries are read-only -- you cannot edit them after the fact. If you need to change one, delete it (see below) and post a corrected entry, or post a second, offsetting entry. This keeps a clean audit trail.
Reviewing and Deleting a Journal Entry
The Journal Entries list (Setup ▾ > Journal Entries) shows every entry you have posted, with its date, reference, and description. Click an entry to open its read-only detail view, which shows each split line with its account, fund, memo, debit, and credit, plus who posted it.
To remove a journal entry, open it and use Delete. This soft-deletes the entry and recalculates your account balances; the entry can still be recovered from the Audit Log.
Note: To protect your closed books, TimelyChurch will not let you post or delete a journal entry dated inside a completed reconciliation period for one of its accounts, or inside a closed fiscal year. If you genuinely need to make such a change, reopen the affected reconciliation (or fiscal year) first.
Adjustments in Simple Mode
If your church runs Accounting in Simple mode, you do not use the Journal Entries tool. Record adjustments as regular transactions instead:
- Navigate to Finances > Accounting > Money In / Out.
- Click New Transaction and choose the appropriate type:
- New Income -- If the adjustment increases an account balance (for example, recording interest earned, or correcting an understated deposit).
- New Expense -- If the adjustment decreases an account balance (for example, recording a bank fee, or correcting an overstated deposit).
- New Transfer -- If the adjustment moves money between accounts.
- Fill in the account, amount, date, category, and a clear description -- begin it with a prefix like "ADJUSTMENT:" or "CORRECTION:" so it is easy to identify later.
- Use the Notes field to document the reason for the adjustment. Future treasurers will appreciate knowing why the entry was made.
- Save the transaction.
Reversing a Transaction
If a transaction was recorded in error but has already been reconciled (and therefore should not be deleted), record a reversal instead.
- In Full Accounting mode, post a journal entry that reverses the original (swap the debit and credit sides for the same accounts and amount), with a description such as "REVERSAL:" plus a reference to the original transaction.
- In Simple mode, create a new transaction of the opposite type for the same amount, account, category, and payee:
- To reverse an income entry, create an expense entry.
- To reverse an expense entry, create an income entry.
In either case, explain in the notes why the reversal was needed.
Tip: The bill voiding feature does this automatically. When you void a paid bill whose payment transaction has been reconciled, TimelyChurch creates a reversal entry with "VOID:" in the description.
Recording Fund Transfers
To move money between bank accounts, use the New Transfer transaction type, which handles both sides in a single entry.
To re-allocate an amount between funds, you have two options:
- In Full Accounting mode, post a journal entry with the source fund on one side and the destination fund on the other.
- In Simple mode, record a pair of transactions -- an expense in the source fund's category and an income in the destination fund's category -- using the same amount, date, and account, with matching descriptions (for example, "Fund transfer from Building Fund to General Fund").
Opening Balance Adjustments
For setting or correcting an account's starting balance, use the dedicated Opening Balances wizard rather than a journal entry. You can reach it from the Accounting dashboard or from the Chart of Accounts page (in the Setup ▾ menu).
The wizard (labeled Opening Balances in Full mode and Starting Balances in Simple mode) lets you set a cutover date and enter the balance that was in each account on that date. It is safe to re-run anytime to correct a mistake -- each save recalculates your balances and updates your reports immediately, and no data is deleted.
If you need a finer-grained correction that the wizard does not cover, you can post a balancing journal entry (Full mode) or record an adjusting transaction (Simple mode) dated to the account's opening date.
Best Practices for Journal Entries
Always document the reason. Use the Description and per-line Memo fields to explain why the entry was made. Include the name of the person who authorized it and any relevant reference numbers.
Use clear descriptions. Start adjustment descriptions with "ADJUSTMENT:", "CORRECTION:", "REVERSAL:", or "RECLASSIFICATION:" so they are immediately identifiable when reviewing your entries later.
Keep adjustments minimal. If you find yourself making frequent adjustments, review your processes to see if the root cause can be addressed (for example, setting up recurring transactions for regular expenses, or training staff on proper categorization).
Review adjustments during reconciliation. When reconciling your bank account, pay attention to adjustment entries. They should be clearly documented and justified.
Use the correct date. Adjustments should generally be dated to the period they apply to, not the date you are making the entry (unless that period has already been reconciled or the fiscal year is closed).